larry merlau
Member
- Messages
- 18,741
- Location
- Delton, Michigan
The moderators have said, "Yes!". The link is up, and I am so delighted!
Thank you everyone, and thank you from my newbies that I know will find your posts and your sharing a great encouragement to them in their new hobby.
Grin!!!! Lora
welcome lora,, glad you found time to join up
") and look forward to your contributions to the forum in any way you can
and look forward to your contributions to the forum in any way you can


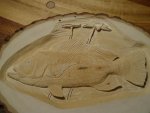
 . I find the eye to be the hardest but not impossible. Most carvers use glass eyes but I don't its up to the individual I'm hoping Lora can look an give her view point during the week I haven't touched mine this weekend I had lots to do with a Turning class an spending time with the family so I will be back at it Monday