Twistie Stick Snake Cane Tutorial

Step 15: Round over the eye area, using the bench knife. - Irish_twistie_cane_0048.jpg

Make a small, slice in the head at the outer corners of the eye, to emphasize the eye, and to create the impress of the jaw and cheek. - Irish_twistie_cane_0049.jpg
 

Attachments

  • Irish_twistie_cane_0048.jpg
    Irish_twistie_cane_0048.jpg
    48.6 KB · Views: 7
  • Irish_twistie_cane_0049.jpg
    Irish_twistie_cane_0049.jpg
    40.6 KB · Views: 7
Step 16: Texturing the Sassafras bark is done with both the veining tool and your small round gouge. Cut small, shallow tear-shaped gouge strokes in the bark area using the small round gouge first. Note in the photo that I am making the bark twist by angling my strokes with the curve of that twist area. Do a few veining tools cuts to add smaller texture strokes. - Irish_twistie_cane_0050.jpg and - Irish_twistie_cane_0051.jpg

With the bench knife, make a few stop cuts along the top edge of the bark in the twist areas. These stop cuts make the bark appear cracked or split - a natural occurrence for any
Sassafras stick. - Irish_twistie_cane_0052.jpg
 

Attachments

  • Irish_twistie_cane_0050.jpg
    Irish_twistie_cane_0050.jpg
    60.8 KB · Views: 9
  • Irish_twistie_cane_0051.jpg
    Irish_twistie_cane_0051.jpg
    48.1 KB · Views: 8
  • Irish_twistie_cane_0052.jpg
    Irish_twistie_cane_0052.jpg
    62.7 KB · Views: 8
Step 17: Bark, literally, lies on top of the wood of a stick. To emphasize that the bark and the wood are two different areas or elements, use your v-gouge to cut a small, thin trough where these two areas meet. You can also use your bench knife to make a few, shallow undercuts into the bark to make it appears as if the bark is slightly peeling. - Irish_twistie_cane_0053.jpg

A little more sanding ... These cleaning steps are technically called 'dressing out' the wood and used to catch those little imperfections while you have them in your sights.
- Irish_twistie_cane_0054.jpg
 

Attachments

  • Irish_twistie_cane_0053.jpg
    Irish_twistie_cane_0053.jpg
    51.8 KB · Views: 6
  • Irish_twistie_cane_0054.jpg
    Irish_twistie_cane_0054.jpg
    64.4 KB · Views: 6
Step 18: There are many, many ways to work the scaling of the body of a snake, lizard, or dragon. What I am using here is the most simple and fool-proof that I know. In working my
snake, I lost just two scales - two that 'popped' out during the cut and my solution to those two was to simply ignore them. Mistakes happen and sometimes trying to fix a mistake
just makes them worse.

Begin by marking parallel lines along the snake body lightly with pencil. Since I will not be cutting this area I use pencil, which I can erase later, instead of marking pen. Also take a moment a re-fresh the edge of your small round gouge on your honing board or leather strop.
- Irish_twistie_cane_0055.jpg

Up-end your round gouge, which means to hold the gouge at a 90 degree angle to the wood so that the cutting edge is go straight into the wood. Gently push the gouge into the wood to
cut a half-circle profile cut. Lift the gouge straight out of the wood. This is a simple push and lift stroke. - Irish_twistie_cane_0056.jpg

I worked several up-ended small round gouge profile cuts along the guidelines to set the spacing of the rows. Then I worked off of that center cut to create the other profile cuts in the row. - Irish_twistie_cane_0057.jpg

Some of the profile cuts made with my small round gouge were slightly lifted from the snake's body. To 'heal' them I rubbed the wooden handle of my gouge over the snake, moving
from the head towards the tail. This light pressure sets the scales back against the wood.

Healing can be done at anytime in a carving. Example, if you make a stop cut that is slightly too deep, after the second stroke is complete, turn your bench knife upside down
and place the blunt side against the deep cut. Use a medium pressure and pull the blunt side down the cut to 'heal' it back together. By applying even pressure, you literally push the wood grain back into the position you want it to lie.

Work carefully! Remember, in this example, that cutting edge is now facing towards your hand! - Irish_twistie_cane_0058.jpg

This style of scale creation will leave a very light, gentle impression of scales along the body. They become more outstanding when you add the linseed oil finish later.
 

Attachments

  • Irish_twistie_cane_0055.jpg
    Irish_twistie_cane_0055.jpg
    61.6 KB · Views: 9
  • Irish_twistie_cane_0056.jpg
    Irish_twistie_cane_0056.jpg
    57.8 KB · Views: 9
  • Irish_twistie_cane_0057.jpg
    Irish_twistie_cane_0057.jpg
    39.1 KB · Views: 8
  • Irish_twistie_cane_0058.jpg
    Irish_twistie_cane_0058.jpg
    56.8 KB · Views: 8
Step 19: At this point the work on the snake is complete, and the Sassafras carving is complete, except for adding the honeysuckle vine into the trough. This is a great stopping
point for the weekend.

So, using your roll of sandpaper, rifflers (small, profiled files), and your bench knife take a little more time to dress out your cane. Next we will begin work on carving the frog that holds onto the top of the stick, creating the joints for the cane and stick, and on the finishing oil steps. - Irish_twistie_cane_0059.jpg, -Irish_twistie_cane_0060.jpg,
and - Irish_twistie_cane_0061.jpg

But right now ... you are ready to go make a bunch of twistie stick key chains for your family and friends as Holiday presents!!!! And, if you have questions, comments, or want to
share your twistie stick carving, now's the time.

Thank you, Everyone, for letting me indulge in one of my favorite pastimes of teaching!
 

Attachments

  • Irish_twistie_cane_0059.jpg
    Irish_twistie_cane_0059.jpg
    57.2 KB · Views: 8
  • Irish_twistie_cane_0060.jpg
    Irish_twistie_cane_0060.jpg
    49.7 KB · Views: 7
  • Irish_twistie_cane_0061.jpg
    Irish_twistie_cane_0061.jpg
    67.6 KB · Views: 9
Last edited:
Good Morning! I am running far better on time this morning than I expected so I am going to post the final steps to this Sassafras Twistie Snake Cane today.

Step 19: To finish out the top of my cane and add some fun interest I have added a small frog clutching to the stick, just out of reach of my snake's head. The tracing pattern is posted here or create your own cane hugger by marking it to the top of your cane topper with a pencil. - Irish_twistie_cane_0062.jpg

Cane huggers - small animals and birds that wrap around the sides of your cane - are an old carving tradition. These little creatures most often have out-stretched arms or wings that 'hug' the shaft of the stick. Beavers, raccoons, squirrels, mice, dragonflies, and, our choice, frogs are all found in folk art styled walking sticks. - Irish_twistie_cane_0063.jpg
 

Attachments

  • Irish_twistie_cane_0062.jpg
    Irish_twistie_cane_0062.jpg
    76.6 KB · Views: 9
  • Irish_twistie_cane_0063.jpg
    Irish_twistie_cane_0063.jpg
    83.3 KB · Views: 9
Step 20: The frog is first stop cut using the bench knife, along the outer edges of the frog's body. This separates him from the top area of the stick. I lowered the cane top about 1/8" at the frog's face and tapered it down to 1/4" at the frog's rump. - Irish_twistie_cane_0064.jpg

Taper the stick twist area of the top to gradually flare. - Irish_twistie_cane_0065.jpg
 

Attachments

  • Irish_twistie_cane_0064.jpg
    Irish_twistie_cane_0064.jpg
    125 KB · Views: 7
  • Irish_twistie_cane_0065.jpg
    Irish_twistie_cane_0065.jpg
    97 KB · Views: 8
Step 21: Undercut the stick area into the top twist. This deepens the wood around the frog, making the frog appear to stand higher off the cane. - Irish_twistie_cane_0066.jpg

Shape the frog body, legs, and eyes using your bench knife to round-over each area. With 220-grit sandpaper and rifflers, smooth out the frog. Irish_twistie_cane_0067.jpg
- Irish_twistie_cane_0068.jpg
 

Attachments

  • Irish_twistie_cane_0066.jpg
    Irish_twistie_cane_0066.jpg
    100.2 KB · Views: 7
  • Irish_twistie_cane_0067.jpg
    Irish_twistie_cane_0067.jpg
    98.4 KB · Views: 9
  • Irish_twistie_cane_0068.jpg
    Irish_twistie_cane_0068.jpg
    107.2 KB · Views: 9
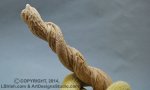
Step 22: You can harvest fresh honeysuckle vine to use on your Sassafras twist cane.

Select second year growth or older - it will have a brownish tone to the paper-like bark. Green tone bark is first year growth and often is not strong enough to dry well.

Roll the vine into a loose circle and hang in a dry, dark space for about 3 weeks. This is long enough for the vine to loose most of its sap and moisture, but still be pliable enough for curling.

Strip the paper bark layer from the vine before you add it to your walking stick Sassafras carving. Honeysuckle looses its bark easily. If you leave the bark on the vine only the bark layer will be attached during the gluing. When the bark is shed you will lose the vine around your cane.

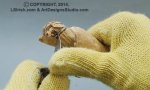
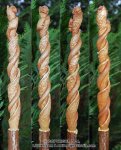
You can also purchase pre-dried, pre-striped honeysuckle vine, seagrass, raffia, and even paper rope from most baste weaving supply stores to use with your canes. Irish_twistie_cane_0069.jpg


Try Save-On-Crafts.com - http://www.save-on-crafts.com/wi1.html
Seagrass, raffia, and Paper Rope - http://BasketPatterns.com

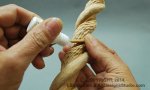
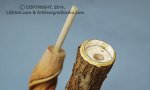
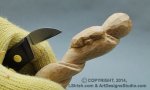
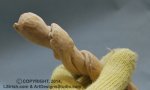
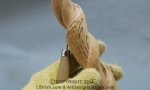
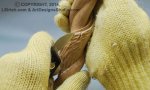
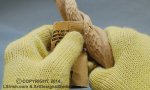
Soak your vine in warm (not hot) water for about 10 minutes. Lightly blot on a dry towel to remove the excess water from the outer surface.

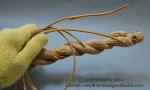
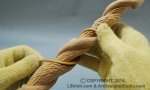
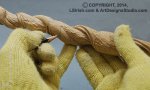
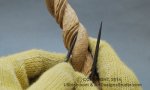
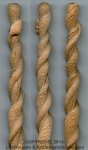
Check the thickness of your vine - the thinner part of the vine should be at the top of your stick, with the thicker, older growth, at the bottom. Using super glue, place several drops into the vine trough on your carving then place the vine into the trough. Hold in place for about 1/2 minute. Work just one or two inches at a time, slowly rolling the vine around the
cane. - Irish_twistie_cane_0070.jpg Irish_twistie_cane_0071.jpg
 

Attachments

  • Irish_twistie_cane_0069.jpg
    Irish_twistie_cane_0069.jpg
    114.3 KB · Views: 7
  • Irish_twistie_cane_0070.jpg
    Irish_twistie_cane_0070.jpg
    111.4 KB · Views: 7
  • Irish_twistie_cane_0071.jpg
    Irish_twistie_cane_0071.jpg
    102.8 KB · Views: 8
Step 23: Cleaning and finishing prep steps.

With any cane topper my cleaning steps begin with a hard scrubbing using an old toothbrush which can reach into the deep undercuts. This is followed by a quick wash at the sink to remove any dirt and hand oils, using a small amount of dish washing soap, warm water, and a small glass scrubbie brush. Rinse well, but do not over-saturate or soak in the water. Blot your carving and allow to dry for about an hour. - Irish_twistie_cane_0072.jpg

Next, mix one part linseed oil with one part turpentine. Stir well, but don't make bubbles. Brush one generous coat to all areas of the cane except the very bottom edge. Allow the oil mix to sit for 10 minutes. Wipe briskly with a dry cloth to remove the excess oil. Repeat one time. Irish_twistie_cane_0073.jpg

This oil mix replaces the natural oils of your caving wood and soaks deeply into the wood fibers. After the oil finish has set for several days you can return and apply whatever finish you personally prefer, including polyurethane, varnish, or wax. If, as I prefer, I will add several more coats of oil mix over about a one week period as my final finish.
 

Attachments

  • Irish_twistie_cane_0072.jpg
    Irish_twistie_cane_0072.jpg
    94 KB · Views: 9
  • Irish_twistie_cane_0073.jpg
    Irish_twistie_cane_0073.jpg
    103.2 KB · Views: 8
Step 24: My cane stick - a two to three year Black Walnut branch - is still green. So I will be dry setting this stick, and will not do the final glue-up until several months from now.

I have drilled a 3/8" hole into both the cane topper and the Black Walnut stick. For my dry set I am using a 3/8" hardwood dowel, which will be replaced with 3/8" threaded pipe when I do the final gluing. My dowel holes go as deeply as possible into both parts of the cane to give as long a section as possible for the jointing pipe.

To hide the joint line between the cane topper and the stick, I have used my bench knife, and small round gouge to cut a 1/4" deep well inside of the top of the Black Walnut stick. The outer 3/16" of the stick is left un-carved to create a lip area. Irish_twistie_cane_0074.jpg Irish_twistie_cane_0075.jpg

When the cane topper is put into place on its stick the joint line between the two parts is hidden by the well area in the top of the stick. Irish_twistie_cane_0076.jpg

In a couple of months, after the Black Walnut is well dried, I will set the cane using two-part epoxy and the 3/8" threaded pipe.
 

Attachments

  • Irish_twistie_cane_0074.jpg
    Irish_twistie_cane_0074.jpg
    91.1 KB · Views: 5
  • Irish_twistie_cane_0075.jpg
    Irish_twistie_cane_0075.jpg
    89.8 KB · Views: 9
  • Irish_twistie_cane_0076.jpg
    Irish_twistie_cane_0076.jpg
    74.4 KB · Views: 6
Top