small cherry/spalted maple blanket chest/coffee table

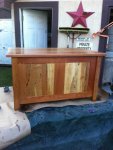
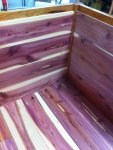
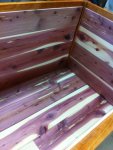
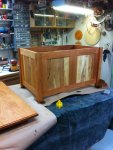
whatever goes in there will be long term, like heavy blanket, or she might just use it to store her old paperwork.
My wife feels its not going in her living area anymore, its going to go at foot of her bed.

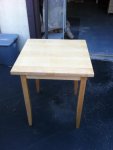
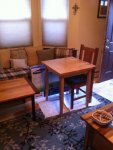
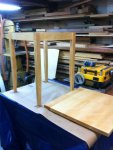
I have a coffee table sitting in my back room for her.
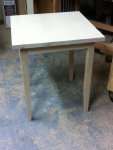
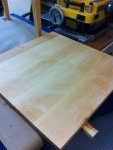
I had the old top to my table, I used 2x4s for legs, so she has something temporarily.
I can make her a simple coffee table in a few days, its just the finish that takes time.

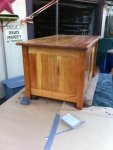
I had some thoughts of putting coffee table brackets onto it, where the top lifts almost straight up, but I like the chest idea.
 
need to give it a final sanding before finish, but the tiny kitchen table for 2 is finished.(30 inches height, tapered legs, I think it was 25 and 3/4 sq;uare top, maybe 25 and a half, don't remember since yesterdays final sizing.I went for a simple butcher block type of look, eh)Im thinking in the future, I may spin a pedestal base for that instead of legs only 18 inches of space between the legs, but she has a table to sit at to eat breakfast)
Used more of that maple I paid less than 2 bucks a board foot, wasted a bit as I planed down 6/4 but I figured out it was 4 dollars in the dust collector, better than making a trip to the lumber yard and spending money, gasoline, and tolls, not to mention the maple has been sitting in my garage since april 2009.

I intend on getting the hinges fitted for the chest tomorrow, then final sand it and table to start finishing by the weekend.

I think I have enough thick maple to do 2 chairs, but my niece just moved into her own apartment 2 weeks ago, and I think I might have made a comment and now I have to make her a coffee table for her living room area. Probably be walnut legs and aprons with mystery wood top.
Chairs would be a good project to get going on with the cold weather coming up. I usually work on Adirondack chairs during the cold months.
 

Attachments

  • table 002.jpg
    table 002.jpg
    61.1 KB · Views: 19
Last edited:
first coat of waterlox on, painted on, wiped off.
Cherry and spalted maple took it fine, (sanded to 180), maple sanded to 180 didn't do as well. Very blotchy. I don't think I should have sanded the maple down past 120.
Ill see how a second coat goes on in a couple of days.
sorry if pics are a bit blurry, once again, hands shake when they get weak, and I was holding an orbital all morning.
I noticed a few glue spots, so when dry, Ill take care of them.
 

Attachments

  • firstcoat 001.jpg
    firstcoat 001.jpg
    73.3 KB · Views: 28
  • firstcoat 003.jpg
    firstcoat 003.jpg
    61.2 KB · Views: 30
  • firstcoat 005.jpg
    firstcoat 005.jpg
    61.1 KB · Views: 26
  • firstcoat 006.jpg
    firstcoat 006.jpg
    50.3 KB · Views: 19
3 coats waterlox original, sanded after second and third coat, one coat waterlox gloss, (not sure if I want to use gloss anymore, tough to apply)
Ill rub it down a bit, I started to rub down top, but Ill let it sit another day or two.
Tomorrow I will start installing the 1/4 inch cedar boards inside(no finish on cedar) Probably silicone a dab in center of each board, and brad nail them to hold in place. Its tongue and groove for expansion.(shoulda purchased cedar sheet, would have went on in 10 minutes)

the maple table for two is finished, just needs to be wiped down and polished. Same finish, 3 coats and one coat on table top.

I put a chair from my house to show size and just how small it is.

That old top there from the old coffee table, I think Im going to cut off breadboard ends, chop down the width by one inch, flip it, (don't want to try to take off 6 coats of poly), run it through drum sander, restain, maybe not its birch, then just apply oil and make a set of walnut aprons and legs and give to my niece.
The children in my family keep me busy.

front, side and back of chest.
 

Attachments

  • almostfinished 003.jpg
    almostfinished 003.jpg
    62.9 KB · Views: 27
  • almostfinished 006.jpg
    almostfinished 006.jpg
    60.5 KB · Views: 28
  • almostfinished 010.jpg
    almostfinished 010.jpg
    54.7 KB · Views: 25
  • almostfinished 013.jpg
    almostfinished 013.jpg
    39.9 KB · Views: 24
  • almostfinished 016.jpg
    almostfinished 016.jpg
    62.1 KB · Views: 26
She's lookin' good Allen. I've learned not to stress the finish too much until I am down to the last steps. Once it cures a day or two you can 'finish the finish' and see what you really have. I'm with you on only using gloss when I want a mirror finish. On more natural looking surfaces it can look sort of plasticky (is that a word?) and be fussy to work with. I'd say it looks pretty good right now so I'm thinkin' it can only get better :thumb:
 
got up at 5:30 this morning because my daughters sofa was listed on computer for before 7 am delivery and I had to drive there.
Unfortunately, they could not make the turn up the stairs, it goes right, then left, and after what I thought was 2 lame attempts, they told me they cant get it up the stairs, I have to go back and yada, yada, yada........I suggested they turn it one way, I was answered curtly, sir, do you think we want to move this now every delivery we have today, its on the tail of the truck, and we are packed to capacity.
I really thought my way would have made it, but I was not about to argue my point. Afterall, they are the professionals.

so on the first night of Chanukah, we all get to go back to the furniture store tonight because Im starting my infusions tomorrow and will be down until Saturday, (we are leaving for a few days sunday if all goes well)

but, being up early, I did get to install the cedar in the chest.
Ill rub the finish Saturday, and Im done with this piece. Time to move on.I have a birch table to cut down and size.

(cedar gets no finish, its raw. A tiny dab of silicone in center of each end, brad nailed to case.)
 

Attachments

  • cedarlining 002.jpg
    cedarlining 002.jpg
    69.2 KB · Views: 11
  • cedarlining 004.jpg
    cedarlining 004.jpg
    60.9 KB · Views: 9
Top