A very special project to me - may I?

Jason, Sorry, but my time has been limited the past week, been trying to get through all of the videos you've posted to catch up. I have to say I've enjoyed all of them so far, well done, and been enjoying seeing the progress on your project(s). Should we start calling you "The Guitar Whisperer"? I think you're on to something with these podcasts. ;)
 
Like others, I have some catching up to do and time has been short lately. But don't let that deter you...keep them videos coming!
 
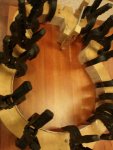
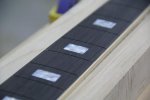
Tiny little sneak peek ... today's current state of the body:

View attachment 88212View attachment 88213

Gotta repair the tail portion where i cut the sides a little short - but just a little inlay/insert thingy should take care of that. Stay tuned! :D

Man this is not fair :D you teasing us with work we aint seen the video of. :(:rofl:

Looking forward to the next video. How did you get the inside of that edge to bend that way. Arrrg dont know how to describe the part i am referring to. I am referring to that brown wood thats been cut and seems to curve up from the center to the top and bottom of each side of the outer strip. :huh:


That's called Kerfed Lining (or so i've been told) and it was what i made up last week. The kerfing is such that it only leaves about .040" or less wood behind so it bends very easily. As for getting it to bend... well ... you'll have to wait for that video! :D
 
I don't think you could ask for a better grain match. You spent a lot of time sanding and sneaking up on your final thickness. Is that the best sander for the job or would you upgrade to something else if you had the money and space?
 
Enjoying the process Jason. :thumb:

BTW, What kind of camera/mic setup are you using? I noticed the remote in the apron, would like to see more of the production and what you are using for editing.
 
Thanks, fellas!

I'm still working out the best format for these things but it seems like the "go to the shop, hit record, post the video" option is pretty popular. I like to leave in as much as possible because that's the stuff that usually has the details you don't realize are important and aren't easily explained. I always learn more watching someone actually do something than I do from someone trying to describe what to do.


I don't think you could ask for a better grain match. You spent a lot of time sanding and sneaking up on your final thickness. Is that the best sander for the job or would you upgrade to something else if you had the money and space?

Ted - most of the reason I took so many passes was i was trying to conserve material at the same time - I needed to JUST clean up a face before i flipped it since I'd sawn it so close to final dimension. The sander is great and I have no complaints about it's capabilities. Unlimited budget? yeah, a big wide belt sander would be great - though it wouldn't really reduce how many passes I'd take. It's more a part of the process than the tools involved there.

Enjoying the process Jason. :thumb:

BTW, What kind of camera/mic setup are you using? I noticed the remote in the apron, would like to see more of the production and what you are using for editing.

Thanks, sir!

Hardware: An oldish Canon Vixia HF R200 - biggest reason for that one was it was a low-ish cost model with an external microphone port at the time. Microphone is an Audio Technica lavalier mic - that was pricier than the camera, but I had tried cheaper wireless mics and they buzzed terribly under my lights. Lots of RF interference. The last critical hardware is my tripod - it's a Manfrotto heavy duty one - i actually got it for my SLR but ended up using it on this since i tend to hand-shoot the SLR more often. It doesn't have a video head on it, but it works pretty well - being super solid and very flexible helps me get the camera tucked into snug spots to get a good shot when possible.

Software: Very primitive here. I first started out with Windows Movie Maker back when I was on XP. And i really got used to it. Up until about a year ago, the MTS files out of that Canon camera worked fine in it but after a glorious update from Microsoft, it no longer does. So now, first I convert to mp4 with Handbrake (and boost the audio 9db because ... reasons?) then bring it into WMM. I have grand plans to one day switch editing apps and get more powerful tools. I'd really love to be able to overlay footage and do some more interesting graphics from time to time but for now, WMM is fast, familiar and free, so that's what I use.

Thanks for watching, everybody! There are some pretty good episodes coming up soon :D
 
I'm curious as to why your going thru the trouble of laminating multiple layers for the sides when one 2mm thickness is sufficient?
IMG_20141217_171032.jpg
 
Ted - yeah, that was a whole lot easier with the steam. The next lesson was in the glue up after it was bent. Trying to wrangle those three slats covered in glue was tough to get a nice tight seam. It took a couple tests to refine my process, as usual. This whole build has been a really fun challenge.

You should see what i got done tonight ... that video footage should be pretty cool :D
 
Top