
Alex Reid
Member
- Messages
- 739
- Location
- Zushi, Japan
I am doing a dining table now and have just completed the stringing on the legs so I thought I would share the process with you. This was my first time to do this but I read a couple of articles and then went ahead with it, forward march into the void. I found it to be fun and interesting plus for what it is worth the end result adds a touch of class to an otherwise standard dining table. I am quite happy with the results.
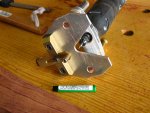
1. Pictures 1 and 2 show my router setup for stringing. It is a Dremel tool with a router base made by guitar outfitters Stewart and McDonald. I also buy the router bits from them as they make a nice downcut 1/16" carbide bit for use with the Dremel. I originally set the depth a little too deep and broke one bit. Actually for some reason I thought I had made it 1/16" and even did a test cut to confirm. Then after the bit broke I confirmed the depth to be 2.5mm. 1/16" is 1.6mm. Had to order another. On the second run I set the bit 1/16" deep, double confirmed it and was able to finish with no problems.
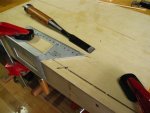
2. Picture 3 shows my stop block setup. The end blocks are rabbetted so they simply fit on the ends and clamp down. Also they they are sized so that the rectangle is equidistant from the all edges concerned.
3. Picture 4 shows the routing. Patience and a steady hand.
4. Pictures 5 and 6 show the routed groove. Just have to chisel out the outside corner to make it 90 degrees and then they are ready to take the stringing inlay.
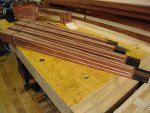
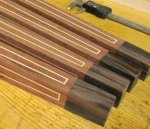
5. Picture 7 shows the stringing next to the legs. I cut them on the band saw and table saw then I put them through the drum sander.
6. Picture 8 and 9 show my method for cutting the mitered strings to length. I am using a 45 degree shoulder square and sharp chisel. This way I am able to make the thinnest cut if I need to trim or make a space filler.
1. Pictures 1 and 2 show my router setup for stringing. It is a Dremel tool with a router base made by guitar outfitters Stewart and McDonald. I also buy the router bits from them as they make a nice downcut 1/16" carbide bit for use with the Dremel. I originally set the depth a little too deep and broke one bit. Actually for some reason I thought I had made it 1/16" and even did a test cut to confirm. Then after the bit broke I confirmed the depth to be 2.5mm. 1/16" is 1.6mm. Had to order another. On the second run I set the bit 1/16" deep, double confirmed it and was able to finish with no problems.
2. Picture 3 shows my stop block setup. The end blocks are rabbetted so they simply fit on the ends and clamp down. Also they they are sized so that the rectangle is equidistant from the all edges concerned.
3. Picture 4 shows the routing. Patience and a steady hand.
4. Pictures 5 and 6 show the routed groove. Just have to chisel out the outside corner to make it 90 degrees and then they are ready to take the stringing inlay.
5. Picture 7 shows the stringing next to the legs. I cut them on the band saw and table saw then I put them through the drum sander.
6. Picture 8 and 9 show my method for cutting the mitered strings to length. I am using a 45 degree shoulder square and sharp chisel. This way I am able to make the thinnest cut if I need to trim or make a space filler.
Attachments
-
 inlay1_router_setup.jpg78.3 KB · Views: 67
 -
 inlay9_stringing.jpg65.8 KB · Views: 56
 -
 inlay8_stringing.jpg67.6 KB · Views: 60
 -
 inlay7_stringing.jpg101.6 KB · Views: 66
 -
 inlay6_inlay_done.jpg72.1 KB · Views: 59
 -
 inlay5_inlay_done.jpg83.7 KB · Views: 55
 -
 inlay4_routing.jpg69.4 KB · Views: 58
 -
 inlay3_stop_blocks.jpg87.5 KB · Views: 51
 -
 inlay2_router_setup.jpg76.9 KB · Views: 47


")