- Messages
- 16,936
- Location
- Reno NV
Not sure this is worthy of being in the 'Showcase', but it's my first real useful project I've made with my little laser.
Just for a refresher, here is my laser. It came with a 500mw laser on it, but I upgraded to a 2.8w diode model.

The basic method is to paint the pcb, and use the laser to burn off the paint where you don't want the copper to be. Once the paint is burned off, then you remove the copper with ferric chloride.
I've got a little wifi module I want to hook it up on a breadboard. The problem is the module is not really breadboard friendly, so I drew up a little breakout board in Inkscape.
It's a black and white bitmap, that I run though a program that converts it to G-code to do the etching.

Here is the PCB after lasering, and a light brushing to get rid of the paint residue

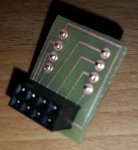
Here it is after I removed the copper and drilled the holes with the header and pins that I'll be soldering to the board.

And After I removed the paint with a little acetone and put the components in place.

All that's left is to solder it up.
Just for a refresher, here is my laser. It came with a 500mw laser on it, but I upgraded to a 2.8w diode model.
The basic method is to paint the pcb, and use the laser to burn off the paint where you don't want the copper to be. Once the paint is burned off, then you remove the copper with ferric chloride.
I've got a little wifi module I want to hook it up on a breadboard. The problem is the module is not really breadboard friendly, so I drew up a little breakout board in Inkscape.
It's a black and white bitmap, that I run though a program that converts it to G-code to do the etching.
Here is the PCB after lasering, and a light brushing to get rid of the paint residue
Here it is after I removed the copper and drilled the holes with the header and pins that I'll be soldering to the board.
And After I removed the paint with a little acetone and put the components in place.
All that's left is to solder it up.

.jpg")