A little wiring cleanup

Brent Dowell

Administrator
Staff member
Messages
16,579
Location
Reno NV
Did a bit of cleanup on the wiring and appearance of my printer.

I'd found an enclosure on thingiverse I liked, but it really didn't work for the components I wanted.

So I pulled it into sketchup and redid it. In the end, I should have just taken the design and started from scratch, which is pretty much what I did.

I created a case to hold the control board, a mosfet, and a raspberry pi.

I also added a little 5v power supply to provide power to the raspberry pi.

Also put a fan on the control board, just because.

I still need to work the wires around and create a custom shorter usb cable for the pi->control board, but will tackle those another day.

I've got a wide angle pi camera coming, so will have to take the cover off and work on adding that to printer.

And I've got my auto level sensors coming soon. So still a little bit of wire work to do, but I'm liking how this worked out.

So now I have a printer that takes one power cord and I can connect to and control over the lan using octopi.


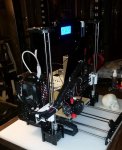


wirecleanup_0.jpg

wirecleanup_1.jpgwirecleanup_2.jpgwirecleanup_3.jpg
 
Last edited:
Its not perfect by any means. I had to drill some holes to mount it, and clip off some of the honeycomb, but it works for me.

I've also put the sketchup file up there with the mounts as seperate objects to make it easier to move things around. Once you start resizing the honeycombs, things get fun fast. I spent way more time exporting to stl, pulling int S3d and then going back to sketchup to figure out why some things were not going to render right.

I also printed out a couple of early versions that I completely didn't work for my needs.

What I'm saying is you should probably open it in sketchup, check the measurements and such and make sure it will work for your needs before printing.

http://www.thingiverse.com/thing:2016433
 
Not perfect by a long shot, lol. The fan on the cover I found out was interfering with the x axis motor going up and down.

So I redid it and moved it over a bit. Working great now.

fan cover.jpg
 
Yep, Not everyone is convinced a fan is needed. I just think it makes sense to have one though.

So, it's take your pick, they both should fit.

I found another 80mm fan guard out on thingiverse I used to put a cover on the outside of the fan. There are a lot to choose from, so I'd say take your pick ont hat. I just chose one with a honey comb pattern to match.
 
Are you ever done with tinkering with these things?

I printed out:
New y axis cable chain in it's entirety
New X axis cable chain bracket
Braces for the front and back
Braces at the top.

so, I had to go and redo all the wiring and such.

At least it's working again very nicely.

Up next will be the auto level sensor.


3dp_platform.jpg3dp_frontbrace.jpg3dp_backbrace.jpg
 
looks real good Brent, did you build a new base. It looks like you have a torsion box under it now instead of the plastic you had previously. How much material have you used so far printing the upgrades so far? I can easily see spending a lot more than the cost of the printer just to get it right.... :D:rofl:
 
looks real good Brent, did you build a new base. It looks like you have a torsion box under it now instead of the plastic you had previously. How much material have you used so far printing the upgrades so far? I can easily see spending a lot more than the cost of the printer just to get it right.... :D:rofl:

Yep a little torsion box. The plastic cutting board I had was not perfectly flat and the printer would shift around on it while printing. I found that could really get the z-level out of whack in between prints.

So I whipped that little torsion box up out of some 1/2" mdf.

I've gone through probably 1.5 rolls of filament so far, but that's been for a lot of different items. Each roll is about 20$. So the little braces and stuff I'm adding to it really only cost a few bucks total, but they really do seem to add some rigidity to the whole shebang. Well worth it.
 
I've been looking at some drawings of cable chains and am a bit (or lot) confused. The plans show an entire chain assembly, making it appear it all gets printed in one pass. Seems to me one would have to have each link printed seperately to keep them from fusing together. Am I missing something?
 
I think both Darren and I printed this one for the Y axis (the heated bed).

http://www.thingiverse.com/thing:1874802

You need to mount the heated bed 90 degrees to the instructions that come with the printer.

You can print out all the pieces at one go, but they are all seperate and require some assembly after printing.

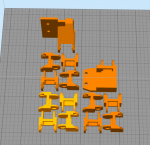
I put everything I needed onto the table and printed them out at one go. Thats the frame end, the hotbed end, and 3 copies of the actual chain parts. Actually, I think I printed out 4 copies, but I think I only used 13 of the links. Obviously you could put one more copie of the chains on the table.

cablechaintemp.png
 
Very cool, will be joining you guys soon.

I think the issue of cost or how much filament is used etc is really a non issue that seems to get in the way here.

If we want a wood object we buy wood if we were all so concerned in a hobby by cost of wood, heck nothing would get done or we would all use pallets.
 
I've been looking at some drawings of cable chains and am a bit (or lot) confused. The plans show an entire chain assembly, making it appear it all gets printed in one pass. Seems to me one would have to have each link printed seperately to keep them from fusing together. Am I missing something?
No, all separate, then snapped together, they just do clear the frame too.

Sent from my SM-G920P using Tapatalk
 
I think both Darren and I printed this one for the Y axis (the heated bed).

http://www.thingiverse.com/thing:1874802

You need to mount the heated bed 90 degrees to the instructions that come with the printer.

OK, there ya go playing with my brain again! The bed is square, so why does it get mounted 90° to the instructions? Does it have to do with the wiring?

You can print out all the pieces at one go, but they are all seperate and require some assembly after printing.

I put everything I needed onto the table and printed them out at one go. Thats the frame end, the hotbed end, and 3 copies of the actual chain parts. Actually, I think I printed out 4 copies, but I think I only used 13 of the links. Obviously you could put one more copie of the chains on the table.

Yep, that sounds like what I would have expected. All of the drawings I've seen show a complete chain, so I'm missing something about the transition to gcode, I guess.
 
OK, there ya go playing with my brain again! The bed is square, so why does it get mounted 90° to the instructions? Does it have to do with the wiring?

Yep, The default instructions have the plug for the heated bed coming out the back. That's fine if you use the cable wraps they give you and you follow the instructions.

But for the cable chain, the plug for the heated bed should be on the 'left' that way when the table goes back and forth, the cable chain can do it's thing.

Here's a very short video that should illustrate the placement and how it works.

[video]https://goo.gl/photos/DhFPriGUm7ZdaNXb8[/video]
 
Top