allen levine
Member
- Messages
- 12,361
- Location
- new york city burbs
it really stinks getting old, everything starts falling apart.
feel better.
feel better.

it really stinks getting old, everything starts falling apart.
feel better.
You have left more room in the apron joints than I usually do... With good hardwood like you are using, I suspect 1/8 inch would be ample. You can put a small trim piece on the inside, attached to only one side of the apron, to help hide the gap.
I use pocket screws on all my aprons - much easier than clips. If you want to get fancy use a biscuit cutter to give the screw extra room to move on the side aprons, but no extra room is required on the ends - the grain of the apron is the same as the table grain.
I put the pocket screws fairly close together on the end aprons, including very close to the leg for extra support when lifting the table. I put them farther apart on the sides, where the movement can become a factor.
I like my extra leaves to be 18 or more inches wide. 12 inches is not enough to add a full place setting to each side of the table.
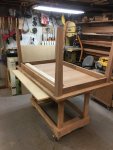
glued up the aprons to legs, and have around 5.5 hours sanding, between drum sander and orbital sanding.
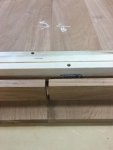
heres a piece of top I clean off with mineral spirits to see if I have any noticeable marks before I go to assembly and then final sanding. Im sanding top down to 180, 2 coats teak oil, then most likely carefully applied polyurethane, sanding thoroughly between coats and final sanding with wet sandpaper. (Im not fond of this, but I cannot spray oil based lacquer and Ive made tops with poly before and like the way they've held up over the years)
Allen i say it again, keep posting, you are an absolute inspiration to me. Looks fantastic. You should get Larry to teach you to spray finish. Then you could use the water based poly and life would be bliss.
....I spray water based lacquer on almost everything I build the past couple of years.
I don't think a water based laquer will hold up as nice as an oil based one for the use this table will get.
its 10 times easier spraying water based, no burn in, I could put 12 coats on the top all within one day.
Just not sure if it will hold up, so Im going with what Ive used previously, and know the results.......