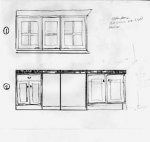
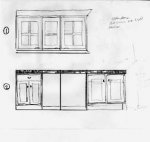
urban sprawl, with Sketch UP

I don't think you need to delete cookies. Just the other Temporary Internet Files. I think Select Delete Files from the Tools>Internet options dialog. You'll need to totally navigate away from FWW before you do that. That is exactly what worked for me..:thumb:

The sketchy look is pure SketchUp. I did download a texture to try to emulate the wall in your photo. It's not perfect but it was what I could find easily. You actually made a rather good selection. The real walls have 7 different treatments to them so yours is quite close. Where do you get those downloads?

p.s. I'm heading out soon to go do some work on my "new" Catalina 27. I'll be back later in the day to pickup here. Have a great day everyone.
How is "our" lovely little "27"?:D :D
 
Shaz, I'm pleased you got that to work.

I'm back from working on the boat and ready for the next set of details for your drawing. Well, whenever you are.

"Our lovely little 27" is coming along nicely. I replaced a rotted bulkhead which I removed on Saturday. It's nice to have the boat back together. Once I get the new masthead sheaves and install them I think we're set for raising the mast so we can go sail.

D
 
Hey Dave, So pleased to hear you are focusing on a joyful goal, sailing.
Okay,, With the depth of the deepest appliance determining the minimum depth for the lowers, that being the ice maker at 24" including the door, let us make the plywood box 23 3/4" then add a 3/4" thick set of stiles and rails totaling 24 1/2" front to back, add the 3/4" thickness of overlay doors and drawer fronts and we have from the wall to the front of the doors 25 1/4". Let us use a 1" over hang on the front and the right side, thus the finished plywood deck top is 26 1/4" minus the thickness of the ceramic tile and mortar, 1/2" wonder board and the 3/4" banding.Figure the tile and mortar at total of 1/4" thick. Thus the deck with 3/4" plywood band is ________________?
Shaz
 
Robert, I'm not quite sure on the details of the counter and we still need to work out some dimensions for the face frames. Are there going to be drawers or only doors? How wide are the face frame components? If a drawer, how deep. How much overhang on doors and drawers? You know, stuff like that.

Here's where I'm at right now.

RobertsProject2.jpg
You do the most beautiful work!:D Thanks for offering to do this.:)
Let us discuss this first drawing.
JandNoptions 3.jpg
We have a drawer above two doors on the left and then under the sink we have two doors. We will make the drawer 20" deep( just a choice) with a flat 3/4" drawer front for the faux painter, all of the doors will have 2 1/4" stiles and rails with a raised panel. The edge treatment for the doors and drawers will be a 1/8" roundover. As far as the face frame. I don't do face frames. I band the boxes as needed to accomplish the look I want. In this case we will show a 3/8" reveal below the counter top banding, 3/8" to the left and right of each set of doors and 3/8" below the doors themself. We will make the height of the toe kick 4" and the depth 3 1/2", and band the bottom shelf with 3/4" solid stock( which would be included in the 3 1/2" dimension). I know it is easy for me to spit out numbers knowing what I have said, but do you understand what I think I said?:rofl:
 
Last edited:
As far as the height of the doors for the sink cabinet, let us figure that out. Total height of cabinet, finished floor to top of the finished tile = 37 1/4". Subtract the height of the toe kick ( 4" ), subtract the 3/8" space below the door ( where the door is laying against the bottom rail), subtract the finished height of the tiled face,( included is the top layer of tile,i.e.the edge view of the tile that is covering the deck top) that number being 2 3/4" total for the visible tile edge. And last subtract the 3/8" space above the doors and below the tile face and there we have the height of the doors.
37 1/4" - 4" - 3/8" - 2 3/4" - 3/8" = door height, which will also be the total height of the doors and drawer height on the other cabinet.
I"ll do width later as I have time. Have a great day.
Shaz
 
Last edited:
Hey there Dave, That is a marvelous rendering of the drawing.
From a function point of view.....
Would you....... reduce the size of the drawer front to 4"?
The sides of the drawer itself will be only 3 1/2" tall. They don't intend using it for deep stuff, bar supplies, bottle openers, coasters, playing cards, dice, stirring sticks, lighters, etc.
From a design point of view.....
decrease the bevel on the raised panel to eliminate the monotony of the 2 1/4" measurement also found in the stiles and rails. Let us go to a 1 1/2" bevel, 2/3s the size. What is your thought?
Oh, just remembered:rolleyes: they mentioned thoughts of having a sink bowl set on top of the ceramic tile. You are doing a great job, don't quit on me now.
Hey Dave,
How can we somehow expose "our people" :D ( "We" have people!!!:eek: ,,,that is another story:rofl: ) to some of the flim flam you are doing behind the scene? It is intriguing, to me at least...:thumb: Please feel free to expound:D :D .((( others chime in here!!!!!:) ))))) :)
Shaz
 
Robert, here's the latest. I agree about reducing the width of the bevel on the panels. and have made the change. I also made the drawer front 4" high instead of six. I'll wait to draw in a sink until we have other stuff worked out. If you can find a picture of a sink, I might be able to work from it. Or maybe the manufacturer of the sink has some drawings I can download.

RobertsProject4.jpg


As far as the actual SketchUp for those who are interested, here's what I've done to make the changes in this drawing from the previous one.

Drawer front: Push/Pull took care of the height issue. I also had to move the rail between drawer and doors.

The doors were resized by selecting the geometry of the upper end of the door component and moving it upward. That's something I've covered in a tutorial here. To modify the bevel, it was easiest to simply delete the geometry and redraw it.

To make the doors on the right hand cabinet match the new version of the doors on the left, I copied one of the new door components, made it unique and resized it. Then I copied and mirrored that door component to make the opposing door. The original doors on the right hand cabinet were then deleted and the new ones moved into place. I also made sure to purge the unused components from the file to help keep file size down.

FWIW, even with the texture and different style settings the SKP is less than 85Kb.
 
What Ed said (Ditto)...:rofl:

Fascinating stuff you guys are doing.
Hi Greg, Thanks to you, Ed and Rob for your encouragement. Hope this moment finds you each, and your people, well.:)
Okay Dave, you are doing a great job but it is time to turn up the fire...:eek: :eek: :dunno: :( :rofl: There is no fire, just kidding:rofl: :rofl: . Since the cabinets on the left die into a wall on their left and an appliance on the right, the toe kick is good. The cabinets on the right however are a "sow" of a different color.:D How would you move the toekick "in" the same distance, (3 1/2" )from the outter edge, (on the right side) as you did in the front? ( The left side of the cabinet is okay as it too dies into an appliance) It is because of the cabinet end standing alone there, exposed to God and Country, and it being a sink area, I think it would be a good idea to recess it too.
Shaz
Oh Dave, just the idea of getting the sink "specs" is another thing that makes the process of Sketchup so impressive. With "specs like that, one would get a very true rendition of the final results.:eek: Would that take the fun out of it?:huh: :D Hopefully not, we will see. :)
 
Last edited:
Now we're starting to sizzle. ;)

Before I read your latest directions I made a change to the model and eliminated the exposed end grain on the toe kick boards.

2c39f2d8.jpg


Here's the cabinet with the wrap around toe kick. What do you think? The toe kick boards are drawn with miters so as to eliminate exposed end grain.
84befd6c.jpg


Now thinking about the actual construction process I did the following. This is simply a matter of pulling copies of related components together and arranging them. This view tells us we can get a pair of side panels out of a half sheet of plywood if we want. If we cut the corners for the toe kick as shown and make a single pass over the dado set we can then split the piece in two and have the sides finished for a cabinet. We could easily do this for the rest of the sheet goods if we wanted to.
9705b5ff.jpg


Lets see what I can come up with for the sink drawing based on the information you can gather from your client.

Hey gang! Is there anything in all this that SketchUp work that you think could make a useful tutorial? Let me know and I'll see what I can do.

p.s. I'm off to bed.
 
Last edited:
I finally caught up on this thread, and it's great (and very educational) watching you two go through the process. :thumb: Thanks for sharing it in public.

Dave, regarding your question about tutorials, I'm following your description pretty well, all the while knowing I just need to spend more time at the wheel in SketchUp to gain the experience. I'm doing that...using SU whenever I can to work out ideas. ;)
 
Now we're starting to sizzle. ;)

Before I read your latest directions I made a change to the model and eliminated the exposed end grain on the toe kick boards. It looks like you sandwiched the toe kick between the side. Correct? When I do it this way, the way you have it drawn now, I usually either iron of banding for that 4" end grain on the side panel's cutout or cover it with 3/4" x 3/4" solid stock. In fact as I think about it, sometimes I will make up a 4" tall,from a plywood ripping, the exact size of "inside to inside" the walls of the cabinet, then cap each end of that with a 3/4" X 3/4'' solid piece, sand that nice and flush and apply it as one piece to the base cutout area, sanding the outside of the 3/4" piece flush to the sides of the cabinet and it is done

2c39f2d8.jpg


Here's the cabinet with the wrap around toe kick. What do you think? The toe kick boards are drawn with miters so as to eliminate exposed end grain. Oh Dave... Perfect is good enough. NICE!
84befd6c.jpg


Now thinking about the actual construction process I did the following. This is simply a matter of pulling copies of related components together and arranging them. This view tells us we can get a pair of side panels out of a half sheet of plywood if we want. If we cut the corners for the toe kick as shown and make a single pass over the dado set we can then split the piece in two and have the sides finished for a cabinet. We could easily do this for the rest of the sheet goods if we wanted to. This is an awesome part of that program. Myself, just looking at the handling of material thing, I would probably crosscut to length plus 1/2" on the firs 4'X8', then reseet my saw to the correct finished height, spin the first piece around and crosscut the second time thus eliminating and factory edge. At this setting I would then crosscut my second piece, then rip both of those pieces down the middle at 23 15/16" giving me 4 pieces. Having done that I would then reset the TS and rip all 4 pieces to the exact width needed while having eliminated the factory edge on the ripped side. Now in more manageable pieces I would dado and cut the notch for the toe kick, remembering that on one piece, a right side, we need to crosscut it completely off when we are set up to cut the height of the toe kick notch out. That is the side wall that over hangs the toe kick.
9705b5ff.jpg


Lets see what I can come up with for the sink drawing based on the information you can gather from your client. From what I gathered up yesterday, the sink will probably be hammered copper either with a small lip or an undermount bowl.

Hey gang! Is there anything in all this that SketchUp work that you think could make a useful tutorial? Let me know and I'll see what I can do.

p.s. I'm off to bed.
Thanks Dave for all the great input!:wave: :D "THUS FAR" ! :eek: :eek: :rofl:
Shaz:)
P.S. I modified the title to this thread for more clarity. Hope it draws your readers in as your information is always so worthwhile found anywhere in a thread. :thumb:
 
Last edited:
Hey Dave, Robert,

I like the idea of the recessed toe kick on the end. However, don't you also want a raised panel on the end face also?

I like the thick/substantial edge on the top as well.
 
Hey Dave, Robert,

I like the idea of the recessed toe kick on the end. However, don't you also want a raised panel on the end face also? Hi Art, You have a good point, often the side wall is plain, like a house with fufu on the front that stops at the corner and not applied on the return walls of the house. It could be a fullsized door, affixed from the inside with some well placed screws.
What do you think Dave?
That would add 3/4" to the overall width but we can add that to the deck top, to maintain the overhang, as we have room on the right side for some expansion

I like the thick/substantial edge on the top as well.
This size is predetermined by the height of the small tile squares ( 3/4"X 3/4") which will band the front edge and the top. From the bottom going up = 3/4" tile 1/8" grout 3/4" tile 1/8" grout 3/4" tile 1/8" grout and then the 1/8" thick tile laid flat as it will be the counter surface.
Thanks for the input.
Shaz
JandNoptions 3.jpg
 
Top