Backless chair/stool with sculpted seat

making of the chair continuation....

Hi guys.
I apologize for not being regular in posting the progress of my chair but due to my job I had to travel for a few days and I have neither been able to do any woodwork nor tidy up the pictures and put them in an orderly manner.

So what you’ll see now is already outdated, but as you are not supposed to know that it it won’t matter.

After cutting, and shaping the legs, the rails, the seat and the back I started to make the joints to glue the legs to the rails.
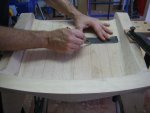
I marked two slots both on the rail and the front legs and cut them with a handheld circular saw attached to a table with a toy fence which I shoundn’t have trusted and therefore the slots didn’t come out as straight as they should.:bang: I have to make a proper fence or get a table saw!!!!

4-02.jpg4-03.jpg4-04.jpg

So I pared them down to shape and made two splines out of a pair of walnut samples I begged at the lumberstore,I adjusted them for a tight fit and glued them to the leg.

4-044.jpg4-05.jpg4-06.jpg4-07.jpg

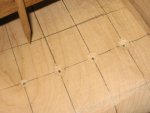
After that, in order to be able to clamp properly the rail and the leg together, I glued two blocks of pine wood to the sides of the leg and the rail with a paper in between aligning theis sides parallel to the side of the miter joint.
4-08.jpg4-09.jpg4-099.jpg
 
Last edited:
more of the same...

Glued both parts and clamped them putting the clamps on the blocks, as their sides were parallel to the joint line it was quite easy to put the pressure in the proper direction.

As I didn’t trust the resistance of the paper I hold the blocks in place with a pair of small clamps prior to gluing the leg to the rail.
4-10.jpg
Once dry, I removed the blocks with a wack of a hammer, planned off the paper and got quite a good joint.
4-11.jpg4-12.jpg

Then I joined both the left and right rail-leg blocks with double sided tape to chek their symmetry, They were about 2mm off, specially on the rails, as the rails were still in rough, it was no problem to make both parts match by planing and sanding.
4-14.jpg4-16.jpg4-17.jpg4-19.jpg

More pics tomorrow... (I hope)
 
It's coming along quite nicely, Toni.:thumb: I was just thinking that if you clamped a block on either side of the rail and leg pieces at an angle that would let the blade run properly you might could have used your bandsaw to cut the mortises, :dunno:
 
I was just thinking that if you clamped a block on either side of the rail and leg pieces at an angle that would let the blade run properly you might could have used your bandsaw to cut the mortises, :dunno:

Hi Norman.
How on earth I didn't think about that!:bang::bang: I could even have used the same blocks that help to clamp afterwards!

A good idea to use on the next one. I should have posted a question here before making them, It would hape spared me a lot of time!

Thanks a lot:thumb:
 
the making of... almost there!!!

Hi there, here there are some more pics, and explanations.

Before gluing the sides I carved as much of the seat as I could because it was easier to clamp it to the bench and to access the seat from diferent sides.
4-20.jpg4-21.jpg
First dry fit of the sides.
4-22.jpg
I used a black soft pencil to find out high spots on the miter joint of the seat with the rail and pared them down until I got a good fit.

4-23.jpg4-24.jpg

With the aid of a jig I drilled three holes to join the rails to the seat with dowels. I offset the dowels down because the seat needed some more carving and I didn’t want to risk carving through them.
4-25.jpg 4-26.jpg4-27.jpg

Applied glue and clamped the rails to the sides, the wood that I left on the back to help to clamp the upper part of the rail revealed itself too small, and the curve that was cut on the rail didn’t provide a proper clamping surface, so I decided to use long clamps and sandwich the seat between the rails, instead of gluing them one at a time.
4-28.jpg 4-30.jpg

to be continued...
 
the making of... almost there but not yet...

This wood had to be carved away and the corners and the lateral slanted surfaces had to be shaped.
4-31.jpg4-32.jpg

To be able to carve the corners in a comfortably position I had to hold the chair in some odd ways

4-33.jpg

Checked the position of the back legs and figure out how to solve the mistake in the joint I made and mentioned some posts ago. Carved and connected the surfaces but the resulting shape was ugly, if I wanted to obtain a pleasant connection I had to carve deeper and then the corner of the seat would appear ( see pencil pointing at it)

4-38.jpg4-39.jpg4-40.jpg4-41.jpg

As the colour and grain of maple is not so evident I decided to carve down and get the shape right although I knew I was not going to like the result

4-42.jpg
I even thought about veneering the hole back to overcome this problem
(and still weighing that solution) but as the shape is made of compound curves and I have no experience at all in veneering I decided to leave it like that for the moment. After all this is my first chair ever! and I can consider this a first prototype.

I made two huge dowels about 1” diameter, drilled the holes on the seat and legs and glued them after dry fitting and adjusting.

4-43.jpg 4-44.jpg.
 
A chair is born!!!!! but still....

Once glued I started shaping the inner curves of the rear legs.

4-45.jpg

Rounded the lower edges of the rails with my home made lignum vitae spokeshave

4-46.jpg

And here it is for the first time all pieces together! A chair is born!!:b-day_cake:

4-47.jpg4-48.jpg

Further shaping and refinements are still necessary, now comes the tricky part where everything can be spoiled if not evaluated carefully. Oh yeah C’mon! It is a prototype… but I want it to look good enough despite all the mistakes I’ve made, otherwise I should have stopped long ago and start all over. Hard is the path to knowledge SIGH!!

So a bit more shaping and a lot of sanding are on the go, and some decisions about the finish to be taken before I can post the final picture.

Thanks for looking and going trhough so many pictures I promise to be more succinct on the next project

Now it is your turn guys! Criticise, suggest and give whatever feedback you think is worth. Unless you want to wait until the final picture ;-)
I learn a lot from your opinions!!
 
Last edited:
Hi Vaughn.

How come are you awake at this of the evening/morning? here it is 07:53?

Thanks for your comment!
I do a lot of my "day" job late at night. Lately I've been working many nights until 4:00 or 5:00 AM. [FONT=&#23435]:type: [/FONT]Here's a little of what I'm in the middle of tonight. I'm formatting and arranging about 10,000 lines of this type of stuff:

[FONT=&#23435]十多年来[/FONT][FONT=&#23435],[/FONT][FONT=&#23435]Diskeeper [/FONT][FONT=&#23435]一直引领着[/FONT][FONT=&#23435] Windows [/FONT][FONT=&#23435]系统碎片整理技术[/FONT][FONT=&#23435],[/FONT][FONT=&#23435]Diskeeper 2008 [/FONT][FONT=&#23435]以作为[/FONT][FONT=&#23435] Diskeeper [/FONT][FONT=&#23435]品牌标记的真正的设置并自动执行[/FONT][FONT=&#23435]([/FONT][FONT=&#23435]Set It and Forget It)[/FONT][FONT=&#23435]性能增强继续保持领先。[/FONT]
[FONT=&#23435]
Tonight is Traditional Chinese. Last night was Simplified Chinese. Last week I was playing in French, [/FONT][FONT=&#23435]Italian, [/FONT][FONT=&#23435]German, Spanish, Japanese, and English. [/FONT][FONT=&#23435](They all look Greek to me.) [/FONT][FONT=&#23435]Just taking a quick break to have a piece of pie while a Help file builds. :wave:

[/FONT]
 
Hey Toni, that is really nice, really amazing work you are doing, true craftsmanship! :clip:

Love all the pics, nice and easy to understand the process, and see the LARGE amount of work you are putting into it, this fine piece of furniture will be in your family for a long time to come! :thumb:

Fantastic!:D
 
Hi Norman.
How on earth I didn't think about that!:bang::bang: I could even have used the same blocks that help to clamp afterwards!

A good idea to use on the next one. I should have posted a question here before making them, It would hape spared me a lot of time!

Thanks a lot:thumb:

Hey, Toni, don't beat yourself up too much for not thinking of that , because you just haven't had your Bandsaw long enough to automatically think about all the different ways you can use it yet, but I'll bet it won't be long before you'll be using it for all kinds of operations.

I've looked at all the latest pictures, and since the artistry of carving, sculpting or drawing are areas that I am physically and visually challenged in, (and that is putting it MILDLY),:rolleyes: :rofl::rofl::rofl:, it never ceases to amaze me that YOU draw something, and then after you do a LOT of cutting, gluing, carving, rasping and sanding, it suddenly appears, LOOKING exactly like you intended it to in your initial Drawings.:thumb: You've definitely got the "Magic Touch" for that kind of work.

I know you've found a couple of design/planning errors that didn't show up until too late in the buildup to make a "Perfect" fix, but I think you've done an excellent job of compensating for the problem to this point, and I won't be surprised if you figure something out to completely hide it with vaneer or other means before you're through. It's a fantastic accomplishment, and especially so, since it's your FIRST Chair. I'd say it's a :thumb::thumb::thumb: (three thumbs up) project for sure.:D
 
Hey Toni thanks for sharing your process and all the pics :)

I think your designs are very original. Each project is a journey and you often let the wood tell you which path to take. Your style of working is very much like one of my heroes, James Krenov.

I think that you are a master in the making ;)
 
Hey Toni thanks for sharing your process and all the pics :)

. Your style of working is very much like one of my heroes, James Krenov.

I think that you are a master in the making ;)

Thanks Jim, I appreciate your enthusiasm and it really motivates and encourages me :eek: James Krenov is one of the master woodworkers I admire but I don't think I can be compared to him,:eek::eek: he is on the top of the Everest and I'm trodding on a hill slope.

I'm trying as much as I can to learn everyday but as the phylosoph said "The more I learn the less I know" and as far as the making is concerned... well... I'm sure that many of the fellow woodworkers of this forum would have done it better than me.

Stu, Tod, Norman and all the rest, thanks to you as well it feels great to be in this family:)
 
Thanks Jim, I appreciate your enthusiasm and it really motivates and encourages me :eek: James Krenov is one of the master woodworkers I admire but I don't think I can be compared to him,:eek::eek: he is on the top of the Everest and I'm trodding on a hill slope.
Humbleness is one of Krenovs best attributes, that and patience to coax the wood into a certain design. Sound familiar :D;)


I'm trying as much as I can to learn everyday but as the phylosoph said "The more I learn the less I know"
Great attitude, you've got what it takes :thumb:

well... I'm sure that many of the fellow woodworkers of this forum would have done it better than me.
Maybe differently but I don't know about better... anything done differently would no longer be your design...

Toni I just admire the way you're in no hurry... the way you evaluate each step and are prepared to backup or do whatever it takes to stick with your original vision. You are not so stiff though that if the wood speaks of a better way you're willing to listen...

From what I gather you're fairly new to woodworking and judging by what you have already done and the way you work I have no doubt that we'll be seeing some great things from you in the future...

Here's to more posts and pictures from you - Cheers!
 
Missing pictures

I just found a set of pictures that I didn't post, and as it seems that finishing my chair is taking a bit longer due to external
reasons I thought that I should post them.

Maybe they are of help to anyone.

When carving and shaping the seat of my chair, I found very difficult to have both sides symmetrical, in depth and in their curvature
so in a couple of minutes I improvised this depth gauge to check and mark the different depths so I could copy the same depth
on the simetrical point on the other side.

I marked a grid of lines evenly spaced and I compared the depth of each intersection point with its homonimous on the other side,
if the point was to high I carved it down to depth either with a drillbit or with a gauge.

If the original point on the right side was higher that the one on the left side, then I copied the depth of the one on the left side.

So some points were transferred to one side and some to the other.

After that it was matter of connecting them by sanding or carving, a "witness" black pencil dot was placed on every one that shoud be sanded down
in order not to loose the reference.
 

Attachments

  • gauge000.jpg
    gauge000.jpg
    55.3 KB · Views: 10
  • gauge001.jpg
    gauge001.jpg
    53.1 KB · Views: 13
  • gauge002.jpg
    gauge002.jpg
    66.7 KB · Views: 12
  • gauge004.jpg
    gauge004.jpg
    62.9 KB · Views: 11
  • gauge005.jpg
    gauge005.jpg
    55.3 KB · Views: 11
Top