Marty Walsh
Member
- Messages
- 1,396
- Location
- Southern Georgia
I thought I might share one of my home-made tools that's been seeing a lot of action lately in the shop...
When building a box, drawer, etc., I used to take out a tape measure to measure the diagonals to make sure the box/drawer/etc., was square. Well, I was never happy with the loss of accuracy caused by holding the end of a tape measure on a point. My measurement depended on exactly 'where' on the corner I held the tape...and whether or not I held the tape in 'exactly' the same spot on the opposite corner.
Lee Valley sells 'tape tips' to help improve the accuracy. But my solution is easier, and cheaper.
I think my solution is a bit more accurate, since it uses the inside of the corners to FORCE accuracy. I call these things 'trammels', but looking on some of the sites, all I see are 'beam trammels' that are used to mark out large circles/elipses. So perhaps I'm wrong in what I'm calling them...
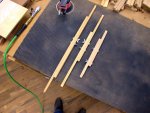
Anyway, here are the ones I've been using for the past week or so:
 ..........
The two long ones on the left I made about 5-6 years ago. I found a need for a smaller one yesterday, so in about 10 minutes I had a new one!
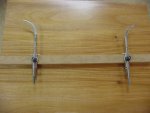
As you can see, they're simply two strips of hardwood, with a 1/4" slot routed up the middle...a pair of 1/4-20 bolts with wing nuts...and greater than 45 degree angles milled on either end.
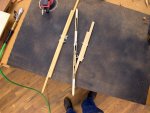
To use them, loosen the wingnuts, place inside the box/drawer/etc., and spread til the two corners touch the inside corners of the box. Lock the wingnuts and turn the device around to check the opposite corners of the box.
I find I can get something DEAD square using these things...as opposed to "awful close to square" using a tape measure.
Oh, and guess what the new one was made from yesterday...Yup, white oak flooring culls!


Off to the shop...
- Marty -
When building a box, drawer, etc., I used to take out a tape measure to measure the diagonals to make sure the box/drawer/etc., was square. Well, I was never happy with the loss of accuracy caused by holding the end of a tape measure on a point. My measurement depended on exactly 'where' on the corner I held the tape...and whether or not I held the tape in 'exactly' the same spot on the opposite corner.
Lee Valley sells 'tape tips' to help improve the accuracy. But my solution is easier, and cheaper.
I think my solution is a bit more accurate, since it uses the inside of the corners to FORCE accuracy. I call these things 'trammels', but looking on some of the sites, all I see are 'beam trammels' that are used to mark out large circles/elipses. So perhaps I'm wrong in what I'm calling them...

Anyway, here are the ones I've been using for the past week or so:
 ..........
The two long ones on the left I made about 5-6 years ago. I found a need for a smaller one yesterday, so in about 10 minutes I had a new one!
As you can see, they're simply two strips of hardwood, with a 1/4" slot routed up the middle...a pair of 1/4-20 bolts with wing nuts...and greater than 45 degree angles milled on either end.
To use them, loosen the wingnuts, place inside the box/drawer/etc., and spread til the two corners touch the inside corners of the box. Lock the wingnuts and turn the device around to check the opposite corners of the box.
I find I can get something DEAD square using these things...as opposed to "awful close to square" using a tape measure.
Oh, and guess what the new one was made from yesterday...Yup, white oak flooring culls!


Off to the shop...
- Marty -


