Wes Bischel
Member
- Messages
- 896
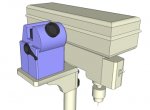
Last month I decided to get a few projects done that would make life in the shop a bit easier. I got one done then promptly got bronchitis which is still hanging around.  Be that as it may, the one project I did get done was a little shelf for my Drill Doctor.
 It previously lived in a drawer in the base of the drill press and didn't get used as often as it could - or should.
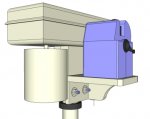
I did the initial layout in Sketchup - which worked so well, I only needed one slight modification when I went from drawing to actual part. I thought that was great considering how tight the space and how complex all of the little protrusions on the DP are. Sketchup proves to be a time saver once again! While I was at it, I added a little work light to it that I had sitting around. (it came with something else, but I don't remember what)
With the Drill Doctor sitting with-in easy reach, ready to go, it's not such a hassle to touch up a bit during a project! I do move it down to the DP table to use mostly because I'm short.
Thanks for looking,
Wes
Be that as it may, the one project I did get done was a little shelf for my Drill Doctor. It previously lived in a drawer in the base of the drill press and didn't get used as often as it could - or should. I did the initial layout in Sketchup - which worked so well, I only needed one slight modification when I went from drawing to actual part. I thought that was great considering how tight the space and how complex all of the little protrusions on the DP are. Sketchup proves to be a time saver once again!
While I was at it, I added a little work light to it that I had sitting around. (it came with something else, but I don't remember what) With the Drill Doctor sitting with-in easy reach, ready to go, it's not such a hassle to touch up a bit during a project! I do move it down to the DP table to use mostly because I'm short.
Thanks for looking,
Wes