Ed Nelson
Member
- Messages
- 1,486
- Location
- Charlotte, NC
ok, so when do we get to hear how many cabs and how you're gonna do the doors??? huh huh huh
chris
Yea Shaz, How'd we score on the test???
ok, so when do we get to hear how many cabs and how you're gonna do the doors??? huh huh huh
chris


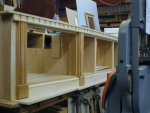
Hi EdLooking good Shaz! 54' radius huh? I can't understand why you didn't use a trammel!
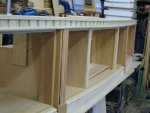
 , And as far as the boxes I made 5, joined them up to make 3 and the joint you are correct, the joint is behind the columns or actually right at the inner ( nearer the center of the piece) edge.
 .. S
.. Sshaz,
as for the # of boxes, right off i would think three, (Hi Chris
as for the bead on the door, if i understand what you mean, then you are saying you'd have a bead similiar to the ones on the sides of the smaller columns on the inside of the door. ( yes, only the bead on the small columns are 3/4" diameter and the one on the door is only 1/4" diameter) 3 ways that i know to accomplish this.
1. make the rails and stile and run the bead on the edge. miter the joints and make the doors like picture frame. in my opinion probably the toughest way to get it done and have a tight strong joint. (This is a possibility I have used at times in the past)
2. make the doors like regular rail and stile paneled doors, and make a separate bead to be mitered and attached with glue and pins. ( This is also an option that would work)
3. run the bead on the rails and stiles like #1 but run the pieces like regular rail and stiles, then miter the bead section on the rails where it meets the stiles, ( I am with you to this point!) then use a 45 degree chamfer bit with no bearing to route the bead off the section of the stile that mates with the rail. this is similiar to what i see done on some exterior doors. ( you do express more than one way to do this and that I think is so important. It is that creative mind that takes you exciting places. One problem with the door plan you and Ed offer is shown in this sample I showed the client. There is more to the door than first imagined
hope half of that made some sense.
ok, so when do we get to hear how many cabs and how you're gonna do the doors??? huh huh huh
chris
Yea Shaz, How'd we score on the test???
Okay Ed and Chris, Test scores are inI've been quietly lurking on this thread, but figured it was about time to say it's looking good, Shaz. I'm guessing this is not going into a mobile home?
!!!!!!.jpg") thumb and intended to stay together from now on.
thumb and intended to stay together from now on.

 my vicarious partner!)
 (450 x 600).jpg")
 (450 x 600).jpg")
.jpg")
Hi EdLooks good Shaz! You move a lot quicker than I do on these big projects!
, ...SWow - that's a major project. You're really moving along on that, also, but I guess that's the difference between a professional like you and a hobbyist like me. It'd take me a year to build that.
Hi Mike
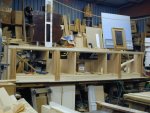
It is a large project but consider working 8-9-10 hours a day and 4-5-6 on Saturday. Problem solving is a challenge for drive time or when you can't sleep. It may seem big but "divide and conquer" and each part is not so bad.
Looking good!!
Mike
I need to download some photos using pixresizer ( thanks Vaughn )
I really enjoy watching someone who knows what they're doing.
Hi Vaughn,
Thanks for your input and your vote of confidence. I sometimes seems that without input like this that I am writing a rather shoddy tutorial to an uninterested mass....Shaz
Oh...and I would have picked frieze #1, too.

 ( hate things when they are not a one man job!)
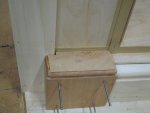
hey shaz, i actually wondered earlier what the big notches were in the backs of the partitions, now i think i understand a little better.
( Hi Chris
I needed a large notch like that as the frieze is out away from the wall about 24" so the screen has to be inserted diagonally, bottom first. The deck top will be a 4 piece unit. #1 will be the front piece, curved to match the front profile on the front edge yet flat on it's back side. It will run the full length. #2 and 3 are small short pieces that will fill the space under the fixed side mounted pillars which will help determine the open width for the screen. Clear as mud? The 4th piece will be a drop in once the screen is set in place....S Hopefully it will become clear as we progress.
this is going to be a nice piece.
question. in this home, is it new construction? ( This was a spec home that has been done over by the decorator, once purchased by the client as their new home. ) i ask because i wonder why the designer wouldn't get the cabinet maker who did the kitchen and bath cabinets to do this as well. although, in the end, i am glad you got the job
chris
. OH, 36" for the refridgerator! . )...Hi JoeShaz,
You continue to educate and amaze. The work you are doing is first class and I like frieze #1 as well.
,Well Chris, you raise an interesting question, Why not let the already there cabinet makers, who were doing the kitchens, vanities, and closet built-ins do the theater, same question if it were an entertainment center?
I can only give you the feed back I have gotten from the gentleman who sells the audio visual equipment and does the pre wiring, programming and the works. "They just don't realize that it comes down to 1/8". Most of the kitchen/ bathroom guys just think it is another set of boxes, which is basically true.
In the end it is the little things like holes for wiring holes, and heat, access to the wiring and plugs, stops for short shelves in deep cabinets ( so that pushing in a dvd does not push the component and the shelf off the adjustable clips), determining the right sizes for needed cavities for speakers ( considering that they get doors+ another inner frame wrapped with grillle cloth which decreases the open space in the door for the drivers to play through) etc.
I think alot of guys look at it like it is a kitchen with box box 24" diswasher box, sink box box corner fill return box box box. Screw that together and give me the money
To do it right, I am like "Columbo" annoying people with question after question about driver sizes, heat issues, age and health related problems ( inconsiderate to plan a dvd player chest high if the person has a shoulder problem or a vhs too low if they are getting older) , storage needs, and their desire for photographs and nic nacs. I really believe this is a niche market. just my opinion, of course. ...("pearls"
Shaz