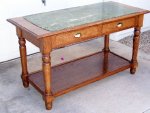
Table

Messages
472
Location
Goodyear AZ
Well, this is flat-work...and turning. Took over a month to complete cause I've been under the weather with some kind if tenacious bug. Anyhoo, Its red oak, as you probably guessed. And as you turners probably already know, turning red oak spindles can be frustrating, it certainly was for me; very splintery and chippy. Took longer to do the legs than all the rest combined, but in the end I was satisfied with the results. It's 60"x27"x32" high. Joints are floating MT. The customer provided the piece of marble. They are an Air Force couple who brought it back from Italy. It was in a table they didn't like, so they asked me incorporate it in a sofa table. They had a picture from an Ethan Allen catalog they wanted me to copy, so I didn't have much freedom of design. Oh well, all I can say is CHA CHING!!! I'll take the money and run. It actually looks remarkably like the picture (aside from the marble top). Cheers, Barry
 

Attachments

  • marble table.jpg
    marble table.jpg
    103.6 KB · Views: 91
  • marble table2.jpg
    marble table2.jpg
    99.9 KB · Views: 141
Well, no wonder there was cha-ching involved. A table that nice is worth some serious compensation. Great job, Barry. :clap:
 
Very Nice Barry.:thumb: I'm glad you're feeling better too. I fought that bug for over 2 1/2 months and STILL don't have my strength back yet, so be careful and don't overdo it, 'cause you don't want it to come back at you like it did me. (It's much harder to kill the second time around).:bang:
 
Hi Barry :wave:,
Nice work as the others have mentioned! Chris brings up a good point, nice job cutting the inset drawer fronts into the same one piece of wood. An explanation of just how you did such a wonderful job would be helpful and appreciated by many I am sure! This in itself would be a wonderful step by step tutorial! A new thread :dunno: or even in this one.:D
Good Job:thumb:
Shaz :)
 
Thanks for the complements, all. Shaz, I didn't get any pictures of the construction process, but I can expalin a few of the key operations. The legs are glue-ups of 4/4 stock. After they were squared on the jointer, but before being turned, I laid out and cut the top and bottom mortices. I use a multi-router kind of like David Marks uses, only smaller/cheaper. Then I cut matching mortices in the aprons and bottom rails. I made the front panel match by using a single board. I ripped the top and bottom rail, cut the drawer fronts from the center piece, then jointed and glued it back together, minus the drawer fronts, then trimed the drawer fronts to size. The drawers are assembled with sliding doevtails on the front and simple dadoed butt-joints in the back. Full extension ball bearing drawer slides. I got these and the pulls from Custom Service Hardware They have good service and I usually find everything I need here. I was fortunate to get the old table I was replacing. It had a cutout that exactly fit the marble piece. I used it as a template and using a spiral patern bit sized the new recess, saving a lot of hassle. For the finish, I used 50/50 Minwax Dark Walnut and Minwax Red Mahogany. Then I sprayed it with Minwax fast drying Gloss Poly. I used one of those Rockler $99 HVLP rigs. I used it a few times in the past and didn't have good success, i.e. splatters, runs, etc. But it turns out it was mostly my lack of experience. I think I have it dialed in now. I used the small needle and choked the feed down to the minimum. Then I had a fine fog that went on perfectly; slow, but perfect. Not a single run or splatter. Thats about it, sorry I couldn't elaborate more. If anyone has a specific question feel free to ask. Barry
 
I can expalin a few of the key operations.

The legs are glue-ups of 4/4 stock. After they were squared on the jointer, but before being turned, I laid out and cut the top and bottom mortices. I use a multi-router kind of like David Marks uses, only smaller/cheaper. Then I cut matching mortices in the aprons and bottom rails. Sound like alot of figuring before you actually cut your grooves!:thumb:

I made the front panel match by using a single board. I ripped the top and bottom rail, cut the drawer fronts from the center piece, then jointed and glued it back together, minus the drawer fronts, then trimed the drawer fronts to size. It works very well and really enhances the face! Good job.


The drawers are assembled with sliding doevtails on the front and simple dadoed butt-joints in the back. That would be a nice tutorial, in pictures, next time you do drawers.:D

Full extension ball bearing drawer slides. I got these and the pulls from Custom Service Hardware They have good service and I usually find everything I need here.

I was fortunate to get the old table I was replacing. It had a cutout that exactly fit the marble piece. I used it as a template and using a spiral patern bit sized the new recess, saving a lot of hassle. That was really good thinking, and good fortune too.:D


For the finish, I used 50/50 Minwax Dark Walnut and Minwax Red Mahogany. Then I sprayed it with Minwax fast drying Gloss Poly. I used one of those Rockler $99 HVLP rigs. I used it a few times in the past and didn't have good success, i.e. splatters, runs, etc. But it turns out it was mostly my lack of experience. I think I have it dialed in now. I used the small needle and choked the feed down to the minimum. Then I had a fine fog that went on perfectly; slow, but perfect. Not a single run or splatter.
Excellent, Barry!


Thats about it, sorry I couldn't elaborate more. If anyone has a specific question feel free to ask. Barry

Hi Barry :wave:,
Really good help underatanding the process! Thanks.:clap:
I just broke your tutorial into smaller chunks, (your large paragraph) because I find it easier to comment on individual steps of the process.:dunno:
What was the thickness of the rock and what was the thickness of your top? How did you support the top with a hole in it where the marble goes?
And one more question, how did you suppport the drawer guides in the center of the table?
Thanks Barry and nice job done!
Shaz :)
 
Shaz,
Thanks for your comments! In answer to your questions:
What was the thickness of the rock and what was the thickness of your top? How did you support the top with a hole in it where the marble goes?
The Marble was 7/8 thick, and so was the wood. I solved this by glueing 1/4" pieces to the bottom of the table top (mitered at the corners) and of a width to provide a 1" ledge all around the inside to support the marble. I also put a few screws down through this ledge to attach it to the apron/leg assembly, but the main attachment point for the top is anchor blocks glued inside the aprons at each end. I put screws through these and up into the thick wood of the top. The reason the marble piece sets proud of the top, even though they are the same thickness, is because I put 1/8 cork strips all around the ledge. This served 2 purposes; to bring up the marble a little (it had a slight roundover on top and wouldn't have looked right setting flush) and as a somewhat self-leveling bed for the marble.

And one more question, how did you suppport the drawer guides in the center of the table?

I notched a shallow mortice in the front and back apron, then dropped in and glued the cross piece. I then glued strips to each side of the cross piece, of a thickness that came to the edge of the drawer opening, then attached the slides to these. Did more or less the same thing for the outside;attached spacer blocks to the top of the legs inside the aprons, then attached a strip to the blocks for the slide to attach to. All these cross pieces also provided additional support to the marble piece.
Barry
 
Fine looking piece, a lot of real craftsmanship went into that. I agree, turning oak is frustrating, something I avoid. I'm not liking the drawer pulls. They seem to be more suited to much more modern (Scandinavian?) style than this table. Caught my eye right away. Just don't look right to me. But, if, customer likes, that's what counts.
 
Yea, I probably wouldn't have picked that type of pulls either. But they are consistent with the piece the customer wanted me to duplicate. The pulls are actually catagorized as mission style:dunno: Barry
 
Top