New (to me anyway) jointer and I need some help

Mike Forsman

Member
Messages
89
Location
North Central Texas - DFW
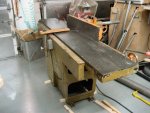
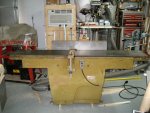
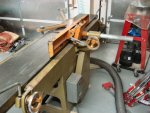
I had been wanting to upgrade my jointer from the 6" machine I currently have. Was thinking about on the 12" combo units. But, I ran across this at a really good deal. I brought this home on Friday. It is an older 12" jointer. Quite a step up from the 6" jointer I had previously.

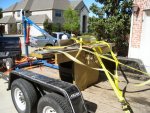
First picture is of the jointer loaded on the trailer after the trip home.
IMG_1419.jpg

After getting it off the trailer prior to getting it into the shop.
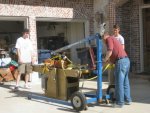
IMG_1422.jpg

Waiting to be connected up to power.

IMG_1429.jpg

After trying it out.

IMG_1430.jpg

View from the back.

IMG_1436.jpg

I need to do a jointer tuneup and it needs to have the blades sharpened. At some point, I will re-paint it and do a restore.

One of the things I don't have any experience with is how to set the knifes when they look like this.
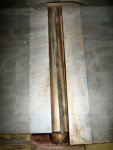
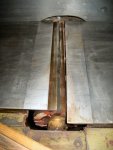
IMG_1431.jpg IMG_1432.jpg

As you will notice in the pictures, the blades don't go straight across the cutter head. They are at a slight angle. Any suggestions about how to get it the same height across the width of the blade and from blade to blade?
 
Mike, that looks like a fantastic machine you've got there. What Make is it? Congratulations on the great find.:thumb: I'm sure there will be someone respond with the CORRECT way to set the blades. I've never set up one of those, but If I had to do it AND couldn't get a knowledgeable response, I would attempt it by doing the following:

I would crank the infeed table down about 1/8" and then get a piece of 1/4" thick glass about 12" x 12" and paint a 2" wide strip along one edge with some of that liquid chalk (that looks like a magic marker but can be erased) along one edge, the then lay it on top of a sheet of wax paper on the outfeed table so that it would overhang the complete blade opening with the painted side down (over the blade opening). I would lay something on the glass to weight it down so it remains flat on the outfeed table. I would then slowly rotate the cutter drum to see if the blade would drag against the bottom of the glass. When the blade, as it is rotated would scrape the chalk off the glass all the way across as the drum is rotated without lifting the glass, that blade would be set correctly, and then move on to the next blade and repeat.

As I said before, I've never done one of these, and I'm sure there is probably a better way, but I don't know what it is. Of course, using the straight edge method on both edges and in the middle and checking for about 1/8" movement of the straightedge as you rotate the drum and the blade passes TDC is the old standby.

Good Luck, and again Congratulations on the "Find". Have fun with it.

(I may have to come see that thing in action sometime when I visit my daughters in Highland village).:D
 
Every thing you need to know. Bob Vaughn on setting jointer knives.

Bob made his living servicing and repairing machines. He serviced machines in many School shops and businesses. He is retired but still very active on OWWM. He is often referred to as the "Resident Throbbing Brain". :rofl:

Also, there is more than one way to set knives that work. But I happen to like Bobs best. The fact they are angled should make no difference.

OH YEA.
I would suggest making or buying, if you can fine one, a real guard for that thing. You have a post there to make one to pivot on. That usually the biggest problem. I made one for mine. It just took some trial and error to get the shape right. But it's worth the effort if it keeps a finger out of the blade.
 
Last edited:
Norman,

The jointer has a label on it that indicates it was made by "Shen Feng Wood Working Machine CO. LTD. Taiwan". I went and looked at it before I put a bid on it. I was a little concerned about it being from Taiwan, but the tables were in very good shape and flat. The motor is a Baldor and single phase so it was easier to get running in my shop. I thought that I wouldn't have much lost if I could get it for a good price (which I believe I did). :D

Your glass and chalk approach sounds interesting. I may try it some time. In the mean time, I believe I will continue to use the same approach that Jeff pointed me to. I have used that approach before on my 6" delta and it works good. I just wasn't sure if there was an easier way with the shear angle knifes. I had never run across that before so thought I would get the experience of others.

If you are in the Dallas area some time, drop me a note ahead of time and we will get together. I'm north and east of Highland Park. Not too bad of a drive if you don't come during rush hour.

Jeff,

Thanks for the link. This was the general procedure that I had been following. I had read about this approach on line and used it for my 6" delta. It worked well for me. The movie really makes things easier to understand.

The guard that was on it is most definitely a home made thing. That was going to be one of the things I fix ASAP. Most likely, I will make one. Along with getting the knifes sharpened and setup right. Some of the other things are cosmetic and can wait until I get the time to do it right.

Mike

Mike, I'll sure try to give you a shout when I'm coming down there one of these days when the "Family" don't have me lined up for something every moment I'm going to be there.:D It looks like someone tried to kinda duplicate the feature of the Euro guard, with that home made piece, and really, it is much simpler than those that have the long elevating arm to hold the guard. If you could find a short piece about 14" long of 8", (or maybe even 6") aluminum irrigation pipe and cut a lengthwise section about 4" wide and then cut a slot in it like that piece that is on it now, I'll bet it would work really well. (It might need a little modification to keep it from rotating around the adjustment bolt). I like the euro guards MUCH better than the others, and properly used, I think they are MUCH safer than the type we get here in the US. If your hand slips using a Euro Guard, it won't get into the blade, (especially when face jointing), whereas with the other type, if a board will push it open, so will your hand or fingers.:eek:

The video in the link is good and describes (much better than can be put into words here) what I meant by the 1/8" straight edge method. It should really be a Hoss, and having a Baldor Motor is the cat's meow too. I think you really did good finding that one:thumb:
 
Top