
Tom Clark
Member
- Messages
- 42
- Location
- Deming, NM
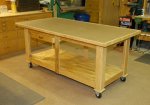
Last year I decided that it was time to build a new large workbench/assembly table for my workshop. When deciding on what kind of construction to use, the design of simple metal shop carts caught my eye. It is easy to tell that they are very useful, as they are always piled high with parts for whatever project is being built at the moment.
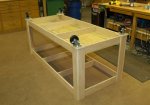
I set a sheet of plywood on two shop carts to help determine just what size the new table should be, and ended up with 40” x 80”. However, this simple project can be built in any size that you have room for in your shop. I build all workbenches to a standard 36” high, so that is how high my table is. This table is extremely strong and stable! Without the casters it would be even more solid.
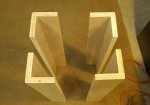
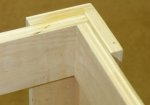
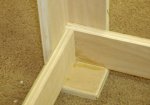
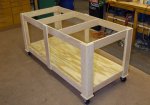
Basic construction uses 3/4” plywood legs shaped like angle iron, and they are strong! Top and bottom stringers are 4” wide, and as you can see the construction couldn’t be simpler. I needed a large shelf under my table, but the area could just as easily been filled with drawers. As a matter of fact, I did add one drawer after finding a single set of left over drawer slides.
Total cost was around $100, as the material was about 2/3 of a sheet of 3/4" oak plywood, some cheap 1/2" ply for the shelf, two sheets of 3/4" mdf for the top, and I found the 5" casters on sale at Harbor Freight for $3 each.
The top is two layers of MDF. The first one is nailed right to the frame, and the second one glued in place. After a 1/2” plywood frame was added around the edges, a sheet of 1/4” Masonite was added for a final, replaceable, top layer. Five inch casters make rolling the table around very easy.
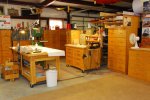
Now my shop has an area dedicated to model building with a large flat workbench, surrounded by custom cabinets designed to keep everything you need right at your finger tips. I just wish I could have learned how to build cabinets years earlier.
There is more photos of the shop and cabinets on my recent shop tour.
I set a sheet of plywood on two shop carts to help determine just what size the new table should be, and ended up with 40” x 80”. However, this simple project can be built in any size that you have room for in your shop. I build all workbenches to a standard 36” high, so that is how high my table is. This table is extremely strong and stable! Without the casters it would be even more solid.
Basic construction uses 3/4” plywood legs shaped like angle iron, and they are strong! Top and bottom stringers are 4” wide, and as you can see the construction couldn’t be simpler. I needed a large shelf under my table, but the area could just as easily been filled with drawers. As a matter of fact, I did add one drawer after finding a single set of left over drawer slides.
Total cost was around $100, as the material was about 2/3 of a sheet of 3/4" oak plywood, some cheap 1/2" ply for the shelf, two sheets of 3/4" mdf for the top, and I found the 5" casters on sale at Harbor Freight for $3 each.
The top is two layers of MDF. The first one is nailed right to the frame, and the second one glued in place. After a 1/2” plywood frame was added around the edges, a sheet of 1/4” Masonite was added for a final, replaceable, top layer. Five inch casters make rolling the table around very easy.
Now my shop has an area dedicated to model building with a large flat workbench, surrounded by custom cabinets designed to keep everything you need right at your finger tips. I just wish I could have learned how to build cabinets years earlier.
There is more photos of the shop and cabinets on my recent shop tour.
Attachments
Last edited:
")