Corner Rounding Jig

Vaughn McMillan

Administrator
Staff member
Messages
36,618
Location
ABQ NM
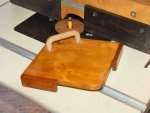
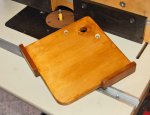
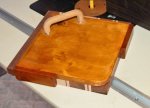
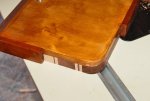
Here's a jig I use for almost every cutting board I make. It gives me a consistent corner radius using a flush cutting bearing bit on the router table. It's a piece of scrap BB ply with a couple maple stop blocks glued and gunned to the edges. I shaped the radius corner on the jig by eye and by feel with the bandsaw, rasps and sandpaper. Prior to making this jig, I was doing them by eye, so I already had a bit of practice. I added a drawer pull handle to make sure I keep my fingers out of the spinny parts. This jig was also a place for me to practice my shellac-applying skills, which, as the pics prove, are sorely lacking. :eek: With no further ado...

The top side:

Corner Jig 1 800T.jpg

The bottom side:

Corner Jig 2 800T.jpg

Sitting in place ready for use:

Corner Jig 3 800T.jpg

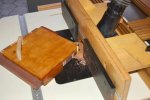
In action:

Corner Jig 4 800T.jpg

After the cut:

Corner Jig 5 800T.jpg

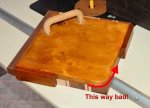
This will be old news to the more experienced folks here, but for the benefit of my fellow newbies, when making cuts like this (transitioning from long grain to end grain) with a router (and I'd guess a shaper, too) you have to pay attention to the grain direction. Always start the cut on the longer grain and end the cut on the end grain. Otherwise, there's a good chance you'll splinter or otherwise mess up the corner. With this jig, I'm feeding the piece from right to left, so I always make sure the long grain is on the left side of the jig. This means I can cut two of the corners, then I have to flip the board over to do the other two corners.

After I radius the corners, I usually put a bullnose edge on the board by making top and bottom passes with a roundover bit, followed by a lot of sanding. I didn't get pics of the board shown in the examples above before it was delivered as part of a set to the customer, but here's the typical end result:
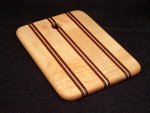
HPIM1780 800.jpg
 
That is a good jig, Vaughn, thanks for posting it, good ideas and good info, I know I blew out a few corners doing it the wrong way :eek:

So, this way good.....
vaughns_corner1.jpg

This way bad....
vaughns_corner2.jpg

Right?

Nice board too! :thumb:
 
you`re correct stu.....the trick is to compress the grain...that`s why when i`m runnin` a bit by hand i`ll "back-rout" or climb-cut...tearout is greatly reduced...
 
Hi Vaughn,
This is a very close to perfect thread. Break it down a bit.
Vaughn has introduced a very good idea for production perfect reproduction. :thumb:
Stu has added some important clarification with beautiful little arrows I must add, and a splash of color, to assure himself and others that what he seems to understand is correct.:rolleyes:
Tod validates Stu's drawing for correctness which is so important, and then explains why, offers an option in a way that he works the wood and the expected results due to using this information.:D
Wrap all this with Alex's compliment and a thanks for posting.:)
Add a real bow with having solved one of Ken's great mysteries of life :thumb: ( I think he is kidding, a little) and you have a complete package.
Thank you all, I have enjoyed this.
Shaz
That's Family Woodworking :type:
 
I wasn't kidding

Really, Vaughn has come up with a way to do something which has eluded me for years. Perhaps not one of life's truly great mysteries, but one I didn't come up with a solution for...until now.
Happy New Year to all,
Ken
 
Hey Ken, " just messin with ya "(there is more where that came from:rofl: ) it is a super solution :) .


"Now about moving those pyramids! Anybody got a month free next year?":rolleyes:
Shaz
 
Vaughn

Great idea, thanks for the post. Do you just wack off the complete corner with the router by taking little cuts or do you trim on the band saw first and then finish up using the jig

Jay
 
Nice jig!

I have one that I made that uses the same concept. Over the years I've mad a lot of counter tops and table tops. I always used a jig saw to cut the radius corners on them before applying the edge banding and laminate. But if you're not VERY careful, you can end up with a cut that's not perfectly square to the top surface. Then you have to use a belt sander to make it square and FLAT so that the edge banding sticks well and looks right. About five years ago a friend of my brothers was opening up a small restaurant. My brother did the design work for the service counters and such. We did all of the work in my basement. It was a LOT of work too because we used three different colors of laminate and they came out looking very nice. But just as my brother was ready to head back to LA after flying in for the week to help me his buddy realized that he needed some tables too. Well that job was going to be mine alone because my brother had to get back to LA the next day. The restaurant had a very "retro" kind of 50's look to it so I made the tables with a nice polished aluminum trim that I applied to the edge of the tables. But the edge needed to be perfectly square and flat in order for the trim to look right. Once the radius on the corners was cut I used a slotting bit in the router and applied the trim to finish it. Oh man, I'm getting off track here. Back to the original subject.... ;)

Out of a scrap piece of 3/4 HD particle board I cut the radius that I was looking for and made it just right and smooth on my disc sander. Then to cut the radius on all of the tables I just screwed the template onto the corner of the table and used a router with a top mounted bearing to cut the corner. I just made the cut in three passes and every corner came out perfect. When done I just remove the screws and go on to the next corner.

Once I saw how well it worked I made up another one that was a little larger and each corner had a different radius on it. That way the next time I went to do a corner on a counter or table top I was all ready to go. The template now hangs on the wall of my shop and I've used it many times.

Take care,

John
 
Top