Finger Joint Jig

Stuart Ablett

Member
Messages
15,917
Location
Tokyo Japan
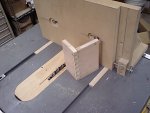
I've been wanting to make one of these for a while, I have a job up coming that I can use this on.
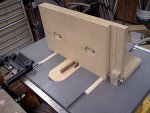
HI370893.JPG
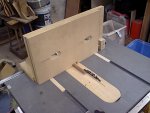
Nothing fancy, 21mm thick MDF, two layers,
the front layer is adjustable, right to left.
HI370891.JPG

HI370892.JPG

HI370908.JPG

Works slick, that is a practice piece I did.

The only thing I'd like to change is to get a finer thread on the adjustment, the thread on there is way too coarse.

I'm also going to make the "Finger" area exchangeable, this will let me easily put different fingers in for different thicknesses of finger joints.

If you have a finger joint jig, then let's see it, I'm always looking for new good ideas :D

Cheers!
 
Hey Wow, Stu actually used his tablesaw. :rofl:

As for my jig, I bought one of these from woodline a couple weeks ago at the Toronto CHW show. It sort of works for med-- I need a better router bit, I thought I had a good one at home so I didn't pick one up when I bought the jig at the show. I've been busy with other stuff, so I haven't worked with it much more (3 practise cuts is not enough to form a fair opinion. I think it will be fine once I tweak my settings a bit and get a better/cleaner router bit.). Seems like a pretty simple system.
 
Built the same jig and used a 1/4-32 threaded bolt. For us that means 1 turn moves it 1/32". Slick jig! Love mine.

BTW, this is one place dial calipers are really handy in woodworking. I use mine to measure the cut width from the dado, then the finger and make adjustments accordingly.

Jeff
 
Yeah, me too, the measurements are the part that makes it a bit tough, but after a few, I got the hang of it, and can do them fairly well now.

I need a shim set for my Dado set, I'm using various thicknesses of cardboard, and even aluminum cans cut up:rolleyes:

Works, but it would be easier with the right shim set.......... I think:huh:

Cheers!
 
Stu, that's a very nice jig you've got there.

Here's mine. :D :D With the digital scale on the east-west movement box joints are dead simple and there's no cumulative error. The last box joints I did were for three toy boxes for my son. Every joint was perfectly aligned and tight.
DigitalRatLarge6.jpg
 
Stu, I don't have pictures of mine in action but you can see a preview of the demo video here: http://www.woodrat.com/dvd.html The digital scales are actually from the Craftsman Gallery here in the US and you won't see them on the Rat in the video because that comes from the UK.

Hope that helps. If I can answer any questions about it I'd be happy to do so.
 
By the way, the method shown in the video for doing finger (box) joints is neat but its different than the way they are done with the digital scale on the east-west carriage. You could do box joints as shown in the video with the digital scale on the north south motion, though.
 
Stu, that's a very nice jig you've got there.

Here's mine. :D :D With the digital scale on the east-west movement box joints are dead simple and there's no cumulative error. The last box joints I did were for three toy boxes for my son. Every joint was perfectly aligned and tight.
DigitalRatLarge6.jpg

Always has to be a show off in the crowd.:D Okay, so I'me jealous.

Nice jig, Stu. I David Marks build one not long ago (much more simple than yours) and was trying to figure out why you's need such an adjustment. But then my senses came back to me and I fgured it out.:thumb:
 
Dave sorta beat me to the punch, but here's mine. In this picture, it's not set up for box joints, but it works very nicely, especially with the Freud box joint blade set:

New Incra Jig Setup 4 - 700.jpg

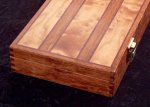
Here's an example of a finished product:

Cue Case 2 800 LR.jpg

:wave:
 
aluminum cans

Yeah, me too, the measurements are the part that makes it a bit tough, but after a few, I got the hang of it, and can do them fairly well now.

I need a shim set for my Dado set, I'm using various thicknesses of cardboard, and even aluminum cans cut up:rolleyes:

Works, but it would be easier with the right shim set.......... I think:huh:

Cheers!


You don't have any trouble with the aluminum cans ripping apart and creating flying guillotines in the air?

Whizzing by, lobbing off ears, cutting arms.. oh the tail of the cat... er.. umm.. sorry, weird imagination...

:eek:
 
Stu,

Nice jig :thumb:

I just recorded an episode of NYW where Norm was showing how to make some of the jigs that he uses. One was a box joint jig, simliar to yours. Instead of putting the jig on runners in the miter slots, he screwed it to his miter gage.

I've watched it a few times, and I'm planning on making one myself. I don't really need it right now, but if I had it, I'm sure I could find a project to do with it. :D
 
I've been wanting to make one of these for a while, I have a job up coming that I can use this on.

View attachment 6243
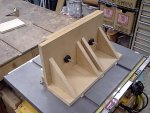
Nothing fancy, 21mm thick MDF, two layers,
the front layer is adjustable, right to left.
View attachment 6244

View attachment 6245

View attachment 6246

Works slick, that is a practice piece I did.

The only thing I'd like to change is to get a finer thread on the adjustment, the thread on there is way too coarse.

I'm also going to make the "Finger" area exchangeable, this will let me easily put different fingers in for different thicknesses of finger joints.

If you have a finger joint jig, then let's see it, I'm always looking for new good ideas :D

Cheers!

Stu,

Have a question about this jig. I am guessing that you used the left and right adjustment to move the indexing pin right next to the dado blade for the 1st cut. Then for the 2nd and all following cuts you set it to the position that it is shown in your pictures.

If the above is correct, then isn't the backer cut by the dado right next to the indexing pin? If this is the case, then how are you holding that pin inplace? (this cut would make a cut immeidatly next to the pin, ineffect making the cut that the pin sits in twice as wide)

I hope this makes some sense.... I couldn't come up with a better way of describing it.
 
Sean, (Not Stu here), but I will try to explain how it works. You set the distance between the blade and the indexing pin the same distance as the indexing pin is wide, then you take one of the pieces you are going to cut and make all the cuts on that piece. Next, you flip that piece around and slide the last notch down over the indexing pin, (that gives you one tab of the piece filling the gap between the index pin and the blade), and then you slide the mating piece up against that piece and make the first cut. Now remove that first piece you cut from the index pin and slide the piece you just cut over so the cut you made butts against and hangs over the index pin and make the next cut, then just move that cut over onto the index pin, and so on across the piece.

(hope this is clearer than mud).:D

Note: The adjustment feature is just so you can fine tune the distance between the index pin and the blade so it exactly matches the width of the index pin.
 
Last edited:
Top