
- Messages
- 8,631
- Location
- Thomasville, GA
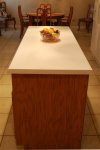
One of the projects I've been working on the past few weeks is a new countertop for our kitchen island. We had the other countertops replaced with DuPont Zodiaq a couple of months ago, but wanted the island to be a bit more 'splashy'.

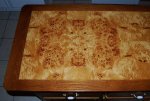
I have a good collection of veneers, so LOML and I looked through them and decided to use some mappa burl for the field of the countertop panel. I made the frame of the assembly with red oak to keep the grain appearance of the cabinets. I dyed the oak to make it darker than the cabinets so it would coordinate nicely with the Zodiaq.
The photos below show the before (typical white laminate) and after. I included a couple of close-ups of the veneer for a better feel of its character. Before starting the finish process, this veneer looked a little plain. A coat of BLO/Naptha helped pop the figure. The finish schedule of shellac, Target WB sealer and Target WB conversion varnish gave the depth we wanted.
I started turning pens to fill in the time while waiting for some of the steps (like finish curing) to complete.
Let me know what you think.


 I'm glad I don't work in your kitchen; I would damage it for sure.


