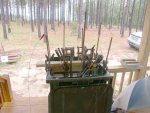
Another 1,000 lbs added to shop floor...

Marty Walsh

Member
Messages
1,396
Location
Southern Georgia
Here I go again...another tool gloat...:rolleyes:

And this one...unlike Denise's lathe...is all MINE! :D

I've been wanting a JLT clamp rack since I first heard of them (thanks to tod!)

Well, eBay let my wish become reality today....actually at midnight last night. I was hoping to find a 6' rack complete with clamps for a good discount. That wasn't meant to be. Instead, I found a TWELVE foot rack complete with clamps...for less than ONE THIRD the cost of new.

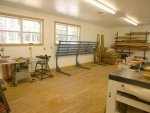
It's HUGE...and HEAVY! Here it is hanging out the back of my truck after the trip home:
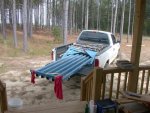
DSCN7341.jpg..........DSCN7342.jpg

With the clamps and rack legs out of the truck, it was time to get that monster out and on it's way into the shop. TIme for the shop crane:
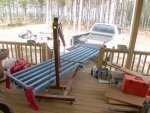
DSCN7343.jpg

Denise helped me guide the rack into position...then helped getting things bolted back together once it was in position. (Thanks Denise!!! :thumb:):

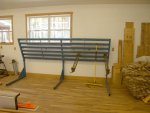
DSCN7344.jpg........DSCN7347.jpg

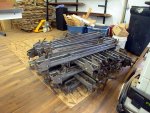
So, there's the 12' rack. Here are the 27 actual clamps that came with the rack:

DSCN7345.jpg.........DSCN7346.jpg

This is a used rack and clamp system. That means there's gonna be a massive cleanup effort to get the four years of glue off the clamps. It's not visible in the pictures...but trust me, they're a MESS! And much to my chagrin, the previous owner liked to use plastic resin glue...so getting it off isn't too easy! :huh:

Here's a picture of a few clamps that I did an initial glue-scrape-off to get into the rack:
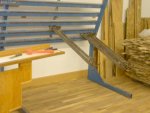
DSCN7348.jpg

I think...once we get them cleaned up...they'll serve us well! :thumb:

Speaking of cleaning off old glue...I've tried lacquer thinner, mineral spirits, and Bix paint stripper. None of them made even a minor dent in the glue. The few clamps I cleaned up enough to sort-of use, I scraped with a 5-in-one and a chisel. We tried a torch...to melt the glue...and are seriously considering lighting a fire and chucking the clamps in to melt the glue. But that seems awful drastic. There's GOT to be an easier way.

Any clean-up suggestions?
- Marty -
 
I was wrong...

I just checked on the JLT site and found out that my new tool is even heavier than I thought...

1450 pounds! :dunno:

No wonder my back hurts tonight...:doh:


Still open to any suggestions for cleaning off old glue...
- Marty -
 
Nice score Marty! I bet you'll find that extra length coming in handy.

I have a chisel dedicated to scraping glue off of my door clamp, but the fire seems pretty tempting if it won't tweak the steel. I've not found anything better for glue removal.

-JR
 
Really nice score Marty!

To take the glue off I'd try electrolysis, do you have a large tall plastic garbage can?

That with some water, and the washing baking soda, plus a 12v DC battery charger and you are in business. The clamps will clean themselves while you do other things, so what if it takes even a week, (I doubt it will) it will also remove all the rust from them clamps.

Just a thought.

Cheers!
 
Nice score on the clamp rack setup. :thumb: I've removed glue from clamps with light taps from a ball-peen hammer. (A point-peen hammer might even be better.) Brittle glues like plastic resin have tended to pop off pretty easily in my limited experience.
 
Marty.....You might try acetone..............Nice score.......I don't have enough Bessies to warrant a clamp rack that big!:eek::rolleyes::D
 
Aha, Marty, I see you've been up to your Jesse James Tricks again, (you know, make a Raid, then lay low for a short while and then make another Raid).:rofl::rofl::rofl: Looks like you hit the Big Time again on this one.:thumb:

I think Stu "Might" have the right idea on the cleanup. I haven't tried it on Plastic Resin Glue, but it has taken off everything else that's been on the metal I've tried it on. Another suggestion would be to call one of the Mfrs of plastic resin glue and ask them if there's anything that will dissolve or soften it.:dunno:

Nice Score, so hurry 'n get them cleaned up so we can see some projects coming off that rack.:D
 
I do think the electrolysis would work, as it deals with the bond between the base layer of steel and the oxidized top layer. Anything that is NOT attached directly to that base layer WILL come off, might take a bit of time, but it is, once you set up the tub, effortless.

I was skeptical about the process removing paint off of my drill press, Kermit, but it did, the parts came out stupid squeaky clean!

jack_up_column.jpg

Before

big_tank_6amps_8hours.jpg

8 hours in the bath........

clean2.jpg

After

Took about 4 coats of paint off of that piece.

Good luck Marty! :thumb:
 
Really nice score Marty!

To take the glue off I'd try electrolysis, do you have a large tall plastic garbage can?

That with some water, and the washing baking soda, plus a 12v DC battery charger and you are in business. The clamps will clean themselves while you do other things, so what if it takes even a week, (I doubt it will) it will also remove all the rust from them clamps.

Just a thought.

Cheers!

Ok Stu,

I really like the idea of setting all these clamps into a bucket and getting on with my work while they clean THEMSELVES!

How about some more details on the process? How much baking soda to how much water? What do I connect to what...positive/negative leads? Etc....

Thanks...
- Marty -
 
Yeah, kind of apealling when you can flip a switch and walk away, and come back in a day or so, and stuff is done..........hey, aren't computers supposed to work like that...... :huh: :doh:

OK, basically you need a DC power source, a 12V battery charger works well.

I ended up using an old power supply from a computer, took a bit of work to figure out which wires to hook up to get the voltage, but ........ it did work.......eventually.

Couple of cautions here.

Don't get this nasty crap in your eyes, and it produces Hydrogen and Oxygen, so best to do it outside, and keep the sparks away from the tub of bubbling soup.

OK the solution, you want washing baking soda, the cooking stuff will work, but the washing stuff works better. What you are looking for is "sodium carbonate". One tablespoon per US gallon of water, adding more washing soda does NOT speed the process up, but adding more amps on the DC source will, to a point.

You want to put some extension leads on your battery charger, to keep the stock ones clean, and so you can place the charger a ways away from the tub. You need a positive electrode, this is some sacrificial steel of some sort, rebar works well, but any chunk of mild steel with work fine, it does get covered with rust.

Mix up your soup, I would suggest filling your container to whatever level you need, and then in a 1 gallon bucket mix up your washing soda and water, if you can, make the water warm, not hot, but warm, as the washing soda does not mix in the cold water so well (or did not for me).

The best way to put the part in the soup is to suspend them from a steel rod on wire into the soup, then hook up the negative lead to the steel rod that the parts are hung on. Your positive electrodes should be surrounding the suspended parts, two is better than one. I put two pieces down the sides of my garbage can, and bolted them in place to the sides of the can, then I ran a wire between the two electrodes and hooked up the positive electrodes, then, and only then, plug in your battery charger.

When ever you unhook the clips from your tub of soup, make sure the charger is unplugged, you do NOT want a spark around all the hydrogen and oxygen coming off the tank.

Make sure that the suspended parts and the electrodes on the sides of your tub NEVER touch.

Really it is a very simple process, and with a decent battery charger, it works well.

You should see bubbles coming off the steel, and there is a build up of soapy brown foam (from the rust) on the surface.


A good link <-
 
Fantastic score Marty! It already looks at home in your shop. Good luck cleaning them up. If you go with the electrolysis, be gentle with the container - I managed to put a small hole (crack) in my container (plastic garbage can) and it leaked out overnight.:(

Wes
 
Marty,

Since it looks like you would have a LOT of electrolysis to do, you may want to take advantage of some more info on Stu's "Kermit" page. (A little overhalf-way down ... search for "electrolysis".)

The 9 electrolysis photos and captions let you in on a big secret: More amperage equals less time in the tub. And he shows how he used an old computer power supply to significantly outperform his original battery charger setup.


Stu,

Did the 5V bulb end up being the only load you needed to "energize" the switching power supply? Did you run into any problems with the "accelerated schedule" provided by the 6 amp output? (Just wondering why your current suggestion is to use a battery charger.)

One more thing. Do you know of a practical limit to the amount of current to use for "home electrolysis"? (Just in case Marty starts thinking a little TOO big. :rolleyes:)
 
HI Kerry

Yes, the one 5v bulb did the trick.

My power supply puts out 6 Amps, IIRC, and that was WAY better than the "trickle" battery charger I had, but I think that Jeff Horton uses a big battery charger, one like an automotive shop would have, and it had a high and low setting, but, again, IIRC, he said there was little difference between the two...... I think it was Jeff........ :huh: :dunno:
 
Just Google Electrolysis rust removal. You will find lots of info. A 55 gallon plastic barrel makes a good tank and should be about the right size for that.

Jeff,

I Googled and as you said, found TONS of how-to's. Thanks!

Stu,

The link you provided is what I was reading, and have printed out at the shop. Thanks! And thanks for the idea to start with!!! :thumb:

Here's where I am...so far:

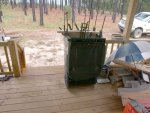
DSCN7357.jpg..........DSCN7356.jpg

Since I didn't have a plastic 55 gallon drum...and since a 55 gallong drum wouldn't be high enough...I opted to "borrow" our 98 gallon trash poly-cart. (Denise's idea, so no grief from her for the borrowing :rolleyes:)

After a good cleaning, and some epoxy to seal the leaks around the handle on the lower back, I had a nice large water-tight bath-tub!

Next, I made a quick run into town to get some 1/2 rebar. I also picked up some Washing soda...sodium carbonate, as opposed to baking soda, sodium bicarb. One of the pages I read said that baking soda would work, but the carbonate form was better. Is it...? :dunno: I guess I can try it with baking soda if I'm not happy with the results.

So, I took the 20' lengths of rebar, cut them into 5' sections, then drilled a small hole on one end of each piece. After clamping them around the interior of the poly-cart, I threaded a piece of bare copper 12 gauge wire thorugh the hole in each piece and hit it with solder and a MAPP gas torch. I now had a ring of electrically connected 1/2 rebar for the sacrificial anode part of the gizmo.

Then I made a 2x4 bridge to lean the glue covered clamp against. Once the JLT clamp was in position, and held fast with a quik-grip, I attached the negative lead from my car battery charger to both the rail section of the clamp, as well as the center adjusting bar. (These two parts touch, but with all the glue and gunk on the parts, I figured seperate electrical connections couldn't hurt.)

I can't imagine what anyone stopping by to visit might think of this contraption on the front porch of the shop. It looks like something from a mad scientists labratory! :bonkers:

Anyway, I plugged in the charger, which was set for 6volt, 2amps, and left the gizmo sit for an hour...

All I can say is WOW! And thanks Stu and everyone else for the idea!!!

When I took out the clamp, after only an hour, I was able to rinse off probably 80% of the glue with a simple garden hose. This is the same glue I was wrestling with last night trying to CHISEL off!

So, here's where I am now:

DSCN7358.jpg

I've put three more JLT clamps into the bath...but I'm out of alligator clips. So, I'm heading into town to get more clips so I can run 4 clamps at a time!

Marty,

Since it looks like you would have a LOT of electrolysis to do, you may want to take advantage of some more info on Stu's "Kermit" page. (A little overhalf-way down ... search for "electrolysis".)

The 9 electrolysis photos and captions let you in on a big secret: More amperage equals less time in the tub. And he shows how he used an old computer power supply to significantly outperform his original battery charger setup.

...

One more thing. Do you know of a practical limit to the amount of current to use for "home electrolysis"? (Just in case Marty starts thinking a little TOO big. :rolleyes:)

Well Kerry,

I'm using a Sears auto battery charger, which has both a 2 and 10 amp setting. I've had it set to 2 amp, but when I get back with the extra alligator clips to hook up the other three clamps, I think I might just throw that switch over to 10 amps :rolleyes:

Less time in the bath is a good thing! ;)


nice score marty! try the battery charger thing...i`ll do mine too if it works.

tod,

I think you're gonna be impressed with the before and after shots I'll post either later tonight or in the morning. Time to find a nice big plastic tub and get a bath ready for your clamps! :thumb:

Thanks again everyone!!!
- Marty -
 
HI Kerry

Yes, the one 5v bulb did the trick.

My power supply puts out 6 Amps, IIRC, and that was WAY better than the "trickle" battery charger I had, but I think that Jeff Horton uses a big battery charger, one like an automotive shop would have, and it had a high and low setting, but, again, IIRC, he said there was little difference between the two...... I think it was Jeff........ :huh: :dunno:

My charger is an authomotive type, probably a somewhat smaller version of Jeff's. The 6V 2 amp setting seems to be doing pretty darn well, but as I go out to the truck to head into town, I think I might just throw that switch to 10 amp and see if it makes a difference.

Thanks again...
- Marty -
 
Top