Dining Table 1

Rennie Heuer

Moderator
Staff member
Messages
11,636
Location
Constantine, MI
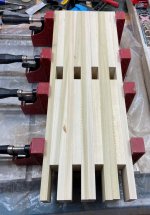
Getting started on this project in a week or so. Small dining table, 64" long, 36" wide. Mahogany with breadboard ends. The legs will have a poplar core wrapped in mahogany. The faces of the legs, 3 1/2" square, will have a 1/8" deep recess, The leg joinery is half lapped aprons in open ended mortices. The aprons extend through the mortices and are topped with a bit of trim to simulate a corbel.

I made some Livingroom tables for this customer last year.
IMG_0572.jpg
This table will sit in an adjacent room so needs to have a 'family' resemblance.
Kitchen Table - 1.jpgKitchen Table - 2.jpgKitchen Table - 3.jpgKitchen Table - 4.jpg
 
Got my popcorn ready. I didn't see strechers in your drawing are the openings in the leg blanks mortises? Inquiring minds want to know ;-)
 
Got my popcorn ready. I didn't see strechers in your drawing are the openings in the leg blanks mortises? Inquiring minds want to know ;-)
There is a long and obscure technical name based in ancient Latin that describes those openings, but for the sake of brevity lets just say I did not have enough lumber to make them full length. :rofl: :rofl:
 
Getting the mahogany veneers attached. Can only do two at a time, using the other two as cauls. I mill the veneer to be 1/16” wider than needed then tape 1/32” shims at the claimp bars to insure I don’t run short on the edges. I’ll clean up one side at the jointer then run them through the planer. Once squared up again I’ll skin the other two sides.

D28DD974-90F7-4612-9895-C69805282CBD.jpegC90F4B70-4DF8-4C8D-AE04-465A0A877312.jpeg
 
have you cut these 'castle' joints, on the table saw,or...?
Glad you asked that.

One 'slot' is actually done when laminating the core by simply gluing in a center piece that is shorter than the two outer boards. After all four veneers are glued on and everything is planed flat and square I use the band saw to cut away the veneer over the gap leaving about 1/32" proud of the core. Then I use a flush trim router bit with a top bearing to clean up the veneer edge and make it flush with the core sides.

The cross groove is a bit more complicated. I built a template that slips over the leg and has a cut out that matches the placement of the cut. It gets marked and then the bulk of the waste is removed on the band saw. Then the template is clamped onto the leg and, using a bottom bearing bit this time, I use the template and a router to finish the cut. Corners are then cleaned up with a chisel.

The aprons are notched on the table saw using a dado blade.

I've seen this done using the band saw only but I think I get cleaner, more consistent results with a template and router.


IMG_1564.JPEGIMG_1568.JPEGIMG_1565.JPEGIMG_1566.JPEGIMG_1567.JPEGIMG_1569.JPEGIMG_1570.JPEG
 
You need to add “Heirloom Creator” to your list of titles and to your business slogan, it’s a true statement.
Wasn't it Charles Neil who had the slogan "Heirlooms Made Daily" or something like that on his trucks? Pretty cool whatever it was.

Rennie, looking good. I am glad to hear how solid the castle-top legs are. Although I don't try to do everything with a router like some folks I am totally with you on a template for these cuts. Looking forward to watching the progress.
 
Top