2021 christmas ornaments from leftovers....

...
those pics inspire me to try my hand at it again.....
They can become very addictive if you set up for batch mode production, the ones with a simple segmented disk are the easiest, assembled as a spindle initially and then just drilled, formed and parted off in spindle mode like slicing a stick of rock using the tailstock centre for support.
Hollowing the larger versions is a challenge but once again addictive when you hit on a holding sequence that allows quick repeats.
 
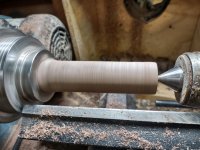
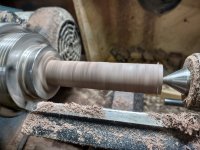
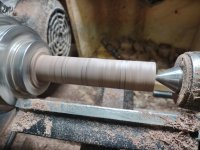
finished the first of the finials today, and test assembled one ornament as well. altogether, it came in at a whopping 1.1 ounces (with no hollowing).
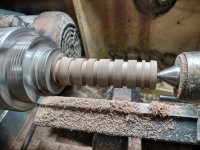
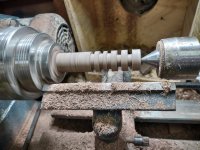
Comes as a bit of a shock when you find a 10-15 gram (~1/2oz.) ornament bends a tree branch.
I do warn purchasers at the local Xmas market that the heavier ones are not suitable for lightweight tree use.

If you want to hollow your small off-cuts, try gluing them with Hot Melt Glue on to short spindle held in the chuck, * keeps your fingers and tools away from the metal chuck should things not go as planned.

* use tailstock to align and support when gluing.
 
looks great dan.

as long as they are light enough, I bet they are good sellers this year.

if I could unbury my lathe I might do some lathe work later on when it gets colder.

not sure I will get results like the pictures you and chas put up, but at least Im using the lathe and havent sold it yet
 
well, the last ones are done, and the whole lot are waiting to be assembled. one thing i had forgotten, is that there may be some new people watching along, not seeing how it was done. so, i have pics (that whole, no pics, didn't happen thing....). first of all, i have the blank in the chuck, and held steady by the tail stock. then, it is rough turned to a smooth cylinder. i have 4 sets of calipers, hard set at 1", 3/4", 1/2", and 3/8" (you will see why). okay, the next step is to have a one inch diameter cylinder, taking the calipers, and a parting tool, i cut notches to one inch in diameter. then, taking a scraping tool, i bring the rest down to the one inch mark. once that is done, i take my story stick, and mark the lines for the detail work. once again, using the half, and three quarter inch calipers, i set the depths for those details, and with the scraping tool, bring them down to cylinders, and make a mark about 1/8 inch from the inside edge. with a detail gouge, i make the cut you see in the picture.
 

Attachments

  • IMG_20211020_163159436_HDR.jpg
    IMG_20211020_163159436_HDR.jpg
    165.8 KB · Views: 6
  • IMG_20211020_163420347_HDR.jpg
    IMG_20211020_163420347_HDR.jpg
    148 KB · Views: 7
  • IMG_20211020_164705495.jpg
    IMG_20211020_164705495.jpg
    184 KB · Views: 6
  • IMG_20211020_163554222_HDR.jpg
    IMG_20211020_163554222_HDR.jpg
    161.2 KB · Views: 6
  • IMG_20211020_163718263_HDR.jpg
    IMG_20211020_163718263_HDR.jpg
    154.3 KB · Views: 5
  • IMG_20211020_164538270_MP.jpg
    IMG_20211020_164538270_MP.jpg
    149.4 KB · Views: 6
  • IMG_20211020_164709255_HDR.jpg
    IMG_20211020_164709255_HDR.jpg
    166.8 KB · Views: 6
  • IMG_20211020_164842615_HDR.jpg
    IMG_20211020_164842615_HDR.jpg
    139.6 KB · Views: 6
  • IMG_20211020_164956537_HDR.jpg
    IMG_20211020_164956537_HDR.jpg
    142.9 KB · Views: 6
to continue, i take the v scraper, and cut a v about a quarter inch or so, from the end of the blank, and with the detail gouge, turn it to a point, (and yes, it does take care of the little hole in the end). the next thing is to cut coves between the line at the left, and bringing the right part of the cove even with the space marked. after that is done, there is more magic to be done with the v scraper. i cut v grooves between the major parts of the finial, no wider than the marked 1/8 inch. with that out of the way, comes the sanding. i go from 100 grit, to 1500 grit. then i apply my pen finish (1/3 blo, 1/3 clear shellac, 1/3 denatured alcohol), buffing it out lightly. then it is a coat of the white hut wax, buffing it out to a nice gloss. after all that is done, taking the calipers set to 3/8 inch, i form the tenon on the end, and part off the finial. since this was the last one to be done, it joins it's 11 other brothers in the box.

IMG_20211020_165107788_MP.jpgIMG_20211020_165216525_HDR.jpgIMG_20211020_165314963_HDR.jpgIMG_20211020_165654867_HDR.jpgIMG_20211020_165825860_HDR.jpgIMG_20211020_165931978_HDR.jpgIMG_20211020_170128917.jpgIMG_20211020_170135791_MP.jpgIMG_20211020_170216512.jpg
 
Top