
- Messages
- 790
- Location
- Central North Carolina
I saw the idea for this drill press table on a YouTube website. The site owner is a German fellow who has quite a few "outside the box" ways of doing things and he is quite talented. His name is Stephan Pohnlien" (hope I spelled his name correctly). Thanks for the idea Stephan.
I made this table, fence, and stop in about 2 hours from scrap and drops left over from other projects. I was looking for a way to quickly set up my drill press for drilling perfectly positioned holes in many identical small parts. When I saw Stephan's table I immediately saw great benefits in it. So I copied his idea, but build kind of an Americanized version of it.
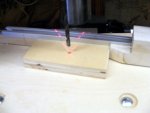
In use, I mark and position the first of many identical parts and place it on the table in position for drilling the hole and hold it in place with my left hand. I then loosen and swing the pivoting fence over until it is against the side of the part and lock the fence in place with my right hand. Then I slide the fence stop over until it is against the part, again using my right and lock it in place. I can then hold the part against the fence and stop with my left hand while I drill the hole with my right hand. Then I can put the second part in place and drill it without needing to mark it, and any additional parts can be placed the same way one at a time against the fence and stop to drill the same hole in the same place in each one of them without the need to mark and align each one for drilling. For very small holes and where I want the best accuracy, I usually use a centering drill bit first. These don't "walk" off position or bend like small drill bits do, so you can get a starter hole positioned more accurately. I do all of the parts in batch form with this centering drill bit and then go back and change the bit to the desired drill bit size, then repeat drilling each hole to the correct size and depth that I want.
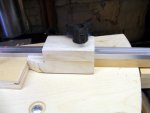
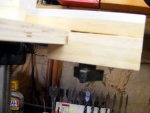
The table itself was made from a rectangular scrap of 3/4 cabinet birch plywood. It can be any size that will work well on your drill press. The arc along the right edge was marked using the left rear pivot location of the fence to scribe a line along the right edge of the board, and then I cut the curve on my bandsaw and then sanded all of the board edges smooth. This arc lets the clamp at the right end of the fence follow the curve, so it can be attached to the end of the fence and not need to change position as the fence pivots.
Th pivoting fence is what is mostly different about this table. There isn't any reason why the fence needs to be parallel with anything except the part being drilled, so a one-hand positioning and adjustment capability is what is great about this one. But having a stop that easily slides along it and locks in position with one hand is nice too, because it eliminates the need to find a clamp and maybe a piece of scrap to make a stop and attach to the fence requiring two or three hands to get into the right position.. I used two 1/4-20 carriage bolts and wing type fixture nuts to attach the wood table to the front to back slots of the drill press table. This lets me loosen and move the wood table forward and back to make it easier to reach and turn the hand crank height adjustment and lock of the metal drill press table. I countersunk the heads of these bolts to keep the top of the wood table surface smooth. The clamp on the right end of the fence uses two 1/4-20 hanger bolts (machine thread on one end and wood thread on the other end). One of these is shorter than the other and just keeps the wood clamp from free rotating. The longer hanger bolt extends through the wood clamp and has a 1/4-20 three wing fixture nut on it to tighten the clamp against the bottom surface of the table edge.
I made my first fence taller, but I have a laser cross hair line generator on this drill press, and the high fence prevented the lines from showing on the work, so I lowered the fence. It is just a piece of 3/4 by 3/4 pine now. On the top of the fence I attached a piece of Mini T Track using screws and epoxy to keep it in place. This T track is designed to allow 1/4-20 hex bolt heads to slide in it, so the clamp is attached with a 1/4-20 hex bolt and another 3 wing fixture knob. Adding this T Track made the tiny wood fence much stronger too.
I have used this table for two projects with many small parts to drill already, and it has been a great addition to this drill press. If you decide to make one I think you will be pleased with your's too. Thanks again, Stephan.
Charley
I made this table, fence, and stop in about 2 hours from scrap and drops left over from other projects. I was looking for a way to quickly set up my drill press for drilling perfectly positioned holes in many identical small parts. When I saw Stephan's table I immediately saw great benefits in it. So I copied his idea, but build kind of an Americanized version of it.
In use, I mark and position the first of many identical parts and place it on the table in position for drilling the hole and hold it in place with my left hand. I then loosen and swing the pivoting fence over until it is against the side of the part and lock the fence in place with my right hand. Then I slide the fence stop over until it is against the part, again using my right and lock it in place. I can then hold the part against the fence and stop with my left hand while I drill the hole with my right hand. Then I can put the second part in place and drill it without needing to mark it, and any additional parts can be placed the same way one at a time against the fence and stop to drill the same hole in the same place in each one of them without the need to mark and align each one for drilling. For very small holes and where I want the best accuracy, I usually use a centering drill bit first. These don't "walk" off position or bend like small drill bits do, so you can get a starter hole positioned more accurately. I do all of the parts in batch form with this centering drill bit and then go back and change the bit to the desired drill bit size, then repeat drilling each hole to the correct size and depth that I want.
The table itself was made from a rectangular scrap of 3/4 cabinet birch plywood. It can be any size that will work well on your drill press. The arc along the right edge was marked using the left rear pivot location of the fence to scribe a line along the right edge of the board, and then I cut the curve on my bandsaw and then sanded all of the board edges smooth. This arc lets the clamp at the right end of the fence follow the curve, so it can be attached to the end of the fence and not need to change position as the fence pivots.
Th pivoting fence is what is mostly different about this table. There isn't any reason why the fence needs to be parallel with anything except the part being drilled, so a one-hand positioning and adjustment capability is what is great about this one. But having a stop that easily slides along it and locks in position with one hand is nice too, because it eliminates the need to find a clamp and maybe a piece of scrap to make a stop and attach to the fence requiring two or three hands to get into the right position.. I used two 1/4-20 carriage bolts and wing type fixture nuts to attach the wood table to the front to back slots of the drill press table. This lets me loosen and move the wood table forward and back to make it easier to reach and turn the hand crank height adjustment and lock of the metal drill press table. I countersunk the heads of these bolts to keep the top of the wood table surface smooth. The clamp on the right end of the fence uses two 1/4-20 hanger bolts (machine thread on one end and wood thread on the other end). One of these is shorter than the other and just keeps the wood clamp from free rotating. The longer hanger bolt extends through the wood clamp and has a 1/4-20 three wing fixture nut on it to tighten the clamp against the bottom surface of the table edge.
I made my first fence taller, but I have a laser cross hair line generator on this drill press, and the high fence prevented the lines from showing on the work, so I lowered the fence. It is just a piece of 3/4 by 3/4 pine now. On the top of the fence I attached a piece of Mini T Track using screws and epoxy to keep it in place. This T track is designed to allow 1/4-20 hex bolt heads to slide in it, so the clamp is attached with a 1/4-20 hex bolt and another 3 wing fixture knob. Adding this T Track made the tiny wood fence much stronger too.
I have used this table for two projects with many small parts to drill already, and it has been a great addition to this drill press. If you decide to make one I think you will be pleased with your's too. Thanks again, Stephan.
Charley
Attachments

Last edited:
