Ah Well, it was About Time for a New Bag Anyway

Vaughn McMillan

Administrator
Staff member
Messages
36,123
Location
ABQ NM
As a preface, let me say this is not the way to cut sheet goods. I'm primarily posting this as a "don't do this" Public Service Announcement. ;)

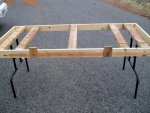
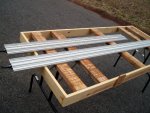
I needed to cut some parts off a full sheet of plywood Wednesday for the toolbox project I'm working on. I don't have a proper outfeed or side table on my tablesaw, so I had LOML helping me support the end of the sheet as I did the cut. We were cutting along the 4' dimension, and for the first cut of the day, I decided to trim about an inch or so off the end of the sheet, partly because there was a chipped corner at that end, and partly so LOML could get a feel for the task I was giving her. That first cut was a bit shaky, because she was wasn't familiar with the feel of guiding it smoothly through the saw. I was using the fence to guide the cut, but since I was supporting the middle of the long edge, I didn't have any control over the 1" strip between the blade and the fence. I knew this was a good potential scenario for a kickback demonstration, but I knew I was well out of the line of fire.

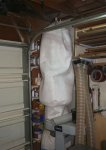
Just as we finished the cut, and almost as if it was in slow motion, the blade gently and smoothly tossed the offcut across the shop and speared the collection bag on my dust collector. Not surprisingly, the air pretty quickly got dusty in the shop. :rofl:

Stabbed Dust Collector 600.jpg

After our little test cut was completed, LOML did a great job helping me make the rest of the cuts now that she had a feel for how I needed to feed the wood into the saw. Plus, the sheet got about 9" shorter with each subsequent cut, making it easier and easier to handle. :thumb:

As a side note, right before we started the second cut, she reminded me that I hadn't turned on the dust collector. I explained to her that it was kind of pointless, seeing as how it was now a dust pump. :D (I did put a new bag on the DC after we were done. I needed a bit of time to figure out where I had the spare bags stored.)
 
Last edited:
Vaughn is that a Harbor Freight collector? Question where did you get filter and also bags. My collection bag wore out and finally replaced it with 55 gal garbage bag which works ok.
David
 
Clean with alcohol, tape from the inside with packing tape, order more bags ;-) For an old bagger I have I put a yard bag inside the old cloth, bottom, "filter" bag. Still going . . . .
 

Attachments

  • DC Bag Cleaned.JPG
    DC Bag Cleaned.JPG
    68.7 KB · Views: 9
I will second the suggestion for breaking down sheet goods with a circular saw.

I've done it on my table saw, but even a shop made cutting guide seems a bit easier to manage with the sheet sitting still.

Glad it was just the dust collector bag!
 
I saw these sometime back at the Orange Borg and if I were doing any sheet work I might consider investing in one of these.
 
Was this off-cut between the fence and the blade? The keeper piece should always be between the fence and the blade. That is why they have 52" fences on table saws. With the scrap/drop piece on the side of the blade away from the fence there is much less chance for it to kick back. When it is between the fence and the blade, the blade can easily grab and throw it.

I'm glad that the only damage suffered was to the bag of your dust collector.

Charley
 
Just might be the time to rationalize that track saw you know you have been wanting.
This is the first time in over a decade I've needed to break down sheet goods, so I'd have some trouble justifying a track saw. :)

Vaughn is that a Harbor Freight collector? Question where did you get filter and also bags...
Darren was right - I get the bags from Wynn Environmental.

I will second the suggestion for breaking down sheet goods with a circular saw...
I broke down another sheet Thursday in the driveway using the circular saw and a plywood saw guide. The pieces I cut on the TS really needed to be exactly the same width. I needed four at 9", another four at 8 1/2", and one at 8 7/8", so I figured I'd use the TS fence to get them all the same. In hindsight, I would have been better off to cut to rough widths with the CS, then do the final cuts with the TS. :doh:

Was this off-cut between the fence and the blade? The keeper piece should always be between the fence and the blade. That is why they have 52" fences on table saws. With the scrap/drop piece on the side of the blade away from the fence there is much less chance for it to kick back. When it is between the fence and the blade, the blade can easily grab and throw it...
Yes on all counts. I was completely aware of all that before I started, but I don't have a 52" fence on my TS. (No room in my shop for one if I did.) That's why I was several feet away from the line of fire.

One clarification on your comment, though. The keeper piece may or may not be between the fence and the blade, depending on the cut you're making. I think a more correct statement is "the operator should always be in control of the piece between the fence and the blade". That was the rule I knew I was breaking. ;) There have been many times when I've cut multiple 1/8" or 1/16" thin strips off a piece of 3/4 or 4/4 lumber, but I move my fence closer to the blade for each cut and have the keeper piece come off the "waste" side of the cut. Here's an example of a cutting board that had various sizes of thin strips:

Incra Board 500.jpg Incra Board Detail 500.jpg
 
Thanks Vaughn. Reviewed what's offered and will order tonight. Beats what I have for the dust in the air.
David
Last time I called them to order some bags, Mr. Wynn answered the phone, and we had a great chat. (This was probably 10 years or more ago.) He told me then that they employed special needs folks to package and ship the bags. I thought that was very cool. :thumb:

By the way, the bags are a tight fit on the HF dust collector. It's much easier to have a second set of hands available to stretch them as you slip them into place.
 
I've tossed my full bags in the truck when I go to the lawn recycling place. Since it's just wood chips, they let me empty them there. I've been using the same 3 or 4 bags for about 5 years now.
 
This is the first time in over a decade I've needed to break down sheet goods, so I'd have some trouble justifying a track saw. :)


Darren was right - I get the bags from Wynn Environmental.


I broke down another sheet Thursday in the driveway using the circular saw and a plywood saw guide. The pieces I cut on the TS really needed to be exactly the same width. I needed four at 9", another four at 8 1/2", and one at 8 7/8", so I figured I'd use the TS fence to get them all the same. In hindsight, I would have been better off to cut to rough widths with the CS, then do the final cuts with the TS. :doh:


Yes on all counts. I was completely aware of all that before I started, but I don't have a 52" fence on my TS. (No room in my shop for one if I did.) That's why I was several feet away from the line of fire.

One clarification on your comment, though. The keeper piece may or may not be between the fence and the blade, depending on the cut you're making. I think a more correct statement is "the operator should always be in control of the piece between the fence and the blade". That was the rule I knew I was breaking. ;) There have been many times when I've cut multiple 1/8" or 1/16" thin strips off a piece of 3/4 or 4/4 lumber, but I move my fence closer to the blade for each cut and have the keeper piece come off the "waste" side of the cut. Here's an example of a cutting board that had various sizes of thin strips:

View attachment 110156 View attachment 110157


I don't even try to cut full or even large partial sheets on my 52" Unisaw. I do my large sheet break downs outside on a cutting table
using a clamp guide and one of two of my circular saws. At work they have a 12" Delta Rockwell saw with 8' side and outfeed tables attached, and a Biesmeier fence. They also have a Leg Up attachment that lets a lone person easily tip a full sheet from the cart up onto the table. This is the only place that I will break down large pieces directly on a table saw. Full 3/4 and 1" sheets are just too heavy to wrestle safely alone. To me, an inexperienced wife/helper doesn't make things safer for either one of you.

I don't intend to debate this. This is just my way and my opinion. You go ahead and do it the way that you want to, and I hope that you have no more "incidents".

Charley
 
Saw a classified over on the other forum for the Makita I have and like.


No affiliation. Just happened to notice. Smokin' deal but, out of the area. Maybe someone else could pick it up for you and eventually shuffle it to AZ.
 
I don't intend to debate this. This is just my way and my opinion. You go ahead and do it the way that you want to, and I hope that you have no more "incidents".
Didn't mean to sound like I'm debating you at all, Charley. What I was doing was stupid and I posted it mainly as a "don't do this" warning for others. (Probably should make that more clear in my first post.) Like I said earlier, I don't do sheet goods very often at all, so I'm ill-equipped to handle them when I do. For the other sheet breakdown I did the next day, I laid the sheet on a piece of thick cardboard in the driveway and used a plywood guide screwed to the sheet I was cutting. Much less pucker factor. :thumb:
 
Last edited:
Harbor Freight sells a very well designed guide for cutting sheet goods on saw horses with a circular saw. They are about $10.00. I have one but have never used it but consider the money well spent if the job comes along. When my sons went off to college I had to figure out how to do a lot of things by myself where previously I would say, "here hold this". Glad no one was hurt, those kick backs have a lot of energy. DAMHIK :confused:
 
Many years ago I built myself a cutting table. It's just a 1 X 4 SPF frame with 2 X 4 cross pieces laid flat and flush with the top of the frame. There is one across the middle and then 2 more near each end, spaced where needed to allow attaching Banquet table metal legs. The frame is about 20 X 70", but the dimensions aren't that critical. When the legs are folded, they fit up inside the 1 X 4 frame against the bottom side of the 2 X 4's. The entire frame was assembled using biscuits and glue so there is no metal in it except for the short screws needed to attach the table legs.

To make it easier to get full or large pieces of heavy sheet stock onto the table, I attached two pieces of 12 mm scrap Baltic Birch to one side of the table with a single wood screw in each positioned off center, so I can rotate these pieces of ply so they extend above the table top surface, or rotate them so they are below the table top surface. When I want to load a piece or sheet stock, I turn these up and then tilt the table over, laying the table on it's side with these pieces down. I can then place my sheet stock on these and against the table, then lift both the sheet and the table to it's upright position, and the sheet is now lying flat on the table. I then rotate these pieces of plywood so they are again below the table surface and position the sheet so that the first cut is roughly down the center of the table. I then position one of my clamp guides and lock it in place. I use either my DeWalt 18 volt saw or an old 7 1/2" Black & Decker Commercial Duty circular saw that I have had for almost forever, setting the cutting depth to cut about 1/4" deeper than the thickness of my sheet to be cut, and then I make the first cut. One of the big advantages of using the cutting table is that at the end of the cut, the last little bit of the sheet and the off cut do not break and neither falls to the floor. They both remain on the table until I remove them. To make an additional cut I just re-position the sheet so the next cut will be roughly down the center of the table, add the clamp guide, and make another cut, and all of these cuts are being made at a comfortable height. With two metal knees I can no longer work at floor level, so this table is a "must have" for me. When my sheet break-downs are complete, the table rests on edge with it's legs folded inside the width of the 1 X 4 frame and leaning against my sheet stock.

I have found two more uses for my cutting table.

1. With a small piece of sheet stock temporarily screwed to the center 2 X 4 I can place my chop saw on it, sitting back about 4-6" from the table edge I can cut molding etc. with the chop saw and stage the pieces to be cut behind the saw on the table, and the pieces being cut in front of the saw. The length of the table works well to keep the pieces from falling too.

2. When additional unplanned guests arrive at a backyard picnic, the cutting table makes a pretty good picnic table too, once a sheet of ply and a table cloth have been added.

Charley
 

Attachments

  • P1010029.jpg
    P1010029.jpg
    185.8 KB · Views: 1
  • P1010030.jpg
    P1010030.jpg
    196.3 KB · Views: 1
  • P1010033.jpg
    P1010033.jpg
    185.8 KB · Views: 1
  • P1010034.jpg
    P1010034.jpg
    182.4 KB · Views: 1
Scary when the saw throws wood at you... I've learned to stand to one side when I use the table saw... the table is just about the same height of parts of my anatomy that I'd rather not have whacked.... I definitely learned after the first whack.
On the dust collector, mine isn't in the shop proper, I built a little shed (looks like an outhouse attached to the end of the shop) that houses my DC. Mine is a Harbor Freight unit that like Glen, I put a leaf bag inside the cloth bag to catch the dust... I need a better filter on the top half... the fine dust still goes through the top bag to the point that out house is layered in fine dust.
I'm very careful with my little table saw... it's a real cheapo and not all that accurate... I can't keep the switch working, the main part of the switch is inside the housing of the saw and fills with sawdust, then jam in the ON position, so I now plug it into a power strip with an on/off switch... I use it only if absolutely needed since I don't trust it and it scares me.... I do cut down pepper mill blanks with it and will rip boards to use in pepper mill blank glue ups...but do that while holding my breath most of the time.
 
Chuck, I have a Delta router/shaper with the switch mounted inside, and it also filled with dust. The switch on my DeWalt scroll saw was also of this same design and it too had the dust collection problem. I dis-assembled the switch and removed the dust, and when I re-assembled it I added some electrical tape around the switch body to seal all of the openings. That was about 5 years ago and I haven't had a problem with either switch since adding the tape.

Your switch is likely constructed similar to mine. My switch has some plastic spring clips that hold the switch body together. Prying these out just enough to get the back of the switch body to separate from the front half allows you to get inside and clear out the sawdust. The contacts are similar to a little see-saw in design and the switch lever just pushes them to one side or the other past center. Just be careful not to loose these and put them back in the way that they need to be. Once back together, just wrap a thin layer of electrical tape around the switch body to seal up all of the openings. It should make a huge difference.

Charley
 
Top