An Oddment of Cherry,

Is this cherry the same as the cherry we have here in the U.S.? The species here is Prunus serotina.

We have several species that can be found in the wild, Prunus avium being native and quite variable, Prunus cerasus, (sour) a none native and oddball bird distributed crosses.

Prunus avium cultivars being the species developed for sweet fruiting orchards, Prunus cerasus cultivars are also popular fruit for orchards, but being sour are more for culinary use.

But Gardens and Parks are awash with flowering cultivars from Japan etc. and you never know what you are likely to find if offered 'Cherry Tree' wood, colour can vary from pale yellow to deep crimson.

Things get confused with growth control rootstocks as well which can throw up sucker growth of totally different characteristics.

'
 
Very clean, and the spacing of the lines around the top is very nicely laid out.

I always have a hard time sanding the inside of deep straight sided pieces like this and kind of give up on getting it "perfect" after the top couple of inches.
 
Very clean work as usual, Chas. :clap: What tool do you like to use for hollowing out cups like this one?
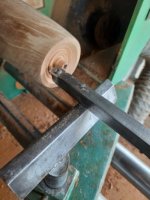
Start off with Forstner bits then finish off in boring mode with home made Carbide tipped tools. (Stiff tool shafts essential for chatter control and decent handle for leverage)
I've often had thoughts about fitting headstock to an old metal lathe bed to make up a pseudo Pattern Makers lathe for this type of work, would be so much easier.

This is on the lathe at the moment and hopefully will turn out into a glass lined vase against a recent request.

cutter.jpg

tool.jpg
 
Last edited:
I always have a hard time sanding the inside of deep straight sided pieces like this and kind of give up on getting it "perfect" after the top couple of inches.

I start off with abrasive wrapped around a split stick.
split.jpg

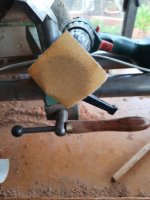
Then I move onto Drill driven sanding pads mounted with square cut sanding sheet, the corner flaps then act similar to a flap wheel and work on the sides of the piece. If necessary with an extension bar.
square.jpgpad.jpg

pads.jpg
 
I think part of the trick is the clean initial cut you're getting with the boring bar, I suspect that would remove a lot of the "texture" problems that are harder to solve with sandpaper.

I've seen the "use the edges of the sandpaper" trick somewhere before, but keep forgetting it :). Good reminder!
 
Thanks for the insights, Chas. :thumb: The split stick sanding trick is a good one...I'll have to remember it. I have a similar square carbide boring bar. It's on a 24" hollow steel handle with a padded grip. I keep it about 1/2 full of lead shot for ballast and vibration damping.
 
I made some split sanding sticks out of various lengths of 1/4" steel rod that I bought at Lowe's. I cut the rod into various lengths and then cut the slot with a hacksaw blade. It works very well and since it is drill powered sanding is accomplished in a flash.

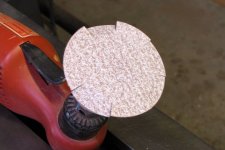
I use the square paper sanding trick as well. I buy partial rolls of hook and loop paper a meter wide and 36 inches long. I used to cut this paper into discs but found that the square cornered wings do exactly as Charles describes. A plus is that it is much easier to cut the squares than it is to cut the round discs.

I also use three inch hook and loop discs on 1" or 2" pads. I make radial cuts to create fingers that allow the paper to conform to whatever internal shape I am sanding. I know everyone thinks it is a sin to start with coarse sandpaper when you are sanding but if you have any internal tear out it is best to go ahead and remove it as quickly as you can. Trying to remove it with fine paper can overheat the wood and cause heat checks. I frequently start with 80 grit on an internal surface to remove rough areas and advance to finer grits from there. On particularly dense woods I will apply a dab of paste wax to the sand paper to help cool the sanding friction down and clean between grits with mineral spirits on a paper towel.

1652265229502.jpeg
 
Nothing wrong with 80 grit in the appropriate circumstances, it's just a multi facetted cutting tool. I aim for 120 start but don't get paranoid if 80 has to be resorted to.
One of the woods I use frequently is Paulownia... you have to start with 60 grit as no matter how sharp your tool, it has a fuzzy surface to start the sanding. It will sand out nicely, but you do work at it for a bit. I usually run up through at least 400.
 
Do you use a Sanding Sealer Chuck? a decently formulated sealer can stiffen any raised grain, seal/fill adjacent pores and act as an abrasive lubricant. I find it can considerably enhance abrasive cutting performance and speed of surface consolidation.

Also with soft and porous wood wet sanding with a sanding sealer can have similar effects to wet sanding with a polymerising oil as it fills open pores with sanding sludge.
Doesn't do much for the longevity of you abrasives useful life though!
I use a sanding sealer after I get the wood smooth.... I usually power sand the lower grits with the lathe running so it doesn't take all that long to knock off the rough bits... when I get to the 120 I usually start hand sanding... with the lathe running.... I'll hand sand off the lathe between coats of the sanding sealer and my wipe on poly.
 
Top