Another remodeling thread

Ken King

Member
Messages
103
Location
Bridgton, Maine
This might get long, but here's some back-story to my latest project.
The last day of December, 2015 we signed the papers of this house. It's an old house, was in fact a barn until sometime in the mid-70's. There are a total of six bedrooms. We have never used the master bedroom for anything but one giant closet because it was in tough shape. The bedroom itself had the dirtiest old carpet in the entire house, and that's saying a lot because they were all filthy!
I started working on that room sometime around May, that first spring. I ripped out the carpet, peeled wallpaper and, well, stopped. It became the giant closet starting then.
The master bathroom was another story. Besides being the most hideously decorated bath we'd ever seen, it was just about unusable. The floor had been ripped up to find a water leak, and very roughly patched. The shower stall was tiny...like 32x32 tiny. The vanity was a plywood box affair, with just two small drawers and doors in the middle.
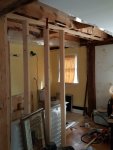
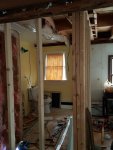
About a year ago we finally decided we wanted to use that room, which is the biggest in the house at about 20x25, and the master bath, so the project started again. I ripped out the walls to the bathroom to increase the size, which would allow a 36x48 shower to fit. And, there it stalled again. Mostly time, as I'd gone back to work full-time, but some budget issues as well.
Two weeks ago my company gave me two weeks off because my wife came back from PR and the management was concerned that she might be bringing coronavirus back with her, and that gave me plenty of time for projects. Having worked full-time for a year also took care of the budgetary issues, so the project came back alive. I've managed to get everything I need now to finish the bathroom part of the project, so it's back on.
Here are a few photos to show you where the project starts from this time.bathroom1.jpgbathroom2.jpgbathroom3.jpgbathroom4.jpg
 
Another couple of shots. The shower pan is only in there in these shots to get it out of the way while I remove "stuff" from the bedroom itself.
The next step in this project is to level the floor. Being a former barn, this house is anything but level. I need the floor level and flat for the shower pan and the tile floor. There will be electric heat mats under the floor tile also. speaking of electric... how about that outlet in the first bunch of pictures??
 

Attachments

  • bathroom5.jpg
    bathroom5.jpg
    107.3 KB · Views: 21
  • bathroom6.jpg
    bathroom6.jpg
    124.8 KB · Views: 21
Wow. Outside of being ugly and in need of a lot of TLC, it is also dangerous. Big task! If the wiring is that bad there are likely similar surprises lurking behind walls elsewhere. Be careful!
 
Wow, What a creative previous owner! Zoiks.

I too, experience 'stalls' on projects from time to time so I totally get it.
 
Yeah, that electric outlet is some true creative stuff. Good thing you're addressing it. Like Rennie said, that's probably not the only electrical surprise hiding the the walls. Please keep us posted on how the remodel job goes. :thumb:

I follow a Facebook group called "Electrical Hacks And Other Screw Ups". It's primarily pro electricians posting pics of things like that outlet that they find on jobs. The pics are entertaining, although sometimes the discussions get a bit heated.
 
Surprisingly, the actual wiring in this house is very good. It was done right, and I haven't found any hacks yet. I can't imagine why that one outlet was plastered in like that though.
Spent the day today accumulating more "stuff" for the remodel. It's amazing how long it takes woman to pick out a simple vanity light...to say nothing of all the other design elements.
 
That wall wasn't papered. I was a bit late with the picture though, the plaster wasn't broken at all until I did it. It wasn't until I was almost done with the demo that I decided I should share the experience.
 
The best development on this project today was going back to work for the first time in two weeks, talking to the boss, and going on vacation before I even punched in. I'm off today and tomorrow and all of next week. I should make some serious headway on this project with that amount of time.
As long as I don't continue to make mistakes like I did today that is. Tomorrow I will start my day with a trip to HD or Lowes for some more drain parts... and gluing them together at the correct angle after I get back home.
 
That I do.
The area where the shower pan goes is now level...after the use of 100 pounds of leveling compound in two pours. I'm still not sure it is high enough to match up with the high point in the floor when I get to where I can level the entire floor. I could not do it all at once because I need to install the shower pan and connect the drain before I can close up the middle of the floor and pour more leveling compound.
The walls are now studded. The ceiling light control boxes and the vent are installed. Tomorrow the ceiling goes up and maybe the drywall.
The second picture is the tile saw that my wife decided I should buy when I went to HF Saturday. I went looking for the little $60 one but those were sold out. I was ready to drive to another store when she pointed to this saw and asked the sales guy if they had "that one" in stock... they did, and now I own it. It turns out this bathroom isn't the only tile job she has planned for me. Weird though...it was the first time she's ever said I should spend more on a tool than I planned.
 

Attachments

  • shower floor leak 5.jpg
    shower floor leak 5.jpg
    89 KB · Views: 22
  • tile saw.jpg
    tile saw.jpg
    226.2 KB · Views: 23
Wow,
So, in the first picture, the leveling compound is actually level compared to the wood work behind it? That is wacky!

Nice score on the saw. Sounds like you've got even more than this job cut out for you!
 
Wow,
So, in the first picture, the leveling compound is actually level compared to the wood work behind it? That is wacky!

Nice score on the saw. Sounds like you've got even more than this job cut out for you!

Yep... that one corner is very low. This house was a barn until the 70's and has moved a lot since then I guess. This bathroom will end up with the only level floor in the entire house I think... though most aren't enough to notice.
Yeah it also appears there's a kitchen floor tiling job in my future.
 
That saw looks very similar to my rigid version. It has been great to use except I usually have to drape some plastic behind the saw where the spray comes off the blade. I tuck the bottom of the plastic into a bucket to catch the water. You may not have to with the extra tray yours has, but if you start getting a puddle on the floor, that is my solution. ;)
 
you need to do something on the white wood contacting the concrete,, it will draw moisture and rot out you studs and bottom plate. nice and level looking shower floor though
 
you need to do something on the white wood contacting the concrete,, it will draw moisture and rot out you studs and bottom plate. nice and level looking shower floor though
I think that is the floor leveler on top of plywood on an upper floor. From my experience it's usually latex based or has the additive and shouldn't cause much if any issue with it on wood contact.
 
That saw looks very similar to my rigid version. It has been great to use except I usually have to drape some plastic behind the saw where the spray comes off the blade. I tuck the bottom of the plastic into a bucket to catch the water. You may not have to with the extra tray yours has, but if you start getting a puddle on the floor, that is my solution. ;)

I plan to leave outside and do a lot of walking, but I will try your method to see if I could then use it in the house.
 
you need to do something on the white wood contacting the concrete,, it will draw moisture and rot out you studs and bottom plate. nice and level looking shower floor though
The wood that is in contact with the leveler has been painted with the latex primer for the leveler so I don't anticipate a problem. Also, as Darren said, it's leveler and not concrete, so I don't think it's an issue anyway, and I hope not, but the primer should be the sealer anyway I'd think.
 
Top