Another remodeling thread

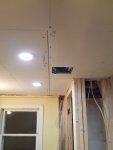
So, today's simple task of repairing the ceiling has turned into a real project as I discovered the ceiling is about as level as the floor was. I need to make it level because the wall behind the vanity and toilet will be shiplap with its level horizontal lines. That makes even a little tilt in a ceiling look like a playground slide.
My tapering jig is getting a major workout today as I make tapered extensions for the bottom of the ceiling joists to nail the new ceiling to. I think I've used the jig more today than all the times over four years or so that I've used it combined
 
I thought I posted this last night, but I don't see it so I guess I didn't.
The ceiling is now up and level. It was my intention to do the taping and mudding this morning, but instead decided to separate the wiring for the light over the vanity and the ceiling lights. That meant taking down a piece of the ceiling that luckily was a small two foor by two foot piece behind which was a junction box where the two circuits were joined. I separated them so now there's two boxes behind the ceiling and ran the wire from the new box back to the switch box. I separated them because I decided the ceiling lights should be on a dimmer, but the vanity lights should not.
That was pretty much the entire progress for the day as we went to my daughter's house 2.5 hours away, and then after about a 3 hour visit, drove home again.
 

Attachments

  • ceiling leveling 5.jpg
    ceiling leveling 5.jpg
    66 KB · Views: 14
The junction boxes aren't accessible without taking down the sheetrock?
They are not. There isn't any way to make them so. I can't run new wire to the vanity light without removing a wall that I don't need to remove, and that wire is about 6 feet too short to get to the switch, so I really have no choice but to do it this way.
 
If the box is not easily accessible (box opening facing up) on the floor of the attic then (if I understand it correctly) you have a code violation. You are not allowed to hide a junction box behind drywall. The connections within must be accessible simply by removing the cover, not the ceiling. You may wish to rethink your solution. :twocents:
 
Anyway to put an extension ring on it to make it accessible outside the drywall? Having bought a home that the previous owner did that to, I've been pretty miffed at them for doing so when few issues came up. One of them had loose connectors in it and had been arching. Another place they simply tapped up the connectors and stuffed them in the wall, no box.

Another option would be to only open up some areas of drywall, to run some proper wiring, and patch things up.
 
I know it isn't what you want to hear, but now is the time to do it right. Darren has given you a couple options. Another way MIGHT be using the old wire to pull in a new one. Moving the J-boxes or adding an extension ring so the cover is exposed on your ceiling will be the easiest if not the prettiest.
 
I would have used the old wire to pull a new one except that the old wire is stapled in place, so there's no pulling it. I could have put them so covers could have been added through the ceiling, but two covers a foot apart is not the effect I'm looking for in that room. There's no way those wire nuts will loosen in there, I do twist them tight with pliers. My preferred way would have been to run one wire, but that just isn't possible.
I too have run across situations where people used wire nuts and tape, with no box and shoved them behind a wall. That one makes me shudder.
 
I see you are between the proverbial rock and....

But you still need to deal with the boxes behind the drywall being illegal and a fire hazard. Can you access the attic space above? If you could turn the boxes 180 degrees so they face up into the attic that might be a fix. Would even help to label the cover for some future homeowner.
Yes, I could probably do that.
 
There you go!:thumb: We're really not trying to make your life miserable.:)
Oh, I'm aware of that. I know you guys are trying to be helpful. I've been thinking about it, and I think I can completely eliminate at least one of the boxes if I go into the attic. I think I can pull up a floorboard and run a new wire all the way from switch to vanity light that way.The other box is new wiring anyway so I may also be able to redo that wire, which would get rid of both junction boxes. There is no drywall on the switch wall yet, so running wires in it is easy... I'll check out this approach tomorrow if time allows.
 
An update.
There are no more junction boxes. However, to accomplish that required some serious work, which isn't done yet. I rook up 3 attic floor boards, and took down part of the ceiling, to include cutting a small square in the part of the new ceiling that is just to heavy for me to take down and put back up again. I'm certainly not looking forward to repairing the cut line, but I'm sure I can do it. Also, I decided to change the way the control boxes for the lights are mounted. Before the removal of the junction boxes the control boxes were not really accessible, so I moved them to a board that is mounted between the attic floor joists. Now accessing them requires only pulling down the light(s) and reaching in the hole.
I was unable to pull the original wire to the vanity light, so I cut it out in all the areas where I could access it, and replaced it with one continuous piece, eliminating the junction box.
I wasted quite a bit of time this morning trying to replace a 3-way switch for the flood lights on the side of my house. The 3-way in the kitchen has always turned these lights on and off just fine, but the 3-way in the back hall did not. We discovered when we first moved here that if that switch is in one position it shuts the flds off, and then the kitchen switch will not turn them back on. Therefore we have always just left it in the position that allows the kitchen switch to work, but yesterday I bought a new switch and replaced it this morning. It made no difference, it still could only shut the lights off. I traced wires, chased voltages, and damn near went crazy, and all to no avail, it still "works" exactly the same way. Someday I'll get back to it again.
 
Good deal on eliminating the junctions!

Three way switch circuits have drove men crazy from the time of invention. Typically you'll have a two sets of wires at each box, one with two conductors, then another with three, which is the one going between the two switches. The two conductor wires usually one switch is getting the power feed, the other switch has the two pair going to the light. If your configuration isn't this way, let us know and we can try to help you sort it out. And it could be that the other switch needs replaced. so maybe try the old one in its spot.
 
Yep, that's the case here. I have determined which has the power, and which goes to the light, which traveler gets the power when the powered switch is flipped, and even swapped out the switches, oh, and then swapped the travelers as well. I even bought two switches before I started. However, one of the new switches is broken, so I could not replace both switches...yet. I will get a new one when I get the chance and replace the remaining old switch, hoping that's the cure. However, unless both old switches have failed I doubt it fixes it, because as I said, I did swap the switches at one point. Of course it could be that I swapped the old switch in before I really had the wiring sorted I guess.
 
Ken, It may be that the switches were never connected correctly. Your 3-way switch will have one dark screw and two bright screws. When tracing the circuit, make sure the black (hot) wire of the power is connected to a dark screw of one switch and the black wire of the load (lights) is connected to the dark screw of the other switch. The white (neutral) wires should be connected inside the boxes. The remaining wires (probably red and black) connect to the bright screws of each switch. I usually make both switch connections the same, but it doesn't matter as long as the correct wires are connected to the dark screws. When people replace these switches, they often put the wires back exactly the way they came off the old switch. However there is no standard for the location of the dark screw, so if that changes, things get weird quickly. :)
 
Thanks for the replies, guys.

I learned the correct wiring for these just yesterday after it didn't work about the third time. I watched several youtube videos, spending even more time on the project. I had a chance today to go to the big orange store and bought another new switch. If I do install it tonight I'll report back.
 
Top