Another Urn

I didn't think we needed another thread from me about urns so I will just tag these on here. Similar construction to the one above; dovetails this time.

2022051148_Urn-Walnut-1n2(1).jpg.ba9de5d7976157cfb6a35fd4531f2396.jpg

The top is a floating panel. The scribble on the piece of paper is the targeted profile.

1313787711_Urn-Walnut-1n2(2).jpg.92625b225638ee94d4e91d10c339af61.jpg

The joinery goes like so.

1319387374_Urn-Walnut-1n2(3).jpg.a53139bc968ef63b1d16fe1e939b8117.jpg


378885944_Urn-Walnut-1n2(4).jpg.6c8b67e4895e9cd7666de6411a3de8dc.jpg

And it ends up like so. Here I have it taped off as part of the finishing process.

2107972588_Urn-Walnut-1n2(6).jpg.01eb9c75c4acbb4d5cb3e0c7702679ab.jpg

The bottoms are fitted as in the first one posted above. I cut the small rabbets with a FTG blade.

693760979_Urn-Walnut-1n2(8).jpg.a8bb4a43d5675b16fd043a189abdfe43.jpg


954316338_Urn-Walnut-1n2(9).jpg.4d83460781d2e1436beea6dd1804e53c.jpg

You can see that I pre-finish the top edges of the boxes prior to assembly. I also pre-finish the panels. This prevents any peel-a-boo appearances of unfinished areas during wood movement.

1158995275_Urn-Walnut-1n2(10).jpg.fd7090261671bd0dc047215a8c70cdce.jpg

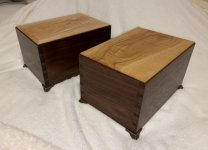
This one is black walnut and curly white oak.

1773866901_Urn-Walnut-1n2(11).jpg.36467c87d829ad0fef3dd848ad8af193.jpg


This one is black walnut and pecan.

789866178_Urn-Walnut-1n2(12).jpg.0015f2d640e0683b3436538aa2e62c46.jpg

This is just the initial top coat. I'll add a pic once they are truly done with feet and all that.
 
My local virtual woodworking club (NCWoodworker.net) discovered some years ago that some of our Veterans cremains were being buried in cardboard boxes and styrofoam coffee cups in our National Cemeteries and we decided to do something about it. We have set up a system that has been working well to provide urns for our Veterans free of charge to the Veterans and families. Several sawyers around the State have agreed to donate hardwoods to this project, and one member pre-cuts this material and assembles kits of the lumber and hardware, which are then stored in warehouse space that was provided and donated by The Klingspore Workshop Store chain. Our members who wish to build the urns then receive these kits, build and finish the urns and they are then again stored in the warehouse until needed.

One of our members assures that every one of the National Cemeteries in NC has a supply of these urns to use whenever needed. A laser cut emblem for the Veteran's branch of service is then glued into a recess in the face of the urn and a similar sized emblem containing information about the club and that the urn is being provided free of charge to the veteran "with thanks for their service to our country". If the Veteran will be buried in a family plot in some other cemetery, the family can request one of these urns and it will be sent to them, also for free. The Veterans themselves can also receive one of these urns before their death, also Free if they request one from us.

Our urns have had several size changes since the beginning, when it was found for one reason or another, that they didn't fit certain crypts or for other complications, but they are large enough to receive either the standard plastic or cardboard boxes that come from the crematory, since no one other than the funeral homes have agreed to open these to transfer the cremains into the urns. With the correct size this transfer is eliminated and the National Cemeteries have agreed to place the sealed cremains boxes in our urns, affix the branch of service emblems, and seal the urns before the grave service.

For construction, lock miter joints are cut in the four side pieces during the kitting process, as well as pocket holes for one screw in the center of each side piece from the inside, to allow joining the top. Screws in countersinks through the bottom allow removal and replacement of the bottom, for access. The hole pattern of these are intentionally different to assure that the bottom is never misoriented when being replaced.

Charley
 
Figure I may as well just keep rolling here . . . I was unexpectedly called away. This left the finishing stage at an odd stopping point. Short story is that I decided to strip the boxes.
Urn-Walnut-1n2 (16).jpg
I used Citrustrip and it worked just fine. A card scraper helped with some stubborn stuff that gravity had taken control of.
Urn-Walnut-1n2 (17).jpg
I took advantage of the situation and cleaned off the striking knife marks aI had left on.
Urn-Walnut-1n2 (18).jpg
I now have a base coat of color on the boxes.
Urn-Walnut-1n2 (19).jpg
They will need a little more love along with the tops. Then they will get a top coat . . . hopefully without interruption.
 
I can't believe I hadn't commented on this Glenn. As others have stated, I am so sorry to see what you are having to create/build. Also condolences on the loss of a family member.

Beautiful work and a wonderful way to keep their ashes.
 
Top