Greg,
Here are some details for the tension/tilt rod attachment that I tried to describe in words. I should point out that I did use solid brass and not brass plated eye screws. Brass was much easier to bend.


I also should have discussed the adjustment screw. When I built the prototype, I discovered that the louvers would not stay in position. So, I built in an adjustment screw to tighten one of the louvers and keep it from moving unless someone moved the tension/tilt rod. I put the access hole for this adjustment screw on the hinge side of the shutter. I also put a neoprene

Here is a line drawing that attempts to show how adjustment screw is constructed. I drilled a hole all of the way through on one of the louver holes about 3 up from the bottom of the shutter. I used that as a reference to make a stepped hole from the outside. I then counter drilled a hole so that I could put a threaded insert into the hole. I used a 10-24 screw and put a neoprene washer that I found in the plumbing area of a local hardware store (not one of the big box units). This neoprene washer was just a little bit bigger in diameter than the hole. this allowed just enough friction to keep the screw from working loose as the louvers move. These shutters have been up now for over 2 years, and so far, the adjustment screws have not moved a bit.

As for how long it took to make/fit/paint/assemble a shutter. To answer this question I must give you some background and go into "True Confessions and Excuses of a Woodworker". Also, the answer to that question really depends on who you ask. And if you are talking about calendar time or hours spend working on the shutters.
Background:
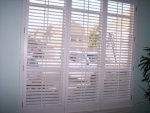
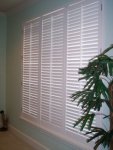
I got started building the plantation shutters when we moved into our new house. While we were waiting for the house to be finished, LOML had plenty of time to think about how she wanted the house to be decorated and what window covering she wanted. She picked plantation shutters. When she brought me the estimate for the shutters I about fell over. I could have bought a new fully loaded Toyota Tundra for what that estimate was. Well, what does any good woodworker say when they are ask to agree to purchasing something made out of wood. "I can make that for much less and they will be of much better quality. All I need are a couple of new tools and I can start building the shutters. It shouldn't take too long."
And so, the stage is set. We move into the house and several weeks later a big truck pulls up in front and delivers the first set of tools to do this project. LOML gets plantation shutters and I get new jointer, planner, and dust collector.
Excuses:
As I said, I spent some time doing research and building a prototype. For a while there, it seemed like every time I planned to go out and work on the shutters, there was some other project in the new house that needed to be done (excuse number 1). So, the prototype got done and I got started on the real shutters. As I said earlier, I had to make frames to go around the windows. These frames served two purposes, make the window square and give a place to attach the hinges. Many more excuse number 1 things came up and before I got back to working on the shutters.
Then excuse number 2 started happening. I had to make a lot of out of town business trips. Excuse number 3 was a ton of extra work piled on at the job. This really didn't leave much time to do any type of woodworking.
I also had some medial things come up and that keep me out of the shop for about 6 months during this time (excuse number 4).
True Confessions:
I did make the shutters all in one batch. That was about 170 sq/ft of plantation shutters to make. I still have more to make, but LOML has other things she wants done first. Since I had so many windows to make and the plan at the time was to make many more than the 7 I had made in the first batch, I spent quite a bit of time building jigs and fixtures to make this process faster when I build the next set. Some of those worked out, some didn't. For example, I tried to make a setup to space the holes down the inside of the stiles. I never did get that to work, the little bit of being off and the slop would build up as I went, and the holes would get out of alignment.
Actual Time:
From a calendar time basis, and due to all of the excuses I talked about above, it took about 2 1/2 years to get the first batch of shutters up on the windows. Have you ever heard the quote "If you live with a woman in a house without window coverings long enough, she can turn into a witch"? Well, LOML didn't turn into a witch, but some times she would get the big Harley broom out and ride it around just to try and make things happen faster.
From an actual hours spent on the shutters, I estimate that I spent about 100 hours building the first batch of shutters. This includes the time that I spent working on jigs an fixtures to make the next batch easier. It also includes the time I spent fixing things that were just plain dumb on my part. For example, (another confession) the first shutter I painted, I used regular latex paint on. I let that dry, and then after several days, I stacked the louvers together to give myself a place to work on the next shutter. I then got sent out of town for 2 weeks. Do you know that happens to latex when it is stacked in direct contact for 2 weeks shortly after being applied. When I came back to start working again, the louvers were a solid mass. I spend a huge amount of time breaking those apart and then striping the latex off (that is when I switched to the Fuhr coating).
I also talked about how long it took, it depends on who you ask. If you were to ask LOML, she would say that it to way too long.
So, most likely more information than you wanted, but that is the good, bad, and ugly of my building shutters. I learned a bunch on those, and I'm sure that the next batch will go much faster.
Mike

 ......so i opt for cheap/replacable...tod