Cleat Fixtures - Sliding Pegs

glenn bradley

Member
Messages
11,547
Location
SoCal
In my ongoing attempt to keep my sanity I am making odds and ends that will hopefully become useful once the new shop appears. I adopted the 'cleat wall' philosophy long ago. It has paid dividends over and over throughout the years. The new shop will have a few cleat wall areas. One is planned for the tablesaw / router table area.

Cleat Wall SU Snapshot.jpg

Don't let the semi-transparent walls bother you. This just makes it easier for me to keep track of where I am when I am working on the drawing. The area you see through the wall is a planned finishing area.

I used to keep my sleds on the ground leaning against the cyclone. Other jigs were in a jumble on an elevated platform to keep them off the concrete. Still others hung on 1/2" pegs here and there. I plan to enlarge or add 1" holes to a lot of the jigs I use regularly. They will then hang from 1 or 2 of the 3/4" red oak pegs on this wall.

Both ends of the cleat will be open so they can be slipped on and off as required (they are not removable except by sliding them off the ends of the cleat). My diligent and carefully controlled laboratory testing environment has revealed that they slide easily into any position along the cleat when unloaded.

Cleat Peg (2).jpg . Cleat Peg (3).jpg

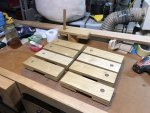
This one is version 2. I managed to stumble through it with small power and hand tools. I ran out of scrap ply and had to use a scrap of BB ply that had been setting on the back patio for about a year; it survived admirably. I will do a production run once I have a tablesaw again. A couple of dozen should be more than I will ever use.

Cleat Peg (1).jpg . Cleat Peg (4).jpg
 
Interesting. Is there a big benefit to have the items captured on the cleat - maybe more secure?
I can see where it would be easier to lift them off and place them elsewhere instead of having to be able to slide all the way to the end to remove and place higher or lower. (this non-captured approach may be the "French Cleat" version) Maybe it just depends on how much rearranging is required over time...
 
I like the capture idea because it keeps the peg board from coming off when you take down a jig, etc., but I think making the bottom part of the capture easily removable would satisfy Rick's desire for easy off.
 
Interesting. Is there a big benefit to have the items captured on the cleat - maybe more secure?
I can see where it would be easier to lift them off and place them elsewhere instead of having to be able to slide all the way to the end to remove and place higher or lower. (this non-captured approach may be the "French Cleat" version) Maybe it just depends on how much rearranging is required over time...

I have others that lift off although they have a double-headed, cut off nail through a hole that puts the nail just under the cleat. The example shown happens to be a clamp rack fixture. Out here where the ground does the watusi we have to take some precautions ;-)

Cleat Clamp Rack V2 (21).jpg . Cleat Clamp Rack V2 (14).jpg

For this purpose specific wall the pegs will be pretty static yet I didn't want them permanent. I do want to add, move or change if required. They are also made to fit the standard cleat dimensions so if they end up migrating away from the "peg wall" that will be a non-issue.
 
Last edited:
Apart from using them in the shop, I also use them on the back of my carvings as they can be pretty heavy and it is easier to hang them up or take them down from the wall rather than having to aim blindly a wire on a hook.
 
Boredom strikes again! A neighbor was tossing some old cabinets made of shop grade plywood. I scrounged it for scrap and added some scraps and whatnot of my own to make more cleat peg fixtures. Between the freebie tablesaw and my CMS I was able to batch out parts that are close enough dimension-wise for this sort of fixture.
Cleat Peg (5).jpg
A couple of simple stops make the drilling for screw holes go quickly.
Cleat Peg (6).jpg
A simple setup at the bench helps me batch out the assemblies.
Cleat Peg (7).jpg
A piece of wall cleat acts as a spacer plus a 1/32" thick piece of gift card. The 32nd seems to be enough to allow easy movement along the cleat. I use glue and hardened screws for the load bearing cleat section. The retainer / stand off block is not glued and is held in place with drywall screws.
Cleat Peg (8).jpg . Cleat Peg(9).jpg
A section of unused wall cleat lets me test the fit and keeps the sub-assemblies out of my way till the next steps.
Cleat Peg(10).jpg
To avoid total brain-death I do batches of different steps rather than 20-odd of this then 20-odd of that. When we get repetition-hypnotised is when accidents can happen.
This complicated looking rig lets me drill the 5 degree holes for the pegs. It's not as involved as it looks and allows me to run through the operation pretty quickly.
Cleat Peg(11).jpg
Soon enough I have a good portion of these drilled.
Cleat Peg(12).jpg . Cleat Peg(13).jpg
Time for a bite of lunch before I carry on . . .
 
I can't help but hear Paul Newman as Butch Cassidy when I say this . . . .

"Well, that oughta do it"

Cleat Peg(14).jpg
Twenty-two of 'em. That's more than I planned on but, when the shop gods hand you neighbor's scrap, you must do your durndest. Now if only I had a shop to hang them in . . . This'll keep 'em out of the way for the next few months,
Cleat Peg(15).jpg
 
Last edited:
I keep a white board in the shop. I jot down things I would like to get done given the time. More cleat wall pegs have been up there for a while. I am between finish coats on the current project so now is a good time.
Despite making more of these than I could ever use . . . I needed some more. I had saved some drawer box material from a bathroom remodel project. This is what is left after cutting the 3 parts to each peg assembly is done.

Cleat Peg(19).jpg
I use glue and hardened screws for the cleat attachment. I just use drywall screws for the lower block as it take little to no stress.
Cleat Peg(20).jpg
The hole for the 3/4" peg as at 6 degrees and stops about 1/4" shy of exiting the back.
Cleat Peg(17).jpg
I use a small retaining screw for the dowel. The "peg in a hole" does the work. The retaining screw just makes sure the peg doesn't fall out. A dab of glue would work as well.
Cleat Peg(16).jpg
Now I need to scrounge around and see if I have a piece of wall cleat laying around somewhere. I just need a couple of pieces about 3' long.
Cleat Peg(21).jpg
 
Last edited:
One of the problems I have in my shop is that instead of having four walls I have something equivalent to two and a quarter, which makes it difficult to have things hanging on them as they are either already full or there is a machine like the TS or other that prevents using that part of the wall.
 
Top