- Messages
- 36,121
- Location
- ABQ NM
I was never happy with the coat rack that I built for Toni's recent challenge. I didn't like the look of the painted plywood, and the shelf was getting smacked when we'd open the front door. (The back side front door is on the very left edge of this photo.) Also, I'd mounted it with regular picture hanging hardware, so it was a bit floppy on the wall when taking things off the hooks.
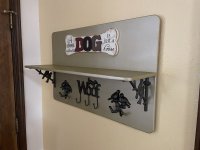
Over this past week I re-did the whole thing. I'm much happier with the results this time. I re-used the hanger hooks, and will save the shelf brackets for a future project. The dog bone sign will be returned to its original state for my wife to do with whatever she wants.
This past Christmas my brother-in-law gifted me piece of 5/4 quilted maple, about 60" long x 10" wide. One of his friends was downsizing and getting ready to move, and he was getting rid of some lumber that he'd inherited from his brother. This piece had great figure, but the board was so cupped and warped that if I milled it flat on both faces it would have ended up being about 1/4" thick. (I see why the friend's brother hadn't put it to use.) As a result, it's been taking up space in the shop until I could come up with a use for it.
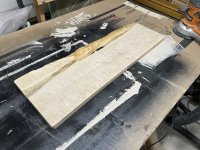
Fast forward to last Tuesday, and I decided to use part of the quilted board for the new coat rack. Here's a pic right after cutting it to length and rounding the corners on the oscillating belt sander. Although it's still a bit cupped, cutting the board in half took care of a lot of the warp issue. (The pencil markings were from the previous owner of the board.)
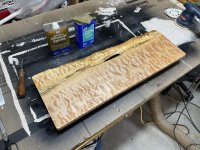
One face of the board had already been planed, so it only took a few minutes of sanding from 80 to 320 grit to get things smooth enough for the first coat of BLO. Here's the board after the first coat.
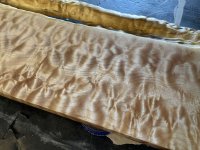
A couple more coats of BLO and then a few coats of Minwax Tung Oil Finish and it was ready to be finish sanded, buffed and waxed. I wet sanded with mineral spirits and 400 and 600 grit paper. Then I applied a couple more light coats of the Minwax finish and then wet sanded with 600 and 1200 grit. Then I buffed it with buffing wheels on the lathe, hit it with Renaissance Wax, and went back to the buffer to put the final sheen on it. It came out very smooth and all shiny-like.
Lastly, I mounted the hooks and used some quake-proof hanging hardware that I had left over from my art installation days. It's mounted very solidly, but can be removed easily. Here's the final result.
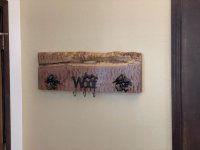
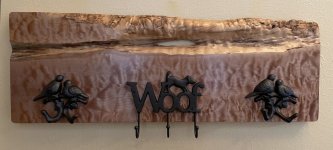
I'm much happier with things this time around. I should have known better than to settle for "good enough" on the first attempt.

Over this past week I re-did the whole thing. I'm much happier with the results this time. I re-used the hanger hooks, and will save the shelf brackets for a future project. The dog bone sign will be returned to its original state for my wife to do with whatever she wants.
This past Christmas my brother-in-law gifted me piece of 5/4 quilted maple, about 60" long x 10" wide. One of his friends was downsizing and getting ready to move, and he was getting rid of some lumber that he'd inherited from his brother. This piece had great figure, but the board was so cupped and warped that if I milled it flat on both faces it would have ended up being about 1/4" thick. (I see why the friend's brother hadn't put it to use.) As a result, it's been taking up space in the shop until I could come up with a use for it.
Fast forward to last Tuesday, and I decided to use part of the quilted board for the new coat rack. Here's a pic right after cutting it to length and rounding the corners on the oscillating belt sander. Although it's still a bit cupped, cutting the board in half took care of a lot of the warp issue. (The pencil markings were from the previous owner of the board.)

One face of the board had already been planed, so it only took a few minutes of sanding from 80 to 320 grit to get things smooth enough for the first coat of BLO. Here's the board after the first coat.

A couple more coats of BLO and then a few coats of Minwax Tung Oil Finish and it was ready to be finish sanded, buffed and waxed. I wet sanded with mineral spirits and 400 and 600 grit paper. Then I applied a couple more light coats of the Minwax finish and then wet sanded with 600 and 1200 grit. Then I buffed it with buffing wheels on the lathe, hit it with Renaissance Wax, and went back to the buffer to put the final sheen on it. It came out very smooth and all shiny-like.

Lastly, I mounted the hooks and used some quake-proof hanging hardware that I had left over from my art installation days. It's mounted very solidly, but can be removed easily. Here's the final result.


I'm much happier with things this time around.
 I should have known better than to settle for "good enough" on the first attempt.
Last edited:
