Craftsman Table saw 113.298720

Dave Gravel

Member
Messages
37
Location
Clinton TWP, Mi
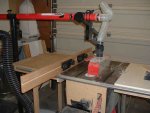
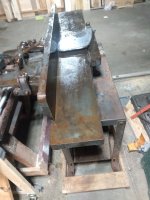
Got an old Craftsman Table saw through Craigslist, guy had a moving sale. See the 113 models allot, from horrible to good saw when taken care of. Well, it's a better saw than anything I could've afforded new, think under $300. Gonna start getting it cleaned up and put back together this weekend.

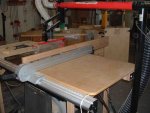
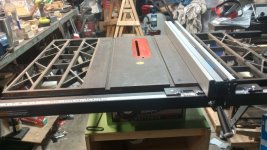
Table has some surface rust, nothing a wire brush can't take care of,v then s couple coats of wax. Even with the rust, the miter gauge slides smoother than the new saws I looked at, with a lot less slop. No play in the arbor. Seen quite a few threads saying replace fence, one guy on another says he cleaned it up, polished the contact points, adjusted it and it moved smooth and locked tight. No money right now for a new fence so I'll tune it up and see what happens. Got a PALS on the way but the way the mail is running, might be a month before I get it. In the meantime, I'll align the blade with a block of wood and cut some push sticks for it.
Looking at blades, thinking the Freud thin kerf 24 tooth ripping blade would be a good fit but also seen posts that people use standard kerf ripping blades without a problem. So, should I get a cheaper full kerf to see how it runs before spending the money on a good blade for ripping or just go with the full kerf blade? I know it's not gonna be able to rip 2 1/2 inch hardwood on one pass. Nor do I have any plans to cut that in the foreseeable future. Like cutting metal with a cutting wheel on an angle grinder, take a little on each pass and it'll get through it. Not sure on a crosscut blade though, thinking one from Freud in the 40 tooth range. Open for suggestions on a crosscut.
When I get the money, the https://ridgecarbidetool.com/saw-bl...-finger-joint-blades/10-ts2000-box-joint.html will be added to my tool box. Note that I want good sharp blades that can be resharpened, not cheap throw away blades.

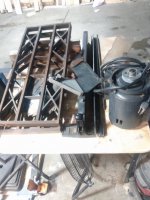
It's on casters but I'm going to make a retractable caster set for it. Plus, being a bit lower for me wouldn't hurt.
I'll post a few pics later, didn't get any before I took it apart to get it in my car to take home.
 
I went the route of thin kerf blades for a while, then switched back to full kerf after having some issues with getting square cuts. A few years ago, I bought this package of blades from Infinity Tools and couldn't be more pleased. They have a good variety of blades and are sharper than any others I've purchased over the years.
 
I did a lot of good work on an old Craftsman 113 series before I upgraded to a cabinet say about 20 years ago. Yeah, the fence is probably the weak point, but it'll do. Maybe take a look at the Incra fence if you want to upgrade. I have the Biesemeier, but I'm not sure of their availability any more. Several folks here have the Incra and speak well of it.

Full kerf blades work okay. I used them before the thin kerf versions even existed. Thin kerf blades do put less strain on the (marginally powered) motor, though.

Regarding the rust on the table: Some WD-40® and a Scotchbrite® pad will work well for cleaning it up.

For the box joints: I have the Freud blade set, and really like it. I've made a lot of boxes with it. If your wallet will withstand it, take a look at the Incra I-box setup. It's the best and most versatile box joint jig I've ever encountered.
 
My ts is a resurrected 113 that I paid $20.00 for. Cleaned up considerably, rewired and added a paddle switch, put on a new 3 hp/220V motor and a link belt. My blade is an Onsrud combo and cuts smoothly with almost glue ready joints.
 
Congrats! I also started with a 1970's Emerson/Craftsman and it served me well for years. Like you I added PALs after spending hours trying to get those table mounted trunnions aligned. The PALs make it much easier. A lot of the Emerson machines use a metal throat plate with a thin lip. I was able to make zero clearance inserts out of laminate flooring scraps by milling a rabbet around the outer edge at the router table. I went overboard and added machined pulleys and a link belt as the vibration was causing me fouled cuts.

I also added a lower shelf to the stand and dropped a 90# sack of redi-crete wrapped in plastic there. Once all that was done the machine really smoothed out but, the fence would no be cured of clamping down out of line. I just checked it front and rear every time I moved it until I could afford an after market fence. The wings were terrible so I just replaced them with 3/4" MDF panels mounted to oak frames with bolt holes in the right spots. I even hung a router wing on it :).

Here's an old picture of it set up with a long auxiliary fence I needed for something I don't remember.
 

Attachments

  • Fence Extn 1.jpg
    Fence Extn 1.jpg
    120 KB · Views: 41
  • Fence Extn 2.jpg
    Fence Extn 2.jpg
    125 KB · Views: 40
My first table saw was one of those.... I used it for almost 30 years.... when I wanted to upgrade the fence I purchased a Mule Cabinet rip fence... I loved it, very accurate and easy to use... I had an Inca on my now cabinet saw and I just could not get comfortable with it.... I am a "tapper" to make fine adjustments I guess. I ended up selling Incra fence and went back to the original fence that came with the saw. The old Craftsman is still in use with the Mule fence... I gave it to my son-in-law about 10 years ago..

 
I grew up using a craftsman, great little workhorse. My dad used to build cabinets for just about every house they owned or he built, hundreds of cabinets. The trick with the craftsman fence is just to set the fence to the measurement from the blade to where you need it, then check the distance from the fence to the miter slot, then set that distance front and back of the fence to the miter slot to get it square to the blade (assuming your blade is square to the miter slots). Always took a bit more time to use and do, but really helped with the quality of the cut.
 
Congrats! I also started with a 1970's Emerson/Craftsman and it served me well for years. Like you I added PALs after spending hours trying to get those table mounted trunnions aligned. The PALs make it much easier. A lot of the Emerson machines use a metal throat plate with a thin lip. I was able to make zero clearance inserts out of laminate flooring scraps by milling a rabbet around the outer edge at the router table. I went overboard and added machined pulleys and a link belt as the vibration was causing me fouled cuts.

I also added a lower shelf to the stand and dropped a 90# sack of redi-crete wrapped in plastic there. Once all that was done the machine really smoothed out but, the fence would no be cured of clamping down out of line. I just checked it front and rear every time I moved it until I could afford an after market fence. The wings were terrible so I just replaced them with 3/4" MDF panels mounted to oak frames with bolt holes in the right spots. I even hung a router wing on it :).

Here's an old picture of it set up with a long auxiliary fence I needed for something I don't remember.
Nice looking saw.

I just brought it home last weekend, still disassembled in the garage so I haven't had a chance to use it yet. But I figure lots of people saying get PALS for the saw to other people and everyone happy after installing gotta be on to something.
Seeing the same with the link belt so I'll probably order the pulley and link belt set next.
 
Congrats....the 113.298720 was top of that heap, or near it, for their contractor saws IIRC. They were never huge on power, so would probably benefit from going with a decent 3/32" thin kerf rip blade like the Freud or Infinity, then you can add a 60T to 80T crosscut blade of your choice for plywood and crosscuts, or even a 40T to 50T general purpose/combo blade if you prefer. Every blade you mentioned is good quality.
 
I envy all you guys with good table saws.... mine is a cheap Delta contractor's saw... not sure of the model... not likely to upgrade either since I use it more as a catch-all table than as a saw... I can rip boards to use in my glue ups for the pepper mills, which is mostly what it does... I do need to replace the switch... it's jammed in the "ON" position, so I mostly plug it in to a switched power strip, make the few cuts I need then unplug it...back to being a catch-all table.
 
Got PALS and new pulleys and belt for it from In-line. Waiting till I can get the parts I need to make a retractable wheel set before I do any cleaning and work on it since I have to take it off the stand. The lighter the better
 
Got PALS and new pulleys and belt for it from In-line. Waiting till I can get the parts I need to make a retractable wheel set before I do any cleaning and work on it since I have to take it off the stand. The lighter the better

On my .113 pictured above, the PALs adjustment screw on one side or the other was a bit fussy to get to due to the saw body. The reason I bring it up is that I fussed my way through it intending to buy a shorter screw for the future. I never got around to it and did not suffer for it. Just trying to save you some time and a trip to the hardware store should you run into the same thing.
 
On my .113 pictured above, the PALs adjustment screw on one side or the other was a bit fussy to get to due to the saw body. The reason I bring it up is that I fussed my way through it intending to buy a shorter screw for the future. I never got around to it and did not suffer for it. Just trying to save you some time and a trip to the hardware store should you run into the same thing.
Thanks for the heads up.
 
Finally making some progress on the Table Saw. Got it taken apart as far as I need to.
Building a new base for it from 1/2 inch Arauco ply. Have the paint for it, going to be green. Adding leveling feet to the stand and going to come up with a retractable caster setup Bought a Delta T3 30 inch fence for it. It's slow going was I only end up with about an hour a night during the week but every step is one step closer to getting it finished. Only thing I did tonight was cut some wood shim for the leveling get to mount them at the right angle. Here's a few pics of it in pieces.
 

Attachments

  • IMG_20211030_182731672.jpg
    IMG_20211030_182731672.jpg
    131.2 KB · Views: 20
  • IMG_20211030_182803387.jpg
    IMG_20211030_182803387.jpg
    129.5 KB · Views: 20
  • IMG_20211104_194836724.jpg
    IMG_20211104_194836724.jpg
    88.8 KB · Views: 20
Looking like a table saw again. Got it on a new mobile base, it's all assembled except for the motor and guard.
Tonight I got the new fence installed. Squared up as best I can till I get the day running and can make a cut. I might end up getting new sides for the fence, the ones on it now aren't flat but I'm not really sure how much of an issue that will be if any.
 

Attachments

  • IMG_20221229_003124718_HDR.jpg
    IMG_20221229_003124718_HDR.jpg
    131 KB · Views: 13
Top