- Messages
- 16,886
- Location
- Reno NV
Just documenting this here in case I need to use it again and forget how to do it.
A little background first. Most acoustic guitars have a slight radius built into their fronts and backs. For the backs, it's thought that it helps focus the sound, and for the front it's more for structural reason. The radii built in to these are typically very shallow.
The radius disk can be used as part of a 'go-bar-deck' which has a top and bottom and uses flexible rods for clamping the braces to the front and back of the guitars. It can also be used for sanding purposes of making sure the braces have the right radius, and sanding the radius around the edge of the sides of the guitar to make sure there is a perfectly flat gluing surface for joining the top/back and sides.

There is a little bit of math required before you go to create disk in vcarve. The following spreadsheet snippet shows the calculations I'm using to figure out how 'deep' the dish needs to be.
Lets do the 16' radius disk as an example. I'm doing a 2' disk, so the chord for the disk will be 2', the radius will be 16'*12 or 192". The formula then tells me that the small sagitta, or depth of cut in the center will be 0.375 inches.

So open up Vcarve and create a project that is 2' square, and 3/4" deep.
The first thing I'm going to do is to create 2 half circles with a diameter of 2'
Arc 1
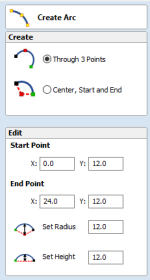
Arc 2
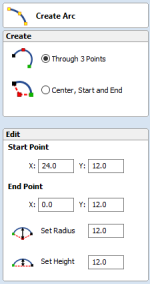
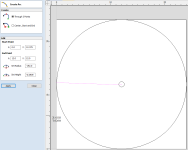
Arc 3 and what it should look like.
I've also added a little circle in the center just to verify the depth of cut. The key points here are the start point having the start point of (0.0,12.375") and the radius being a negative radius of 192. Those match our radius in inches and calculated sagitta. The 'Set Height' of the curve is calculated for us and really has little bearing in how we are setting things up.
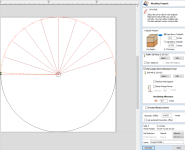
Next open up the molding toolpath tool. Select the outside arc first, and the the arc we want to use as our profile second (That's the arc 3 that we created that is not semicircular).
I've also selected 'Use Larger Area Clearance too', but just set it to the same bit I'm using for cutting the disk. In this case a .25" ball nose cutter. I might up the size of that later, but this is what I have selected right now.
This will create 2 tool paths for the cut. One that 'roughs' out the shape and a second one that does the actual cut.
You should end up with something that looks like this:
Repeat for the other half of the circle.
I also did a pocket toolpath for the center circle, again, this is just to verify that the cuts here are going to the right depth, our 'sagitta' number of .375"
That gives us this circular vinyl record looking set of tool paths.
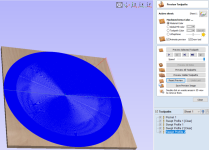
If I preview just one of the sets of swept profile cuts and the pocket cut, I end up with something like this, which is exactly what I want.
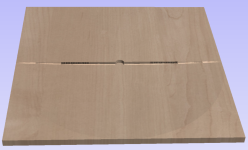
Run all of the toolpaths and there you have it, a 2'x2' 16' radius dish.
A little background first. Most acoustic guitars have a slight radius built into their fronts and backs. For the backs, it's thought that it helps focus the sound, and for the front it's more for structural reason. The radii built in to these are typically very shallow.
The radius disk can be used as part of a 'go-bar-deck' which has a top and bottom and uses flexible rods for clamping the braces to the front and back of the guitars. It can also be used for sanding purposes of making sure the braces have the right radius, and sanding the radius around the edge of the sides of the guitar to make sure there is a perfectly flat gluing surface for joining the top/back and sides.
There is a little bit of math required before you go to create disk in vcarve. The following spreadsheet snippet shows the calculations I'm using to figure out how 'deep' the dish needs to be.
Lets do the 16' radius disk as an example. I'm doing a 2' disk, so the chord for the disk will be 2', the radius will be 16'*12 or 192". The formula then tells me that the small sagitta, or depth of cut in the center will be 0.375 inches.

So open up Vcarve and create a project that is 2' square, and 3/4" deep.
The first thing I'm going to do is to create 2 half circles with a diameter of 2'
Arc 1

Arc 2

Arc 3 and what it should look like.
I've also added a little circle in the center just to verify the depth of cut. The key points here are the start point having the start point of (0.0,12.375") and the radius being a negative radius of 192. Those match our radius in inches and calculated sagitta. The 'Set Height' of the curve is calculated for us and really has little bearing in how we are setting things up.

Next open up the molding toolpath tool. Select the outside arc first, and the the arc we want to use as our profile second (That's the arc 3 that we created that is not semicircular).
I've also selected 'Use Larger Area Clearance too', but just set it to the same bit I'm using for cutting the disk. In this case a .25" ball nose cutter. I might up the size of that later, but this is what I have selected right now.
This will create 2 tool paths for the cut. One that 'roughs' out the shape and a second one that does the actual cut.
You should end up with something that looks like this:

Repeat for the other half of the circle.
I also did a pocket toolpath for the center circle, again, this is just to verify that the cuts here are going to the right depth, our 'sagitta' number of .375"
That gives us this circular vinyl record looking set of tool paths.

If I preview just one of the sets of swept profile cuts and the pocket cut, I end up with something like this, which is exactly what I want.

Run all of the toolpaths and there you have it, a 2'x2' 16' radius dish.
Last edited:


 Wes
Wes