bill kaminski
Member
- Messages
- 450
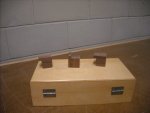
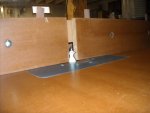
I will try to post my work..first thing that I have made in 3yrs...life does get in the way at times. This is where it stands as of today.


") The left side is definitely the "show" side imho, that one panel has some awesome flame character. The edge detailing on the top also works pretty nicely to give it a bit of visual lift.
The left side is definitely the "show" side imho, that one panel has some awesome flame character. The edge detailing on the top also works pretty nicely to give it a bit of visual lift.