Drill Press Accessory Cabinet

glenn bradley

Member
Messages
11,559
Location
SoCal
This sort of cabinet is fairly specific to the woodworker using it. As usual I looked at everything I could find, threw the parts of each example that I liked into the Waring blender and poured out something that I think will work for me. This build is a bit premature since I have no where to put this until the new shop gets walls ;-) Be that as it may . . .
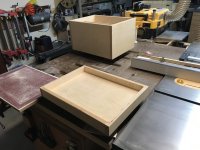
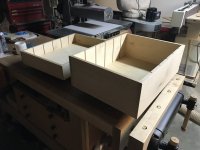
Here's the general idea.
DP-Cab-Wall (1).jpg
The blocks are actually drill indexes for split point, brad point, Forstner and countersink/doo-dad bits.
DP-Cab-Wall (2).jpg
Since I have been out of the shop for a year I am over-emphasizing; test your setups, test your setups ;-)
DP-Cab-Wall (3).jpg
I start by cutting the sides for the upper and lower and one set of top/bottom panels. I cut a reference slot in each side panel.
DP-Cab-Wall (4).jpg
There was some conversation about repeated dados and I showed another version of this jig. These are throw-aways since the likelyhood that I will need 3-1/2" spacing again soon does not outweigh the bother of storing these things.
DP-Cab-Wall (5).jpg
Use the factory base of your router to setup the screw pattern and mount an appropriate sized guide bar the appropriate distance away (see what I mean about throw-away?) and make sure the guide bar moves snugly but easily through the reference slot.
DP-Cab-Wall (6).jpg
Once you have that glue your jig together and go get a cup of coffee.
DP-Cab-Wall (7).jpg
I use a setup bar to align the two sides, clamp them tight and then grab them with the bench dogs so I can get the clamps out of the way.
DP-Cab-Wall (8).jpg
Set your bit depth.
DP-Cab-Wall (9).jpg
And cut a slot riding the guide bar in the reference slot.
DP-Cab-Wall (10).jpg

cont'd . . .
 
Last edited:
cont'd . . .
Rinse and repeat.
DP-Cab-Wall (11).jpg
The carcass joinery is just tongue and dado. Similar to a drawer-lock joint and pretty common for sheet-goods joinery for me.
DP-Cab-Wall (12).jpg
I put a witness mark around the back to remind me where to cut once I take this back apart.
DP-Cab-Wall (13).jpg
There will be a recessed back to allow for a french cleat on the upper and lower carcasses.
DP-Cab-Wall (14).jpg
This is the front and rear of the upper carcass. I will add the panel for the door during glue-up. This assembly will then be cut into two parts to yield the door and cabinet.
 
Cutting the carcass sections is just like cutting a small box for a body and lid. The backer board prevents teearout on the first cut.
DP-Cab-Wall (19).jpg
The kerf-minders keep the parts stable while the other cuts are made.
DP-Cab-Wall (20).jpg
And you end up here.
DP-Cab-Wall (21).jpg . DP-Cab-Wall (22).jpg
 
I'd have tried to build those as two boxes.. your way is much smarter!

One question - would it be easier to put the backs on the "outsides" then just cut it down the middle (that way you could use the same jig up to setup both back panels offset from the outsides) or is there a reason not to do that?
I'm guessing the carcasses will line up 'exactly' the same size and the grain on the sides will naturally match each other.
 
I really could use a cabinet like this. I have assorted drill index boxes scattered in various places, particularly on the small (and only) built-in benchtop in my shop. Weather's warming up, so I might have to take a stab at designing one for myself.
 
I'm guessing the carcasses will line up 'exactly' the same size and the grain on the sides will naturally match each other.
Wait . . . are you guys making fun of my . . . affliction!?! :p
DP-Cab-Wall (23).jpg
I'd have tried to build those as two boxes.. your way is much smarter!

One question - would it be easier to put the backs on the "outsides" then just cut it down the middle (that way you could use the same jig up to setup both back panels offset from the outsides) or is there a reason not to do that?

The door 'front' is a deep recess since it will hold the drill indexes exposed when closed. The cabinet 'back' is pretty normal. It is like each section has a 'back' with the door being the 'front of the rear portion and the door not really having a 'front' panel. The design is specific to ways that I have been doing things for awhile and might not work for someone else; it's a little over-custom-made :)
 
Parts for the bottom carcass.
DP-Cab-Wall (24).jpg
I put a stopped dado in to accept a shelf. I rounded the front of the shelf to fit. You can also notch the shelf to go past the stop point for a squared front shelf.
DP-Cab-Wall (25).jpg . DP-Cab-Wall (26).jpg
I use a scraper to put a sort of 'scratch stock' edge on some trim. The trim is on the inside and won't really show; it is a recovery mechanism ;-) I cut the 1/4" panel a little shy. I was counting on a tight fitting, glued-in, panel to give the door sag resistance under load. I could have made another panel but enjoy doing what I call "recovery woodworking" ;-). The trim will bond the panel to the frame for strength.
DP-Cab-Wall (27).jpg
I forget what this shot is supposed to show . . .maybe just the puzzle box nature of some construction methods(?).
DP-Cab-Wall (28).jpg
The shelf is not glued in. The back is removable. I did this since I know what I will initially do with the lower carcass but, needs change. The 1-2-3 block is a visual aid to keep me drilling straight. Since my retinal surgeries I can get a bit wonky if left to my own judgement. My dad bought a 10# box of these 1-1/8" x #7 oval head screws at a garage sale so long ago I forget when it was. He gave me a coffee can full years ago and I have been using them ever since.
DP-Cab-Wall (29).jpg
I get a cube.
DP-Cab-Wall (30).jpg
And saw the door off as before.
DP-Cab-Wall (31).jpg
Time for lunch.
 
My typical method on shop fixtures is to shellac the interior surfaces (except where glue will go) prior to assembly. I then finish sand the outside and shellac the outer surfaces. Following any necessary touch ups I put a second coat on the outside surfaces. Everyone has their first outer coat.
 

Attachments

  • DP-Cab-Wall (32).jpg
    DP-Cab-Wall (32).jpg
    113.3 KB · Views: 8
  • DP-Cab-Wall (33).jpg
    DP-Cab-Wall (33).jpg
    85.8 KB · Views: 8
Thanks Brent, I needed a quick hinge jig so thought I would show that here . . .
DP-Cab-Wall (34).jpg
It is sized to the hinges I will use. The hinges have been with me for quite sometime having been picked up at a good price from a member.
DP-Cab-Wall (35).jpg
The idea is to allow me to confidently cut a mortise for the leaf and about half the barrel.
DP-Cab-Wall (36).jpg
The 'arm' has a fence. I groove both surfaces of the 'arm' so that I can reverse the fence position.
DP-Cab-Wall (37).jpg
For clam shell doors one is always a little happier if a bit of a gap is planned. I shoot for about 1/32" or the thickness of a used up gift card.
DP-Cab-Wall (38).jpg
The position closest to the fence is for the upper and lower carcass. The second position is for the center hinge on the upper carcass only.
DP-Cab-Wall (39).jpg
While testing I realize that I have cut a bit too deep and the barrel is not right where I want it. I started to shim the jig and then snapped out of it and ripped the 'arm' a smidge narrower at the tablesaw.
DP-Cab-Wall (40).jpg
I use an 1/8" high hinge mortising bit.
DP-Cab-Wall (41).jpg
I zero the plunge using the jig and the surface to be mortised. I then add the additional depth required.
DP-Cab-Wall (42).jpg
This is a good use of my teardrop router plate I made for the Colt plunge base.
DP-Cab-Wall (43).jpg
cont'd . . .
 
Last edited:
. . . cont'd

Leave the jig in place after routing to use as a guide to cut out the remaining corner material.
DP-Cab-Wall (44).jpg . DP-Cab-Wall (45).jpg
I clamp the smaller part of the lower carcass to the larger part for stability.
DP-Cab-Wall (46).jpg
And I just keep doing the mortises with the fence on the left of the jig till I run out.
DP-Cab-Wall (47).jpg
I put the fence on the other side of the jig and do the remaining mortises.
DP-Cab-Wall (48).jpg
Ready for hinges.
DP-Cab-Wall (49).jpg
These hinges are not normally mounted this way so I have to create a recess for the finials. They do not show once the hinges are in place.
DP-Cab-Wall (50).jpg
As I said I do not have any wall space to mount this thing but, this will give you the idea sans pulls and catches.
DP-Cab-Wall (51).jpg
The lower cabinet accepts the plastic bins which are a standard storage form factor in my shop.
DP-Cab-Wall (52).jpg
The door holds my most often used index sets and swing toward the DP operator position. The lower door will have lid supports to hold it at 90 degrees. A generous lip around this 'shelf' will hold all those various things we use at the DP.
DP-Cab-Wall (53).jpg
The catches will be magnetic. I have not decided on the pulls yet but they will be shop made.
 
Last edited:
Things just look more done with pulls and catches.
DP-Cab-Wall (54).jpg
I used magnets in recesses and matching washers in recesses for the catches. I left them proud a bit to leave an even reveal.
DP-Cab-Wall (55).jpg . DP-Cab-Wall (56).jpg
I used a lid-stay for the door/shelf part of the lower carcass. I bought two but, with thee hinges one is plenty.
DP-Cab-Wall (57).jpg
Still need to make the inserts but,
DP-Cab-Wall (58).jpg . DP-Cab-Wall (59).jpg
I have to seal the saw lines on the slab and back-fill a trench because my new shop is supposed to show up day after tomorrow!:bliss:
 
Top