Lora Irish
Member
- Messages
- 115
As the weather gets colder, many of our woodworking friends are thinking about moving back into the house and perhaps taking up carvings. I thought that maybe we could share a few tips and tricks that will help them get started. So I am asking everyone to share one idea, one technique, or one good resource that might help others enjoy our craft. Please share an idea, a link to a thread already posted, or photos of your tips and tricks.
Suggestions to get us started:
What tools do you really need - what is a basic tool set?
What woods do you carve and where do you get them?
How do you sharpen those tools - what does a beginner really need to know about sharpening?
Where do you work, how do you stand or sit, how long to you carve during one session?
What was your first carving project?
Thanks everyone!!!!
-----
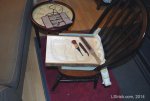
Easy relief carving table!
While over the years I have enjoyed doing some woodworking, carving is my passion. A set of beginner's tools, a bench knife, some emery cloth and a strop for sharpening and you are ready to go. One of the great advantages to carving is that this time of year, mid-autumn, you can easily move your projects from the workshop into the rec room or living room.
Not everyone has a dedicated area in their home for their hobbies. Many of us do our arts and crafts at the kitchen table, on a coffee table in the living room, or just in our laps in the rec room. So I wanted to share this simple, absolutely cheap, cheap, cheap carving table set-up.
Supplies:
One old ladder-back kitchen chair - you can get on at GoodWill for around $15 dollars or less and that you won't mind it getting all dinged up.
One rubber-backed floor mat or scatter rug, 3' x 4' - Walmart has them on sale all the time at $10 or less.
One thick terry cloth towel
Three rolls of non-skip kitchen mats
One small side table - again check out GoodWill when you pick out your chair
1. Put two of the non-skid mats on the floor in front of your favorite chair in the rec room.
2. Put the scatter rug on top of the non-skid mats.
3. Roll the terry cloth towel into a tube and tuck it into the outer ladder rails of the chair back.
4. Put the last non-skid mat on the chair seat.
5. Place the small side table on your dominant hand side, within easy reach.
The non-skid mats keep the chair anchored on the floor. When you need to make extra-hard cuts you can brace the chair with your foot on the front leg rail. The towel cushions your wood against the ladder back, keeping it in place as you work. The non-skid mat under the board also keeps the wood from moving. Because the ladder-back chair has no arms, it is easy to move and turn the carving wood so that you are always pushing the tool towards the chair back.
This set-up costs almost nothing, its easy to put together and then take apart at the end of the evening, and it will make your relief carving so much easier!
- Lora
Suggestions to get us started:
What tools do you really need - what is a basic tool set?
What woods do you carve and where do you get them?
How do you sharpen those tools - what does a beginner really need to know about sharpening?
Where do you work, how do you stand or sit, how long to you carve during one session?
What was your first carving project?
Thanks everyone!!!!
-----
Easy relief carving table!
While over the years I have enjoyed doing some woodworking, carving is my passion. A set of beginner's tools, a bench knife, some emery cloth and a strop for sharpening and you are ready to go. One of the great advantages to carving is that this time of year, mid-autumn, you can easily move your projects from the workshop into the rec room or living room.
Not everyone has a dedicated area in their home for their hobbies. Many of us do our arts and crafts at the kitchen table, on a coffee table in the living room, or just in our laps in the rec room. So I wanted to share this simple, absolutely cheap, cheap, cheap carving table set-up.
Supplies:
One old ladder-back kitchen chair - you can get on at GoodWill for around $15 dollars or less and that you won't mind it getting all dinged up.
One rubber-backed floor mat or scatter rug, 3' x 4' - Walmart has them on sale all the time at $10 or less.
One thick terry cloth towel
Three rolls of non-skip kitchen mats
One small side table - again check out GoodWill when you pick out your chair
1. Put two of the non-skid mats on the floor in front of your favorite chair in the rec room.
2. Put the scatter rug on top of the non-skid mats.
3. Roll the terry cloth towel into a tube and tuck it into the outer ladder rails of the chair back.
4. Put the last non-skid mat on the chair seat.
5. Place the small side table on your dominant hand side, within easy reach.
The non-skid mats keep the chair anchored on the floor. When you need to make extra-hard cuts you can brace the chair with your foot on the front leg rail. The towel cushions your wood against the ladder back, keeping it in place as you work. The non-skid mat under the board also keeps the wood from moving. Because the ladder-back chair has no arms, it is easy to move and turn the carving wood so that you are always pushing the tool towards the chair back.
This set-up costs almost nothing, its easy to put together and then take apart at the end of the evening, and it will make your relief carving so much easier!
- Lora