Keith Thomas
Member
- Messages
- 73
- Location
- florida
I mentioned this once before recently that its been about 10 years since I did any wood working. So I am kinda teaching myself how to do everything again. I have face frames that are kinda 3/16" proud of the inside of the cabinet and I was having trouble figuring out how to get all the slots cut so everything meets up properly. My dewalt plate joiner has the same gage on it that all the joiners have ( I have a porter cable also that has the same scale) but when I just try and go by that I remember always screwing things up. So I tried to figure out a way to make it fool proof ( And I can be quite the fool in the shop).
While doing some test cuts I came up with a great idea. I don't know if this is new but Didn't see it when I was looking for videos on biscuit joinery. Lets face it. there isn't much left to be discovered. But this is what I did anyway.
I have three pictures.
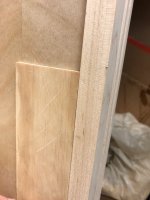
The first should be the piece of wood I cut as a gage. I just thinned a 3" wide piece of flat fine with the table saw. Cut it once and then ran it through one more time to shave a tiny bit off and it was perfect. You could fine tune it with a sander but I'm good at micro adjusting the table saw. Its my only true skill other than the ability to take a nap any where any time. So Now I have a gage to use when setting up the joiner.
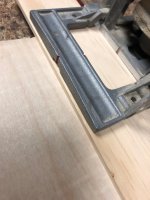
The second picture is of the joiner. I made a slot into a piece of ply wood the same thickness as my cabinet. In my case 3/4". I have 2 joiners so having one set up the correct depth for the ply wood made it easier. I then put the blade into the slot cut into the plywood and adjusted the height until my gage slipped under the fence nice and snug.
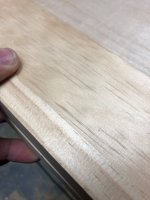
The third picture , because I do not trust anything I do, Is my test cut into any flat scrap piece of wood and then you can put that piece into your test plywood cut and use the gage to make sure it is correct. As you see the gage is flush meaning my cuts will all meet up.
I'm not sure if anyone will find this helpful. I am the type of person who gets depth, height , length AND orientation screwed up on a regular basis. This way I can see what I am actually doing and have something to use to test the cut. It sounds more complicated than it is.
While doing some test cuts I came up with a great idea. I don't know if this is new but Didn't see it when I was looking for videos on biscuit joinery. Lets face it. there isn't much left to be discovered. But this is what I did anyway.
I have three pictures.
The first should be the piece of wood I cut as a gage. I just thinned a 3" wide piece of flat fine with the table saw. Cut it once and then ran it through one more time to shave a tiny bit off and it was perfect. You could fine tune it with a sander but I'm good at micro adjusting the table saw. Its my only true skill other than the ability to take a nap any where any time. So Now I have a gage to use when setting up the joiner.
The second picture is of the joiner. I made a slot into a piece of ply wood the same thickness as my cabinet. In my case 3/4". I have 2 joiners so having one set up the correct depth for the ply wood made it easier. I then put the blade into the slot cut into the plywood and adjusted the height until my gage slipped under the fence nice and snug.
The third picture , because I do not trust anything I do, Is my test cut into any flat scrap piece of wood and then you can put that piece into your test plywood cut and use the gage to make sure it is correct. As you see the gage is flush meaning my cuts will all meet up.
I'm not sure if anyone will find this helpful. I am the type of person who gets depth, height , length AND orientation screwed up on a regular basis. This way I can see what I am actually doing and have something to use to test the cut. It sounds more complicated than it is.