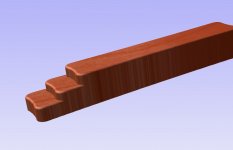
Greene and Greene drawer pulls - in process

Sorry guys, Spent the day moving huge video files around. I also worked on the mic and web cam setup. I took several hours to rearrange the videos. The last video file is 12.7 GB - so you can imagine dozens of video files. Computers get jammed up doing stuff like this. It gets stuck, then you trying clicking more stuff and it gets even more stuck. Then you just gotta walk away and let it catch up.

I still need a couple more shots of the cutters, so you can see really clearly what I am using and how I am doing it.

So, Friday will be the day.

Tidbits - I am hoping you all can get some tidbits.
 
Ohhh there is more to the story. Making you tube videos can be daunting. I am trying to create this next video, BUT. When working from my external NAS drive, the video is VERY choppy. The read write time is a real hinderance. So, I am locked into moving ALL the files for the #2 test onto my desktop. Then I can make the video and post it. After that I can move all the files back to the NAS. Grrrrrrrr. Well it is certainly a learning experience.

I DID start the video and there is some really good content.

I posted a nice video of Beavertail to fill in while we are waiting.

 
I posted a nice video of Beavertail to fill in while we are waiting.

I was thinking that looks almost rideable.. so cross checked some surfing forums.. and umm .. Ok no I guess I'm good watching this one from the shore :)

"Yup - rideable, but not for the faint of heart. Arguably most dangerous wave in RI due to extremely strong currents and varying rock issues depending on where it’s breaking."
 
This is a rather mild day at Beavertail. It is on the south end of Jamestown Island in Rhode Island. What you are looking out to is the Atlantic Ocean. You don't want to be there on a stormy day. The wind and waves are unobstructed from the ocean. Some day I want to go back out there on a somewhat stormy day with my new camera. The toll bridge is around $5.00.

I have kayaked across Narraganset Bay a little more north of this point. Kayaked from Newport to Rose Island, then to Jamestown almost under the Newport bridge. I would NOT call that mild flat water, and I would NOT recommend it for a pond kayaker newbie. Very Very LARGE ocean going vessels go there. Newport navy, Volvo Ocean race, Americas Cup.

There are other less rocky beaches around Newport that surfers use.
 
OK, I know this is not the forum favorite. This is me fighting my way through some design and learning, but.

This is the most current iteration of design. This time It is done ENTIRELY in Aspire. THIS is the model I will use.

I have made a settings change to the "Z" axis acceleration in Mach 3 to match the "X" & "Y".

I am also going to set the "Z" axis plunge rate slower in the tool settings.

****************************************
Just as an aside - RYAN - RYAN - RYAN.
I just gotta tell you. I crashed a cutter yesterday. I was cutting a slot and ran the collet nut into the workpiece. LOTS of smoke - nasty burn in the workpiece.
My setting gage - the one you suggested - came in yesterday. IRONIC.
I am telling you - I WILL - be using it from now on
rant over
***************************************

FINAL.jpg

I think it looks better than the Fusion model.
 
I fought with my machine today. Acel - Decel - max Velocity - homing - spindle not starting. :bang::bang::bang: I had to shut it down and walk away from it. I had visions of dollar with wings flying away. Dollars that I do longer have.

BUT -- I do NOT give up the ghost so easily. It is RARE that a machine beats me.

Additionally, I was on Vectric forum going back and forth about some modeling techniques.
This has been an AWESOME challange.

I made three more GnG drawer pulls today. Sorry, no pics - YET. I am holding them up close to my web cam ---- can you see them??

Well - I can say - they look - almost great. Sorry, but to me they will NEVER be 100% great. Most people will say they look great. I cannot. BUT - they WILL fly.

I took them off the machine, with ZERO sanding. They don't need sanding. Well, yeah they do, but 220 MAX grit and just a little. NOT like you saw me going at it in the first video. NO NO - NOTHING like that at all.

******************************************************************
Ohhhhhhh - RYAN - just as an aside. I took my setting gage and polished the internals a bit to make it work nice and smoothly. I actually used it 4 times already
*******************************************************************

Sorry - well anyway, I will be moving on to the next stage to put in the finger undercuts and the threaded brass inserts. For MY display purposes I will do some finish sanding with a dremel and some polishing buffs. On the Oak, I will stain with General finishes Warm Cherry, and finish off with clear lacquer. I will be making them available on my web store and on ETSY. Now that I have the process, my machine is set to be able to do this, I can make them longer, shorter, taller, wider or for that matter make any shape I want.

SOOOOOO ----- ONWARD!!!!

Ohhhhh - tomorrow I will grab some pics and post the results.
 
Cool, I was hoping you'd get past the edge sanding requirement (and am looking forward to how you set that up). That was a major human time spend.

Would a buffing wheel (or two..) work for finish work? I think that would be a lot faster than the dremel.. but might round things over to much if you don't hit the grits right. But might be a way to finish off batches to a nice polish?

The PEC gauges are imho a really good deal. The one I picked up was as close to as good as the old starret I found at a gunsmiths estate sale (the starret is a smidge lighter and more refined I guess).. but the seconds can be a smidge hit & miss on the final refinement still worth a quick polish..
 
I am going to do a little mini video today. In that, I will show the Dremel stuff. A buffing wheel will be too much. I have a Beal 3 wheel system and would maybe use a soft polishing wheel with compound, but only on the flatter surfaces, as they really don't need anything at all. The end grain is what needs a little polishing, but just a little. You will see.

Today is Friday, so I want to be sure to post at lease every Friday, hence a mini video for today.

Today, I will be going out with Diane, my daughter Shelle (Michelle), and her 2 kiddies David and Anna to the Roger Williams Zoo in Providence, R.I. I will be taking my camera and practicing photography.
 
leo, i know you mentioned you didn't get your coat caught in your jointer, but i have to say that jointing a small piece like that on a jointer without push blocks is very dangerous, you need your fingers for the cnc work you do
 
but i have to say that jointing a small piece like that on a jointer without push blocks is very dangerous, you need your fingers for the cnc work you do

I gotta say that getting a grrripper has totally changed how I do a lot of that sort of thing, super highly recommended.. it's another one of those "it's both safer and a heck of a lot easier" things where you go "why did I put off getting this for so long".

I also made a second "almost the same" as it for a second flat push block out of some scrap and a windsurf board grip "tape" (it's like dense neoprene with a sticky backing). That gives me two blocks for the jointer.
 
Larry, thank you for the advice.

I uploaded a video last night, but as of Saturday morn 9:00 it still has a half hour to go. Maybe loading a 4K video is not a great idea. I will cut that down to STD HD next time. So, it will post sometime today.
 
Those are looking pretty good.

I suspect if you're going to do significant batches you'll end up making some gang fixtures for drilling the holes and indexing the sides. That should be fun!

I did something very similar to what you're doing for the side index for a batch of tap handles (3/8" inserts.. but same idea). What I did there though was I cut the bolt short (well.. I used a couple nuts to "lock" the bolt short.. so it was adjustable) so only like 2 threads engaged - just enough to index it and used a clamp on the other side to push against it to lock it in place. That was super fast per unit (I think I made like 40 or 50 in that set? not sure.. it was quite a few anyway).

The other trick I've found with the screw in inserts is to cut the holes just a wee smidge larger than spec. You only really need maybe half of the thread engaging as it'll push some wood out as it goes in. A lot more than that and I've had a bunch of trouble with pieces splitting. Clamping the sides of the work tight in a vise while screwing them in also helps. I'm mostly going into end grain for tap handles and pushing kind of the edge of "appropriate amount of remaining wood" (even with a ferrule..) so it's perhaps a worse problem than you're likely to have.


On the K cups - I worked out once that the cost/lb was somewhere around $50 for the pre-packed (might have come down since).. There are a bunch of different reusable pods (you could even pre-fill a bunch I think if you're looking for the time saving). Kinda like these ones (although I haven't used any of them so I don't know if these are the "best" or not and some reports the 2.0 still has issues with them - maybe one of the other k-cup users can comment)
 
I hadn't noticed your intro before, very nice job, kind of triggers some interest in me to want to see more on those projects too.

Your lighting was good. I did notice you looking off to the side every little bit and figured that was the reason or for looking at a topic list/prompter.

There was some machine/fan noise in the beginning but you were clear enough, but once it stopped the thing I've noticed is a little distortion in your microphone. I watched it on a couple of laptops and it seems to be with your mic as it was noticeable on both of them and usually the mac is pretty clear. I've had good luck using a lapel mic overcoming the machine noise and distortion, but may require either a wireless setup or separate recording device that can then be overlaid in processing. I've started using the lapel mic plugged into my smartphone when recording and trying to explain things. It could be something you could filter out in post processing also, not sure. However, it's not so bad that it's causing a bad experience, just thought I'd mention it.

As for the fixtures, I'd probably do the same for drilling the holes and batching them.
 
Darren yeah the audio was not so good. Sorry bout that. I had the Rode mic on the camera, and it's not really the bestest. I was tired last night shooting the vid, and editing. I have a lapel mic but have not tried it yet. Nice thing is that I am a real person behind the camera, not just an actor, though I have been accused of a lot of things. I can GUARNETEE that I will do lots of stuff wrong.

I like the voice over - seems to be better that way.

I am really hoping to get this up and running and to do a good job. Constructive criticism is very welcome. Background noise, looking aside - all good stuff. I did notice the distortion. Funny thing is - I did the New Years resolution with the exact same setup. I wonder if battery life is low??

The haters will come on strong in youtube and other sources I am am sure. Why they do that I will never know.

I am working on a fixture for the finger grab and the holes for the inserts. I will make the holes for the threaded inserts as recommended by EZ-LOC.

I really do appreciate your comments - thank you.
 
Top