Robert Horky
Member
- Messages
- 925
Off to a great start. Always wonderful to see how we can help each other out when and as needed. Great collaboration for sure.

All done on the router table. Nothing more than a stopped groove on the legs and used a tenoning jig for the rails. Check out post #13 above. The leg sockets had to be squared up with a chisel.way nice Rennie
? how do you cut your dovetails?


")


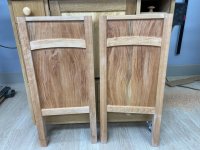
You were not exaggerating!...There's a lot going on in these panels...
Too much?You were not exaggerating!
For my tastes, yes. Especially would you add in the trim. As you said there is a lot that is going on. But the opinion that counts is the customer!Too much?
No, decided not to as the match on the other edge was not as good. Doesn't matter now as I have decided to remake the panels with boards that don't have as much 'drama'. I'll save these for something else...someday.did you rework the panel?
General answer - its what the customer wants. Specific answers, I think the arch makes more sense if you look at the entire table. The front has a long arch. Initially the ends had a cloud lift/arch but the addition of the 'Gamble" trim on the ends made that both impractical and way busy.To me, the arched batten doesn't fit with all the straight lines in the piece. Perhaps if the end rails were also arched, but not as a 'stand alone.' To my eye, the 'extra' ornamentation shown in your drawing makes the whole thing too busy.


Yeah, the customer is always right - even when (s)he's wrong!General answer - its what the customer wants...