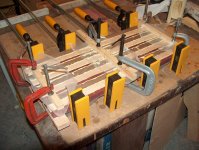
How to clamp and keep it flat

Messages
8,119
Location
North West Indiana
Say a person were clamping strips of boards together to make a 24" X 24" square. Pipe clamps (3) cause the whole shenanigans to bow up. How do you keep that from happening? Will get some pictures and provide more information as it progresses. Figured there were enough cutting board experts on here I could maybe find a solution to my problem.
 
Calling all cauls! I always just used scrap wood. They can be any size as long as they're relatively straight. I use wax paper to keep the cauls from sticking to the project. (Especially handy if you use too much glue like I did in this photo, although I did remove the excess after it had set up a bit.) When I was making a lot of cutting boards, I eventually wrapped a few cauls with wax paper or clear shipping tape. That saved me the step of cutting pieces of wax paper before starting a glue-up. I tighten the clamps holding the cauls moderately tight before I start tightening the bar clamps, then once the bar clamps are tight, I loosen the caul clamps a bit, then re-tighten them. I do that so the different clamping forces aren't fighting each other.

HPIM1926.JPG
 
I don't do cutting boards but do glue pieces together to make pepper mill blanks... didn't know the scrap woods were called cauls...to me just scrap wood to keep the pieces from sliding around.... tend to use too much glue also...

But instead of the waxed paper, which will stick to the glue ups, I use Parchment paper.... glue doesn't stick to it and a piece can be used a number of times before you need to discard.
 
The main difference between scraps of wood and cauls is that proper cauls have a slight curve on the outside edges. This forces the assembly flatter than it would if they were flat because plain flat ones are more apt to bow somewhat up in the middle.

How much that matters in reality depends wildly on a variety of factors.

In practice I've only used flat sticks but I've also had a couple of bowed glue ups that might have been prevented so.. ymmv.
 
One clamp on bottom one on top one on bottom one on top etc, no claw needed
Like Jay I was taught to alternate clamps between the top and the bottom. I also used cauls in really wide glue ups with wax paper under them. Never had a problem peeling the wax paper off if it stuck.

I also suggest using an old chisel to remove glue squeeze out in the area where the cauls are to be placed to prevent the excess glue from being pushed into the wood surface.

I also found out that if you raise the glue up with scraps (I always wrapped these scraps in wax paper) so that it is not resting directly on the pipes you get more direct clamp pressure and less bending of the wood. If the joints are good you don't need but so much pressure.
 
As Jay said, alternating the clamps as you apply them, but start with two, one near each end to hold the pieces together. Then one in the middle, applied from the opposite side. Then apply the rest, so the end result is clamps alternating from side to side (it doesn't have to be perfect). Once the clamps are all on and the work pieces are all aligned, then tighten each clamp to the desired clamping pressure alternating from end to end to keep the pressure at all clamps as equal as possible. Wax paper between the clamp bar or pipe certainly helps keep the glue off of them. I apply a couple of coats of Johnson's Paste Wax to my clamp bars and pipes, and this works too. I use the bars or pipes of the clamps, positioned against the work, to keep the assembly flat but cauls with a slight curve work well too.

You should also study the grain direction of each piece by looking at their ends. Alternating the grain curves
will prevent the panel from developing a significant curve as it's moisture content changes. It will become more or less wavy when it's moisture content increases and decreases. Avoid wood that has a spiraling grain structure, because it will cause a slight twist in the finished panel as it's moisture content changes. For a really stable panel, all of the grain lines in all of the work pieces need to be straight across from panel surface to surface. Quarter sawn wood will have it's grain running closer to this perfect solution. Then when the moisture content changes the panel will remain much flatter and just change in width with the changes in moisture content.

For some projects you can create a close imitation of quarter sawn wood by ripping your work into square strips, where the width and thickness of each are the same. Then turn each strip 90 degrees, so all the grain lines will run across your assembled panel, and then glue all of these strips back together to form your panel.
It's a lot more cutting and gluing, but the end result produces a panel that will be much more likely to remain flat, and the cost of the materials will be much less than the price of quarter sawn material, if you can even find it. I once did this with construction grade 2by wood and made a very nice 1 1/2" thick pine table top for a coffee table that has remained very stable and flat over the last 20+ years.

When doing very wide panels, it's wise to not try to glue all joints in one step. Glue in groups of up to about 12" in width (but they can be narrower than this), and when dry, glue these wider assemblies together. The gluing and the assembly process is much easier to manage this way. Otherwise you will need to use very slow setting glue, because the glue will be setting up before you can finish gluing and clamping them together. If you can't apply the glue and get them clamped in less than about 15 minutes, you will need to work with smaller groups or slower setting glue.

Charley
 
Last edited:
Guess I will be swimming upstream on this issue. I have been doing this craft for 45+ years and I never use cauls. To start with I spend as much time as necessary to use my jointer to accurately flatten one side of each piece making up the project--than carefully joint each edge--the flattened edge to face the clamp. With this completed and all segments glue applied the clamping proceeds---I always place masking tape on the clamp surface---saves cleaning clamps. The other thing I have learned is to use moderate clamping pressure-one does not need to bare down with the clamps-well jointed surfaces sqeeze out glue adequately --more than moderate pressure creates the bowing effect. I don't mean to demean any of you experienced craftsman but this process has been learned over the years--after experiencing my share of bowed glueups. There are times when clamps are used on the top if some bowing is showing.
 
Over tightening of the clamps can definitely cause problems, but clamping from one side only, when you are using pipe or other clamps that have jaws that aren't perfectly parallel, is going to cause bowing too.

Also, if your jointer fence isn't at a perfect 90 deg, the error of even 1/2 degree off or so, can also cause bowing when you joint the edges of each piece with the face side of the work always against the fence. I joint one edge with the face of the board toward the fence, and then the other edge with the face of the work away from the fence, so the slight angle error of the jointed edges will cancel each other out when placed back together and glued. To keep things from getting too complicated, I lay the work pieces on my bench and position them to get a grain up, grain down, grain up sequence of adjacent boards. When happy with my arrangement, A long diagonal pencil line across all of the boards will indicate not only the face side, but also the sequence of the boards when you want to put them back together. Then it's easy to see which side is the face side. These help me keep the orientation correct as I run them through the jointer and also get them back in the same sequence before gluing. If the face side of the work is always toward the jointer fence and there is any error in the jointer fence angle, you will be, in effect, creating barrel staves with all of the jointed edges angled slightly in the same direction and will form into a curve when assembled. You want to alternate the jointed edge direction, so any fence angle errors cancel out. Getting a good flat glue up will be very difficult if the pieces are all jointed with the boards all facing in the same direction during the jointing process.

Light pencil lines that don't dent the wood surface can be easily and completely removed with a wipe of alcohol. Pencils aren't made with graphite any more.

Charley
 
Top