How to cut and dry lumber. (updated)

Messages
5,629
Location
Catalunya
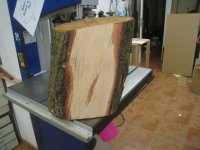
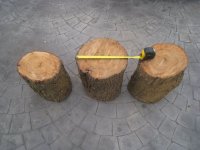
Hi guys, a neighbour, has fallen down a holm oak, and I asked him for some wood. Unfortunately, it had alredy cut it down to firewood size so no posibility of getting long boards. But as the wood is very hard, it is good for tool handles and body planes. In here it was the preferred wood for all ww tools. Planes, handles, gauges and so forth.
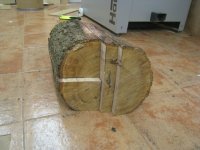
They measure between 12 and 15-16 inches both in diameter and length. They are freshly cut, (3 days ago) so how do I prepare them to dry? seal the ends with wax or paint? or cut them to boards and store them piled up separated by sticks.? I know that if I leave them like that they will check and split very soon.
Any suggestions?
IMG_6589.JPG
 
Last edited:
I'd also go ahead and just split them into quarters and hew off a bit of the center (take out any of the original pith and get the pointy bit to sort of flat).

If your wanting them mostly for dimensionally stable projects that gets you "pretty close" to something you can later work, spilt, or cut down further.

My experience has been that pretty much no matter how you seal them sort pieces will crack, but quartered I've had decent luck.
 
Note that I'm not dissuading you from painting the ends, my proposal was more of an "and also" proposal :)

Also I've found that when you split them if you shave them half smooth so at least there are no "cracked" chunks that helps lessen the chance of further cracking.. I'm not sure why (waves hands at propagation points). I just use a small axe/hatchet for that so not "perfect" by any stretch just not ragged.
 
I'm not sure why (waves hands at propagation points). I just use a small axe/hatchet for that so not "perfect" by any stretch just not ragged.

I can see that clearly. You split the wood away to gain a nice strain grain surface, not cutting through any grain. Like splitting balusters spindles for chairs. I know there is a name for it - it just eludes my hear right now. Perfectly straight grain. Strong wood.
 
Another option...if you have access to a chainsaw...is to make two parallel cuts down through the log, one on each side of the pith. You are essentially taking a full width board at least an inch thick and probably more out of the log with the pith in the center. You can either leave the remaining halves whole, or split them in half to get the quarters mentioned above. It's possible the center board will not check, but you can also rip the pith out and toss it leaving two nice quartersawn boards that should dry nicely. End seal everything as others have said.
 
I'll echo the suggestions to remove the pith from the logs as soon as you can. Even with paint or any other type of sealer, either Ryan's or Ted's methods will be better than just leaving the logs whole.
 
Another option...if you have access to a chainsaw...is to make two parallel cuts down through the log, one on each side of the pith. You are essentially taking a full width board at least an inch thick and probably more out of the log with the pith in the center. You can either leave the remaining halves whole, or split them in half to get the quarters mentioned above. It's possible the center board will not check, but you can also rip the pith out and toss it leaving two nice quartersawn boards that should dry nicely. End seal everything as others have said.
I do have a chain saw, and I like that suggestion I'll give it a try, although I'm a bit concerned about sawing along the grain with a chainsaw. I'll get a new chain before that, and I'll fix the log very well somewhere so it doesn't move.
 
I do have a chain saw, and I like that suggestion I'll give it a try, although I'm a bit concerned about sawing along the grain with a chainsaw. I'll get a new chain before that, and I'll fix the log very well somewhere so it doesn't move.

Laying the log on it's side works reasonably well, although you have to watch real close that the long ribbons don't clog up the saw to fast hah. If you run the saw in a smidge of an angle you get shorter chips and it's not as much of a problem.

Don't cut all the way through on the first side, leave a solid inch or more then cut the other side then split off the sides.

Here's a good article from Doc Green and a video by Sam Angelo on cutting bowl blanks (which is basically what you're doing here..).


Thanks Ryan.
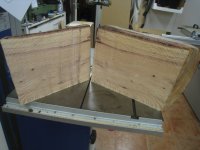
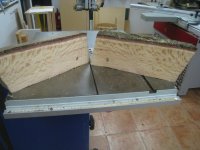
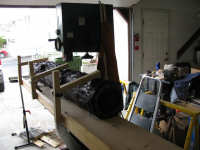
I've just made a trial on one of the logs following Ted's suggestion. Although I cut it on my bandsaw. My chainsaw didn't want to start.

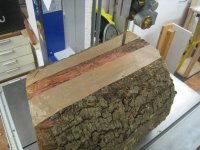
First I removed the bark by hand on the flattest side I could find. Then I passed it on the jointer a few times to get a flat side. IMG_6594.JPG

After that I marked two vertical lines 35mm apart from the pith at 90º from that flat side on both sides of the log.
IMG_6595.JPGIMG_6599.JPG
IMG_6600.JPG
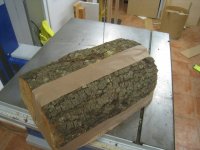
As it is not possible to draw a line on the bark (maybe I could with a chalk line) I used masking tape, sticking it from one end to the other and used it as guide to saw the central board on the bandsaw.
Then I used the same method to cut one of the halves in quarters.
IMG_6605.JPGIMG_6606.JPG
IMG_6609.JPG
For the moment I'll those two quarters and one half like that. It is a pain on the neck that the guy who cut it didn't cut the trunk pieces close to 90º.

Last question: Should I seal the sides now that they are exposed as well or only the ends?
 
Last question: Should I seal the sides now that they are exposed as well or only the ends?
Just the ends is good IMHO. But also knock the bark mostly off if you can (if not it'll likely dry and start coming loose in a week or three so do it then).

The reason for sealing the ends is to try to equalize the drying rate (wood looses water a lot faster out of the ends than the sides of course). You can seal the sides but that will slow down overall drying quite a lot as well so it's usually not worth it unless it's something really dense (like ironwood or similar folks will wax coat the sides as well).

That wood has some amazing ripple character, hope it dries well!

For ripping blanks like that I made myself a sled a lot like this one (this is my bigger one.. I also made a smaller one). There's a bit of a riser in the front with some short nails poking out of it that keeps the piece from twisting there, and the arms also have pokeys that help lock the log in place. It works pretty well for cutting boards down to maybe 1" or so thick. You don't need to flatten the bottom side.. as much.. with this, just enough so it doesn't have a huge amount of wiggle. Takes some of the manual management and keeps your hands clear anyway.

1666369780963.png
 
Your cuts look great, Toni. :thumb: If you cut the pith out of that slice from the middle, you'll get a couple of smaller boards that work well for making tool handles and such.
 
Top