Inlay Conundrum

Rennie Heuer

Moderator
Staff member
Messages
11,635
Location
Constantine, MI
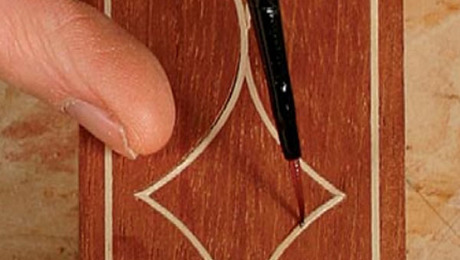
That large Limbert coffee table is going to have an inlay of lighter wood. Leo is making up templates for me to use with my inlay router bit/collar set. Never done this before, but, how hard can it be? :LOL::LOL:
Limbert coffee Table inlays.jpg


Here's the conundrum - When do I do the inlay? I have applied the dyes but not the stains that follow. If I stain everything first, how do I not damage the stained surface when planing and sanding down the inlay? If I inlay first, how do I avoid getting stain on the lighter inlay wood? Any ideas?

Is there a wood so light and tight grained that the stain will not affect it much? Is there a way to plane and sand without upsetting the stained surface?

Here are my thoughts, so far.

I've not yet decided on an inlay material, but I'm assuming something I can thin way down using my planer and drum sander. I had thought of buying some holly but is it too soft? Too white? Maybe maple?

So, in order to get it as close to finished thickness as possible, here's my idea. Go ahead and finish staining the table. Plane the inlay material down to near 1/8" +. Rout the table top to 1/8". Route the inlay to 1/8" leaving just a skin on the underside to hold it all together. Then run the inlay good side down through the drum sander till the skin is gone leaving the loose pieces. These should seat near perfect. Sound right? Minor scraping and very careful sanding should finish the job.

I know many of you have done inlay work. I have, but only a few pieces many years ago. All comments are welcome!
 
Tricky problem! Looking forward to seeing other better ideas and what you end up with.


"The short answer is that I do not stain or dye any of my projects that include inlay."

"Other woodworkers use other methods. Some painstakingly coat the inlay (string, banding or paterae) with shellac to block the stain or dye from reaching the inlay. I have, on occasion, worked this way, but only on a small amount of inlay. I’ve not had great success."

jewit pre-seals with shellac.. with an artists paintbrush.. yikes.. I'm not sure my hand is steady enough to do that anymore. This looks "Hard" with a capital H to do.


This guy has an interesting idea..
Easiest thing is to use a colorant that affects only the mahogany and not the inlay. Potassium bichromate will work. Also lye is supposed to be effective, and Rob Millard uses lime. All three dissolved in water. Different concentrations yield different degrees of color change, so that you will need to experiment with scraps so that the veneer comes out the same as the solid wood. I've only used the potash, it is bad for showing lap marks, but ideal for coloring mahogany or cherry. The colors are natural looking, not muddy. Safety glasses and gloves recommended, don't drink it or breathe the dust, as this chemical is poisonous, and classified as a carcinogen.


"Stopping out" with shellac, lacquer, or varnish is possible, but takes good, magnified (for my middle-aged eyes) eyesight, and a steady hand. Use a strong cut of shellac, or varnish right out of the can to achieve complete sealing, then stain with your ordinary stain. Thin shellac, etc, flows off the tiny brush better, but tends not to adequately seal in my experience, and can also bleed from the inlay onto the ground you want to stain.

Obviously that depends on the woods used.. but it's intriguing... In that same thread is an article link lost to the mists of time but saved by the wayback machine.. which talks about using hydrated lime as a colorant.

 
i would say, do the inlay first, then sand flush to the entire table. then, tape over the inlay, do the staining, and such, finish the whole works as planned.
Sounds fair, but stain capillaries so freely that I doubt tape could stop it. Don't you think? Perhaps if I were using gel stain this would work well.
 
The one article above suggested that liberal amounts of glue helped block the stain capillary action.. I'm mildly dubious .. but maybe in conjunction with pre-sealing the inlay?
I think that the liberal amount of glue is acting as a sealant so that plus the pre sealing should get the job done. I would do a test piece.
 
What about staining it before gluing/making the inlay? That would get away from the capilarity potential problems, and I guess that the stain will penetrate enough to allow for sanding afterwards, although it is my assumption that inlays rely always on the natural colours of the woods used and never used stained wood. What I have seen is staining small pieces at the end of the whole process to match the overall hue.

Don't take my word for granted I am a complete ignorant about inlays.
 
Practice, practice, practice, and then more practice. Find what works well before attempting on the finished piece.
At this point I usually break out in a blue sweat (severe tension) when doing the actual real part.

Charley
 
On my way to the can at 4 AM a few mornings ago (something we septuagenarians do with disappointing frequency) I had a bit of an epiphany. I can sand back the dyes and stains already applied to the top, cut all the pockets for the inlays, plane and sand them flush, then remove them, marking locations for each, then reapply the color. Once that is done I van insert the inlays, this time with glue, and add the top coat.
First order of business, find the middle.
7759D435-CC26-4103-BA87-9873849B9C08.jpeg

once I’m sure I have things lined up it’s time to put Leo’s excellent template to work and cut the pockets.
C36E3C00-1671-465D-ACAB-CA747BB4882D.jpegB485A5E6-6EA1-45A5-8D0F-F14B4BA0BD47.jpeg

Using the same template and removing the outer bushing on my template guide, I cut all the inlays. Plus a few extra, just in case.
75067F11-ADF9-456D-B6FC-67183D622FCB.jpeg68F0CCB6-55D4-4B17-8461-D0CC51B29F87.jpeg45FEFBF5-1F89-4382-938B-23D281E3CBB2.jpeg

Once the pockets are cut I drilled a 1/8” hole through the top at the center of each square and every three inches in the banding. I’ll use these to poke up from underneath to dislodge the inlays later

7B4FFB77-E6F8-49DB-97FB-32C21E6758D6.jpeg
All done. Tomorrow I’ll pop them all out and reapply the color.
E7D51B59-9960-49AA-86B9-DD815DA63562.jpeg
 

Attachments

  • 6E4C5F7B-0CAE-4C0B-BEBE-E218B0F1837D.jpeg
    6E4C5F7B-0CAE-4C0B-BEBE-E218B0F1837D.jpeg
    257.2 KB · Views: 19
  • 466DC840-C71B-4D68-94B4-F095A939C1E0.jpeg
    466DC840-C71B-4D68-94B4-F095A939C1E0.jpeg
    267.7 KB · Views: 16
That worked out great. Wonderful skills Rennie. The template looks like it worked perfectly. Hats off to Leo. The holes to pop the inlay out were an early morning stroke of genius.
 
Top