Jessem rout r lift older style installing question(s)

Keith Thomas

Member
Messages
73
Location
florida
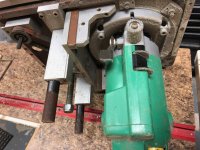
what ever router lift I have been using stopped moving up and down. Years ago I purchased a used Jessem rout r lift but never installed it. I don't even remember putting my old one in it seems that long ago so I'm not sure how I should do this.
I really need the router and can not afford to make a mistake in the only table I have or I will have to build a new table.
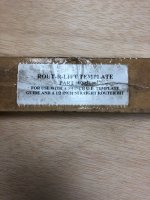
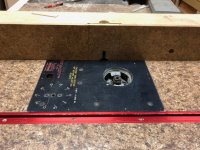
I have the template but no instructions. there is about 1/8" between the template and the Jessem router plate when its centered in the template. I have no idea how I did my last one. could some one throw me a clue?
Like does the plate need to be perfectly parallel with the fence or because its just a center point of a spinning bit it won't matter? And why is the template the size it is compared to the router plate? the plate is 14-3/4 by 11-3/4 and the template opening is 15x12. so does that mean I need a 1/4" bit or a 1/8" bit or what? I'm clueless. I've been watching videos but so far I'm lost.
 

Attachments

  • IMG_3857 (1).jpeg
    IMG_3857 (1).jpeg
    189.1 KB · Views: 10
  • IMG_3857.jpeg
    IMG_3857.jpeg
    189.1 KB · Views: 10
  • IMG_3861.jpeg
    IMG_3861.jpeg
    163.7 KB · Views: 10
I sure don't know the answer to your question, but jessem has most of their manuals online, maybe one of them can help you figure it out (if there's one that's close enough to your model..).

 
It doesn't matter if the plate is slightly (or even majorly) misaligned with the fence, except getting to the lifting screw might be encumbered. I have no idea why that template is larger than the plate. The ones I've used were always a perfect fit around the plate, and you use a flush trim bit to cut the recess the plate sits in.
 
It doesn't matter if the plate is slightly (or even majorly) misaligned with the fence, except getting to the lifting screw might be encumbered. I have no idea why that template is larger than the plate. The ones I've used were always a perfect fit around the plate, and you use a flush trim bit to cut the recess the plate sits in.
thats what is confusing me the most about the template that came with it. I've never really used one for routing but I assumed it would be the same size. I would need a bearing an 1/8" larger than the cutter I guess but I don't think anyone makes them that way.
Could it be for a bushing? I've never used a bushing either so I am not sure how they set up.
 
I sure don't know the answer to your question, but jessem has most of their manuals online, maybe one of them can help you figure it out (if there's one that's close enough to your model..).

thanks.
 
i would say the difference was because of template bushing. but like Fred said, a top bearing router bit would do your job and fit tight if you made a new pattern or just runs some tape to make the pattern a touch smaller. more than one thickness of tape
 
thats what is confusing me the most about the template that came with it. I've never really used one for routing but I assumed it would be the same size. I would need a bearing an 1/8" larger than the cutter I guess but I don't think anyone makes them that way.
Could it be for a bushing? I've never used a bushing either so I am not sure how they set up.
Actually they do make such bits. I have one set that has 2 cutters (one is 1/2" d., the second is 1.5" d) and all kindes of bearings that are larger/smaller than the bits. But here's another example, and this bit would enable you to use the template to cut the opening that fits the plate. Page down to see the combinations of bits/bearings.
 
I guess turning things over will sometimes give you a new perspective. or at least show you a operational note. In my frustration I din't examiner both sides of the template and on the bottom it has a piece of paper taped to it that says
for use with a 3/4od template guide and a 1/2" straight cut router bit. so is a template guide a bushing?
 

Attachments

  • IMG_3862.jpeg
    IMG_3862.jpeg
    175.9 KB · Views: 6
A little fine tuning and I'm done. After I saw that note on the back of the jig I was discouraged because I not only had never used a bushing before but I didn't even have one. Then I started thinking that my brother in law Paul left me some tools when he died. And I thought one thing was a router kit. So I dug it out because I had never used it. I already had 4 routers. I figured it was a long shot that it would have everything that I needed. He was an actual rocket scientist at Raytheon. The kind of guy who usually figured out how to do things right the first time without practice and would buy tools for a project and only need them a few times. Turned out the router kit he left me was one of those tools. And what did it have with it? A bushing kit. Porter cable 6391 plunge router base and 1001 fixed base with the motor and a whole set of bushings. All looked brand new. a couple of videos and some practice on scrap ply wood sheets and I was ready to go. the 1/8" difference was because of the 3/4" bushing and 1/2" bit difference. Made a perfect 1/8" gap all the way around the template. Got the depth right on the first time. this Jessem has a pretty need adjustment to level out the plate with the table. aluminum bars with set screws that push the bars out instead of set screws only that would just dig into the wood on the rabbit like my last one. very nice set up. And by the way. this old PC 6391 plunge base has the best height lock lever I have ever used. very easy access and use. I have dewalt, freud, Hitachi blunge routers and none of them compare in that department. The bit no longer meats up with the proper spot on y custom made router fence but I'll worry about that later. Worked right through dinner. once I got going it took me about 4 hours tho get it done.
Thanks to all of you who advised me. seems like every thing went great. For now on I'm always going to turn things over and look at both sides.
 

Attachments

  • IMG_3863.jpeg
    IMG_3863.jpeg
    196.5 KB · Views: 4
Top