My first finger joint jig and trial

Messages
5,629
Location
Catalunya
Neither I am a jig maker nor I have the need for them as most of my projects do not involve maing the same joint over and over again. I did make a couple of jigs some years ago to make my two stools and those were the only ones I made.
Lately I found myself having a lot of scraps that I do not want to throw away, they are too thin to make cutting boards and to small to make other than boxes.

I find boxes quite time consuming so I decided to make a boxjoint jig to make boxes with them and start giving them away to my friends and relatives.
So here is the jig and its first trial. Sorry no pics of the making.
IMG_6363.JPGIMG_6366.JPG
 
For me, box joints are very satisfying to make for some reason. It looks like you have your jig nicely dialed in, Toni. :thumb:
 
Nice box joints !!!! Now that you have achieved success with this jig and your first box joints, are you planning to make other size box joints too? Are you using a table saw or router table to make them? I'm guessing table saw, because I was never able to get this quality on my router table. Please tell us more about how you are doing this?

I make quite a few boxes using different sizes of box joints for the box corners. At one time, I think I had a dozen or more jigs so I could make many sizes of joints. I had tried making the joints on my router table, but then found that I got better joints using my table saw, but then found a better blade to get clean, square, and flat bottomed cuts. Some of my jigs did well, but others did not work as well. How did you achieve such great looking box joints with your first shop made box joint jig?

Charley
 
Nice job Toni! I often use this method (although at the tablesaw) even though I have an i-Box jig.
 
Last edited:
Nice box joints !!!! Now that you have achieved success with this jig and your first box joints, are you planning to make other size box joints too? Are you using a table saw or router table to make them? I'm guessing table saw, because I was never able to get this quality on my router table. Please tell us more about how you are doing this?

I make quite a few boxes using different sizes of box joints for the box corners. At one time, I think I had a dozen or more jigs so I could make many sizes of joints. I had tried making the joints on my router table, but then found that I got better joints using my table saw, but then found a better blade to get clean, square, and flat bottomed cuts. Some of my jigs did well, but others did not work as well. How did you achieve such great looking box joints with your first shop made box joint jig?

Charley
Thanks a lot for your comments guys.
Charles, I used my cheap router table, and I say cheap because the only good things it has are that the top is cast iron and that I can put 6mm, 8mm, 1/4" and 1/2 collets so that I can use a wide range of bits. As for the rest, the height is alwaystricky to get as the shaft moves up and sideways when you tighten the mechanism. It is terribly noisy because the casing behaves like a resonating box, and the dust collection is so bad that all the dust goes inside the casing and around the router motor.
For the joints I used a 6mm spiral up 4 flutes bit for metal. The jig is pretty straightforward to make, I watched several youtube videos and took the simplest one.
You can see the two parts of the jig as well as the router table and bit. The stick that you can see portruding from a slot is there as stop for the jig. It is put on the slote where the bolt that fixes the fence is inserted.
As per how I got such a good result, I guess it is the luck of the begginer. And yes I want to give a try at different box joint sizes, but with this one I am allright for the moment.
IMG_6367.JPGIMG_6368.JPGIMG_6369.JPGIMG_6370.JPGIMG_6371.JPG
 
Great results, so far.

I hope you have the same good luck when you make more jigs for different sizes of joints. Like I said earlier, I found that my table saw cut better box joints, because the blade cuts through the wood in only one direction, and the jig behind and below the piece being cut formed a type of zero clearance insert to minimize the splintering of the cuts. With a spinning router bit, the cutting edges on one side of the bit are cutting forward, while the cutting edges on the other side of the bit are cutting in reverse. If cutting into any material that splinters easily, a backer (zero clearance insert type of thing) needs to be located where the cutter is exiting the material being cut to minimize the splintering. But a router bit cuts in two directions, so you need a sacrificial backer on both sides of the work to stop the splintering. Another problem arises when you realize that you can't re-use these backers, because you can't line them up exactly right so the pervious cuts will line up perfectly with where the cutter will enter and exit the next sacrificial board, unless you key the sacrificial board to the wood finger on the jig. The cut slot in your box joint jig takes care of providing the backer for the back side of your work, but you need the second piece on the opposite side of the work too, the one located away from the jig.

Using a table saw with the jig, the blade is always cutting in the same direction as it passes through the work, so the slot in the jig performs the zero clearance function, and an additional sacrificial piece is un-necessary, but each jig for each box joint tooth width and depth must either have a precision pin/space area or be made as an additional complete jig. I ended up with over a dozen box joint jigs to store in my small shop and they were always in the way, so they ended up in a pile in my shop attic and became difficult to get the one that I needed each time that I wanted to make box joints. About this time, a friend and woodworker invented a new box joint jig that was easily adjustable, could be used on either the router table, or the table saw, and was having them made and sold by a reputable woodworking tool manufacturer. He showed up at a club picnic with his prototype of this box joint jig and demonstrated how it worked. I immediately decided from watching his demo that I had to have one. But they weren't being sold or even advertised yet. When they did start selling them, I was one of the early customers. His box joint jig is the Incra I-Box jig, and there are training videos and manuals to explain how it works. After getting one and using it, I cleaned all of my shop made box joint jigs out of my shop and fed them to my fire place. I saved a lot of shop storage by getting rid of all those box joint jigs. The Incra I-Box jig only requires about 10% of the space that my old jigs occupied. Here are a few of my box joint projects Here are a few examples of boxes and box joints that I've made. The last two photos are of the Incra I-Box jig and the box that I made to hold it.

Charley
 

Attachments

  • DSCF0545.JPG
    DSCF0545.JPG
    117.1 KB · Views: 14
  • MVC-724F.JPG
    MVC-724F.JPG
    103.5 KB · Views: 12
  • MVC-730F.JPG
    MVC-730F.JPG
    97.6 KB · Views: 12
  • P1010007.JPG
    P1010007.JPG
    130.8 KB · Views: 11
  • P1010013.JPG
    P1010013.JPG
    92.4 KB · Views: 11
  • P1010014.JPG
    P1010014.JPG
    132.5 KB · Views: 14
Thanks for all the tips and info Charles, you are right about the backers and the way a router bit cuts. In my jig I only wanted to give it a try and make it as simple as possible.
If I was going to make a lot of boxes with finger joints I would like to have an I-box jig as well, unfortunately they are expensive and not sold here. So customs and shipping costs would make it even more expensive. Besides, I wonder how it would work on my european TS, as it has a built in slider and although I can lock it if I want, I believe that the width of the slot on it is not the same as in US. So I doubt it would fit, and TS here in Europe are not suited to use dado blades due to safety regulations.

Thanks for sharing the I-box creation story, it's interesting to find out how certain tools were born.

Great boxes BTW. The one you made for the jig definitely adds value to it.
 
Last edited:
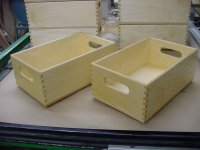
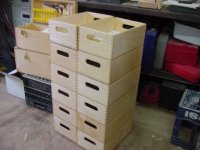
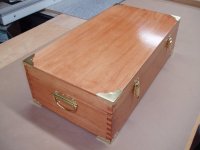
I make most of my boxes to keep all of the pieces of a tool together with the main part of the tool, or whatever. Most of my boxes are never built any fancier than these, because they are "just tool boxes". The totes were made because I teach and demonstrate woodworking, mostly scroll sawing, so I needed a way to batch many small pieces, carry them around, and even move them from one workstation to another back in my shop. I built 12 of them a year ago, and I may be building another batch of them soon. They have proven to be very handy. Each has a 1" square piece of 9mm Baltic Birch with tapered sides glued to the tote bottom to act not only as feet, but also to locate each level of the stack by these feet fitting into the top of the tote below it. I have a Leigh D4R dovetail jig, but I rarely use it since I started making box joints so easily.

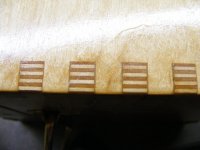
I understand your problem with European table saws and the European regulation prohibiting the use of DADO blade stacks in Europe, but would it be illegal to just stack two regular saw blades together? To me, this isn't really a DADO blade set, but you have to play by the rules. The box joint blade set that I use for 1/4 & 3/8" box joints is a Freud SBOX8, which is actually two identical saw blades, but they have offset teeth and a flat tooth ripping blade type of tooth grind. Orient them with the writing on them facing out and you cut 1/4" box joints. Orient them with the writing facing inward and they cut 3/8" wide box joints. The secret to clean flat bottomed cuts is that the saw blade teeth are flat top ground. the offset and long side of the teeth fit into the sawdust gullets of the mating blade so the center plates of the blades go together tightly. I also have a standard 10" Freud ripping blade that has 0.126" wide teeth, and although this blade is intended as a solid stock ripping blade, it actually cuts great, but small 1/8" box joints because it is also a flat tooth grind. For box joints larger than 3/8", I usually resort to my DADO blade set, and I know these are illegal for you to use. They scare me too.

Back to cutting box joints using a router table. The Incra I-Box jig is made to also be used on table saws, but yes I know, it has a 3/4 X 3/8" bar that needs to slide in an American sized table saw miter gauge slot that's 3/4 X 3/8", and it needs to fit this slot quite close, but I was thinking that this miter bar is actually just bolted to the bottom of the I-Box jig, so maybe it could be bolted to your saw's slider without using the bar. The setup instructions for the I-Box jig have you bolting this bar to the jig and squaring it with the fence part of the jig. You then slide the fence over to get the blade slot approximately in line with the blade, so the blade will then not touch the jig. You then use the adjustment knobs to move the jig's fingers over until the first finger just lightly touches a tooth of the non running saw blade or router bit. This calibrates the jig, and from there, when you change the adjustments for different box joint blade or bit widths, it also changes the spacing of the jig so the bit or blade cut both the slot and the mating fingers to the same settings. This part is automatic in the design of the jig, so changing from one size box joint to another only requires the one adjustment for the box joint slot width. The the pin width is then automatically adjusted to match the cut slot by the jig.

I'm just making suggestions and providing some thoughts toward future box joint making. You are farther along with your own shop made jig than I was when I first started making box joints. If you are happy with just one or two sizes of box joints, then why not just make a few jigs to do it, or get fancy and make one that is adjustable. I got into trouble when I decided that I needed to cut many sizes of box joints in different thicknesses of wood. This one desire caused me to create a huge pile of size specific jigs with one for every size. It was then that I created a space problem for myself and then need for an easily adjustable box joint jig.

Charley
 
Thanks a lot for your comments and suggestions Charley, I appreciate them very much.
The jig I made was just a quick trial to see how I could make quick box joints to use some of the scraps I had, I may get an Incra jig if anytime I come again to US but so far I'm ok with this one, I'm more prone to make another jig as you suggest for a bigger box joint if I need it than going into some expenses, but I've marked your comment for future reference. Thanks a lot again!
 
Top