Quick update on what we've been up to mostly focused on mods to the printer itself as I think most of these are things most people would want to do with this printer.
We hooked the printer up to an existing linux box that it was sharing the table with instead of buying an RaspberryPi specifically for it and installed
https://octoprint.org/ on that. I think if your generally sitting/living in a different room from the printer, this is a nice-to-have thing. I'm not sure we'd have bothered with this right away but the computer was right there.. just add a USB cable add a few scripts to the computer and boom remote printing support. The alternative is either to have your slicer machine connected or to carry a little SD card back and forth. The SD card works pretty well and we used it for the first couple of prints, but direct printing is kind of nicer.
First was printing strain reliefs:
For the bed heater cables (picture taken from the thingaverse shot because ours is in black so photographs poorly). This seems like a basically required fix because of the voltage there and the general lack of support not having this is a fire hazard.
Improved version of the already excellent strain relief designed by derandi3d. Improvements come primarily in the reduction of stress risers at the interface to the bed. I also removed the bolt and tailored the gap for a snug friction fit on my bed. You may find that you need to alter this...

www.thingiverse.com

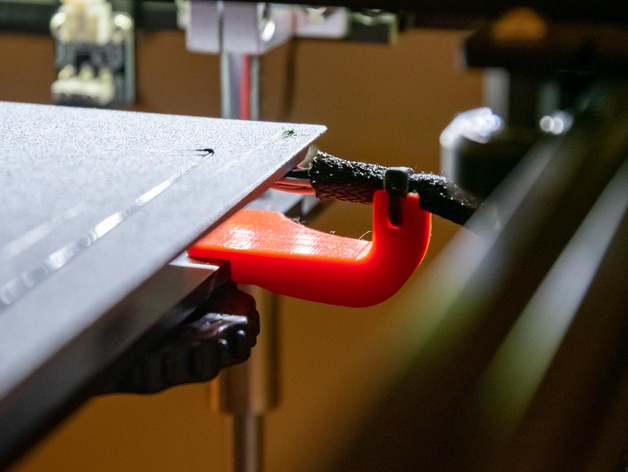
Next up was hot end strain relief.. Which keeps the delicate little cables there from twisting back and forth and breaking prematurely. I'd also mostly put this into the required category. There are a bunch of ways to skin this cat but some sort of strain relief here seems pretty much required.
(picture also taken from thingaverse because .. ours is black and you can't see it).
This is original for Ender 3 but i adjusted it so it fits Ender 5.
www.thingiverse.com

I also did a bunch of futzing with the cables trying to get them routed happily and we printed a handful of various cable management clips that .. generally seem to work ok. I'm still not super happy with the layout and will likely re-visit it all before to long but it's working for now.
Around this point was a long and tedious set of experimentation with much bed leveling, test prints with slightly different temperatures, retraction settings, etc.. etc.. to try to get PETG to work well. PETG is apparently quite a bit trickier than PLA to get to print well but we wanted it for the next project because it's also stiffer and won't sag as much if it gets warm.
Next was under bed supports.. These take about 9 hours.. each .. and the first ones we printed snapped under light pressure when installing them. Some adjustment of print head temperature and another round of destroyed benchies and we got it dialed in better and the next ones seem to hold up pretty well (also the second pass we used a remix linked below that added some more material to the fragile part so that likely helped). Brent's 5 Plus doesn't need these because he has 2 Z axis supports, but the 5 Pro is cantilevered off of one so the far end droops a bit with very much weight at all, so imho these are mostly required. These were, as noted above, printed with PETG (actually so was the hot end relief but the timing complicated).
Attempt one:
https://www.thingiverse.com/thing:3661405
Attempt two (succes):
https://www.thingiverse.com/thing:4128533

We also replaced some of the sleeve fans with ball bearing fans, this proved to not be necessary and could have been avoided if I'd experimented more. That required a bit of soldering but pretty simple. There was an annoying high pitched fan whine that persisted across fan upgrade. Some further experimentation showed that this was due to the airflow of the fan across the fan shroud on the hot end. Interestingly Brents setup with the 5 Plus doesn't have this noise and his setup appears the same from the pictures. I definitively isolated it to the fan being close to the shroud, so to fix it I just snipped the fan guard out of the way and voila noise gone. I'm not recommending anyone remove safety devices of course

Current plan is to add a wire mesh fan cover over the front for now (digs through parts box..) eventually I suspect we'll follow Brent in upgrading the whole hot end.. but that'll likely be a bit out.
We've also printed a few tool holders, and a cover for the back of the control panel which had a bunch of electronics sort of hanging out in the breeze.
The boss also found a few sheets of plexi for $5 at the local rebuild it so I'm looking at an enclosure. I think that'll help some with the more fussy material like PETG and the fussier PLA stuff as it'll make the temperature swings around the model a lot less. We've noticed a bit of corner lifting in a few cases which this will likely solve. That will, of course, require re-thinking some of the spool setup and .. some other things.
At this point I'm still pretty convinced that 3D printers are good devices for spending your time leveling 3D printers so you can print more parts for the 3D printers.


 The wire is perhaps one size smaller than I'd like but sufficient and at least the hot bed and rails are grounded (proven by multimeter) now so that seemed like a good idea.