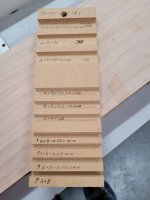
My dado blade is a Freud Dial-A-Width. It uses standard width chippers, but one of the blades has a dial attached to vary the space between it and the chipper. So I set the blade up, adding chippers to get close, and then turn the dial to get the exact width desired. One click of the dial adds or removes 0.004" of width to the dado set.
For routed dados to fit shelving, etc. I built a jig that uses the edges of the router base to guide it, plus a certain straight cutting 1/2" router bit that I use every time I use this jig. When first built, the router bit trims off the excess base material from both halves of the jig. From then on you first place the board that you wish to insert in the new dado between the two halves of the jig and set the jig width to match the board thickness. Then place the jig where the dado needs to be cut, and clamp it in place. I then rout the dado leaning the router against the left half of the jig in one direction, then repeat the process leaning the router against the right half of the jig. A perfect fit dado every time without measuring. Since the base of the router can vary with respect to the bit, I put an arrow on the top of the router base and always use the router with the arrow pointed in the same direction. This eliminates the base offset error from the cut.
Charley


