Profile challenge

Rennie Heuer

Moderator
Staff member
Messages
11,635
Location
Constantine, MI
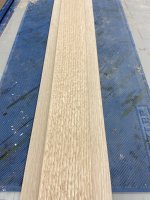
Any thoughts on how to mill this profile? I'm starting with 7/8" thick stock - I do not have a shaper. I think there might be a router bit for this but I only need about 6' and would like to avoid that expense.

Base profile.jpg

IMG_0859.JPEG
 
Last edited:
I'd do it in two passes.

First rip the line for the lower lip, probably on the tablesaw (or if I was feeling like a workout with a plow plane..)


Second cut off the bevel. You could 99% do that on the tablesaw as well with (assuming left tilt) the molding between fence and the blade with the blade tilted out and brought up to just barely touch the corner. Or again.. you could use a Rabbet plane ... if you feel the need to do such things in such a way...
 
My forst thought was the table saw also.

I was sitting here looking at my drawing and realized I might be looking at this the wrong way - I was about 90 degrees off.

Turn the profile on its side and you have a raised panel.
99-516_Profile-Images_0320200302.png

And it just so happens I have one of these...
99-516_Main-Image20191114.png

Not sure if the dimensions will match up so I'll need to play with it a while. If not, the table saw idea will be there waiting.
 
Oh well, not going to happen that way - the angle is way to shallow on the bit.

Hmm could you hot glue/carpet tape a strip on the outside edge of the moulding to raise the effective angle a smidge? The raised panel seems like a good way to get a clean cut... (might still need to to the first rip on the TS to get a true 90 if you do that...)
 
Looking at using the table saw. The problem I see with this method is that once past the blade there is very little support for the workpiece as it will be balanced on a 1/8” wide flat at the top and wedged against the fence. (I have a right tilt saw) I may look at some form of carrying device or perhaps tape a backer board to the workpiece to give it more bearing on the table.
 
:ROFLMAO:What about using that router bit, and then hand plane to finish the cut?
Well, two issues with that approach. First, I’m horrible with a hand plane. :rofl: :rofl:
Second, this is rift sawn red oak - brittle and grain that changes direction making it prone to tear out which just amplifies reason one.
 
Starting with a large blank, cut the "step" as a groove. Then cut the long angle as you would a raised panel. A task specific version of one of these would be my choice.
TS Vert Panel Jig (3).jpgTS Vert Panel Jig (2).jpg
Then rip off the width for the larger blank. I use this approach on a lot of trim so as not to be profiling long thin stock. I'll add some drawings in a moment . . .

Grab some MDF and make a saddle fixture for your fence dimensions and length requirement. This one is 72" long.
Ad hoc long.jpg
Add some slots to allow the clamps to compensate for the ever shortening blank.
Ad hoc long-2.jpg
I didn't have any pics of mine in action but, here's a (short) example.
Ad hoc long-3.jpg
It always sounds simple when someone else has to do the work ;-)
Rennie Demo.jpg
Not to scale but you get the drift.
 
Last edited:
I wouldn't hesitate to use a feather board or just a guide piece to steady the cut piece after it passes the saw blade. This is definitely a piece that requires a Grripper or dedicated sacrificial push block that holds the work down as well as pushing it through the saw.

Charley
 
Thanks for all the great advice! I took a little from here and a little from there and this is what I came up with.

First things first - I drew out the profile on the end of my blank.
IMG_0885.JPEG

Next I set up for the shoulder cut using 1/2 of my box joint blade for a nice square and clean cut.

IMG_0887.JPEG
IMG_0889.JPEG

The next step was to attach a carrier board. In this case some scrap 3/4" plywood. I started with some double faced tape but also put in 3 #6 x 1" screws just to be sure.

IMG_0890.JPEG

I lined up the cut by eye and got the featherboard in place.

IMG_0891.JPEG
IMG_0892.JPEG

Not bad!

IMG_0893.JPEG

Just needed a little clean up with a card scraper, chisel, and sanding block.

IMG_0894.JPEG

IMG_0897.JPEG
 

Attachments

  • IMG_0896.JPEG
    IMG_0896.JPEG
    188 KB · Views: 3
The only thing that I would have done differently, would have been to place the feather board higher and above the cut so it could exert constant force on the main part of the work all the way through the cut. I'm glad that the result was great, even though you didn't do this.

Charley
 
Top