Putting a New To Me Aircon in The Workshop

Stuart Ablett

Member
Messages
15,917
Location
Tokyo Japan
A new video is up on my channel, I'm replacing my old busted aircon with a new to me one that I took out of a client's apartment.
This is just a Vlog style talking about doing the work, the work will be taking place soon, as my workshop is HOT and HUMID now that the rainy season has started here in Tokyo and things are starting to rust.
I'm also changing the location of the aircon in the workshop, which is going to cause my workshop to get even messier than it is right now, which is hard to believe.
Cheers!
 
:lurk::lurk: Been thinking about a split system for my shop. Got an estimate for full installation less electrical - $4,000!!!! :thud: Priced a comparable unit at Menards for under $1,100. Worth trying to do it myself! Will be watching. Wondering how difficult the job might be.
 
:lurk::lurk: Been thinking about a split system for my shop. Got an estimate for full installation less electrical - $4,000!!!! :thud: Priced a comparable unit at Menards for under $1,100. Worth trying to do it myself! Will be watching. Wondering how difficult the job might be.
For a one time deal, the only tools you REALLY need are a vacuum pump and a flaring tool.
You drill a hole in the wall, run the tubes and electrical outside cut the copper tubing, flare the ends and connect it all up, then you vacuum the lines, open the valves and you are done, really it's not that hard.
Cheers
I'll need to look into it - mostly I see them advertised with "pre-charged" lines. I took that to mean no cutting, flaring, vacuuming, etc. The lines are available in different lengths to match your installation. Well, that's what I thought. :dunno:
 
I'll need to look into it - mostly I see them advertised with "pre-charged" lines. I took that to mean no cutting, flaring, vacuuming, etc. The lines are available in different lengths to match your installation. Well, that's what I thought. :dunno:
Rennie, I looked at them and it looks like the refrigeration my be in the compressor but it is not open to atmosphere. it says you evacuate the lines and then once you have the lines evacuated and holding a vacuum then you "release "the refrigeration maybe by opening a valve. It also says that the unit is pre-charged but if you run longer lines you may need to add additional refrigeration.
 
I've never seen precharged lines, dunno how that would even work?
The units come precharged, the outdoor compressor is precharged.
After you connect all the lines you evacuate the lines and the inside head unit.

Here they have enough refrigerant to do fairly long lines.
I always do my own flares, the most common point of a leak is a bad flare.
I also do not think it's good to have a bunch of extra line in a loop outside near the compressor, I see this all the time, it's a place for compressor oil to gather, just my two cents.
 
I've never seen precharged lines, dunno how that would even work?
The units come precharged, the outdoor compressor is precharged.
After you connect all the lines you evacuate the lines and the inside head unit.
The lines aren't charged. The compressor is precharged (overcharged). You connect the lines to it, but don't open the valve; then vacuum the lines and the evaporator, open the valve and the whole system is then charged - pretty much the same as you've described.
 
I notice that Mr Cool talks about "pre-charged line sets" which don't require vacuuming the lines. I watched Keith Rucker of Vintage Machinery install one in his shop several months ago and got the impression that the lines were pre-charged? Is this consistent to what Jim's take on it is or something different?
 
The thick plottens...


Taken from a description of a unit I am considering - thanks to our innovative line set attachments, there's no extra refrigerant required or system evacuation necessary - meaning you can easily set-up this system within hours
 
Last edited:
The thick plottens... Taken from a description of a unit I am considering - thanks to our innovative line set attachments, there's no extra refrigerant required or system evacuation necessary - meaning you can easily set-up this system within hours
Interesting. I guess that means all three components - compressor, lines and evaporator - are pre-charged. Just hook up, open the valves, and presto - instant cold air.
 
I'm getting it done, and getting very dirty and sweaty too! LOL


1592220962850287684896885333490.jpg
I got the flare unions installed to extend the lines to the new location. I'll leave them uncovered to check them for leaks later. (They are notorious for leaking).


20200615_175723.jpg
When installing the unions I had a bit of a brain fart and used the old flare nuts, when I went to torque the old flare nut I broke it.
The new aircons operate at a much higher pressure needing the flare nuts torqued to a higher number, the old flare nuts are NOT up to this and this one broke, lesson relearned to not use old flare nuts. You can see how much beefier the new nut is on the right.

20200615_194847.jpg
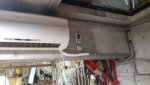
The inside unit is almost completely done. The drain is done too, only the electrical needs to be done, but I ran into a problem.
IMG_20200615_202321_519.jpg
Crispy critters!

Holy let the smoke out Batman!

The workshop has it's own subpanel that's fed from the main panel on the first floor, but there were two existing circuits from the first floor main panel, in the workshop.
One that feeds four of the sixteen light fixtures I have and one fed four outlet boxes in the walls.
I like having four of the lights on the main panel upstairs so if I ever trip the main breaker on the subpanel I still have some lights.
I never used the outlets in the workshop from the upstairs main panel, so I had the aircon wired to that circuit.
The two first floor circuits come out in the same junction box in the ceiling. I decided to move the aircon to an open breaker I have on the workshop subpanel, as the aircon is much closer to the subpanel now, but I wanted to use the old surface mount box and outlet, no need to buy a new one.
IMG_20200615_202321_518.jpg 20200615_195937.jpg
When I opened the junction box I found this crispy critter...
WOW!
I thought it must be on the aircon circuit, but it was not, it's on the lighting circuit.
I turned off the breaker and cut the wires back to where the insulation was not burnt and replaced the connector.

I've got to run the new electrical line from the subpanel, and I have to then connect the line set to the outside compressor unit, and vacuum the lines down and check for leaks.

I reassemble the shelves and clamp rack. I also removed two old light fixtures and replaced them with two new LED fixtures. a lot of work to relocate the aircon, but even just finding that melted connection makes it worthwhile.
One more partial day to get the aircon done, then I'll have to cleanup workshop, because it looks like a bomb went off in here, but at least I'll be able to do that in a cool dry workshop.
Cheers
 

Attachments

  • 20200615_194847.jpg
    20200615_194847.jpg
    75.6 KB · Views: 14
45 years ago I owned an HVAC company. I haven't worked in refrigeration since then, but passed the tests and have the card to let me do it again, if I should want to.

Back then, the pre-charged lines contained refrigerant, but not enough if the lines were more than 20' long. The end fittings of pre-charged lines were capped with a thin metal. When threading the line to the unit, cutters inside the fittings cut through this thin cap and opened the line-to-unit connection. They work well, but you only get one chance at it. If you need to open the connection again for any reason, you will loose the refrigerant charge and need a vacuum pump and replacement refrigerant, plus the proper tools to re-charge the system. I suspect that the present pre-charged lines are still made this way, but I haven't seen them to verify this.

I used to deal with a supplier that occasionally sold to DIY people. Every once in a while he would ask me to do a "warranty job", and it usually involved one of these DIY projects. On one of these DIY projects, the guy had rotated the line when connecting it, instead of just turning the nut on the fitting. The cutters are a cross, much like a razor head for an arrow, but it has a point on each quadrant. They are intended to pierce the metal in a cross pattern and fold it back out of the way as the fittings go together. When the cutters inside the fitting rotated, they cut a circle out of the thin metal, and this metal disk had partially plugged the line. I needed to replace the compressor, because the lack of refrigerant flow through the lines had starved the compressor of oil, and also figure out why the system never cooled properly. I later found out that I was the third HVAC contractor that had been given this job, but the first to figure out why the unit never worked correctly. I think the DIY guy learned his lesson, because I got 3 other refrigeration jobs as a result from him, and none had been worked on by him before me.

On another of these DIY warranty calls, the guy had used plumber's pipe dope on the line fittings, and it got into the line. It eventually plugged the thermostatic expansion valve and the unit had quit working. I had to replace the valve and the refrigerant charge, but then wished the guy luck, because he would likely need it replaced again and again, with full recharging each time, because of his stupid mistake.

I could go on, but these pertain closest to the subject. Don't rotate the lines when you connect the fittings, and don't use plumbers
pipe dope. If anything, use a small amount of special "wax free" refrigeration oil of the correct type for the system, to help lubricate the fittings. If the lines are long, you will likely need to have additional refrigerant added for peak performance. Leak testing is recommended too. The rest of the installation of one of these systems is quite easy.


Charley
 
Finding crispy critters is no fun. I've got a section of electrical to replace outside due to a bad breaker not tripping, luckily it did before making its way inside the house
 
"Crispy" electrical connections like in your photo are caused by excessive resistance in the connection, that heats up when current is flowing. If the current isn't excessive for the breaker rating to trip, it will not, but the hotter the bad connection gets, the worse the resistance, and the hotter next time, etc. Unless it is a true overload, don't expect the breaker to protect you from this. I hate those "push-in" style connections, and will not use them, favoring well crimped terminals or the proper size wire nuts instead. Bad connections, even at less than rated current flow can, and will, cause a fire.

When you replace these, make certain that you remove the damaged portions of the wire too. Putting a new connection on previously overheated wire will not work well, and will likely lead to a repeat of the problem. Clean metal to metal connections, and not point contact situations, will keep the joints cool and safe.

I'm a retired EE.

Charley
 
Top