Road Back to a Wood Shop

A co-workers husband makes and sells a lot of candles at craft shows. He takes his left over wax and mixes it with wood shavings to create fire starters...just in case you know someone that makes candles also. He uses a lot of normal saw dust, which ends up looking like oatmeal cookies, but the curls would look nice too. He usually puts a small piece of wick out the side to get things started.
 
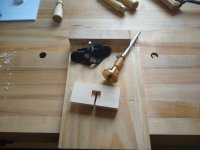
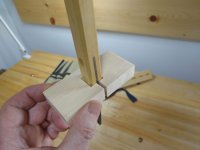
I should probably start on a rack for my rasps. Because stock prep takes time, I like to do proof of concept on scraps. The larger rasps require a mortice in addition to a tapered hole. Looks like drill the hole, then the mortice and finally rasp the taper.IMG_20220220_085608849.jpg
IMG_20220220_090659042.jpg
 
Just an observation. With long tools like chisels and rasps I like an open slot so I don't have to lift the tool the full length to remove it.

This also lets me put other things above the long tools while still being able to get them in and out easily.
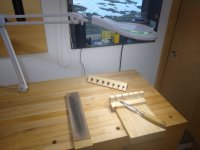
Good point, I may have to add a slot. Thanks!
 
Using pine with it's sharp contrast in density between early and late wood sure makes hand work more difficult. I would prefer using hard wood for these holders. You have to be so careful in handling or you pick up dents and other marks. And making paring cuts requires constant touch up of your chisel. It is amazing how hard the latewood can be. And you have to really control your cut as you slip from latewood to earlywood.

IMG_20220222_071111339.jpg

IMG_20220222_071124347.jpg
 
The variation in density that you speak of is what makes many newbies start with woodworking unexpectedly difficult when they try to learn on "soft" woods. I was one of them :). I have learned to love poplar for my less expensive / softer wood needs.
 
The other thing that's annoying with most "softwood" is that the crumbles from the hard growth rings are really bad about putting little dents into your workpiece if you happen to leave any on the workbench and press down onto them with something you care about.

I've also found some types of pine to be a bit less annoying in this regard, mostly east coast varieties unfortunately.
 
Just an observation. With long tools like chisels and rasps I like an open slot so I don't have to lift the tool the full length to remove it.

View attachment 119611 . View attachment 119612

This also lets me put other things above the long tools while still being able to get them in and out easily.
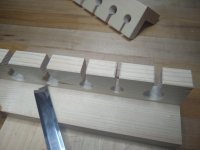
Glenn saved me from making a real mistake with some of my tool holders with the above advice. Luckily I was easily able to modify the 3 holders I was in the process of making. All the others I had made previous, all had open slots except the one I made for my plane floats. Some of those floats are really long and would have been difficult to pull out without an open slot and would impact anything I tried to install above it.

IMG_20220223_141750490.jpg

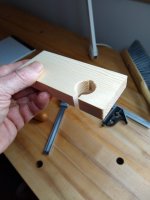
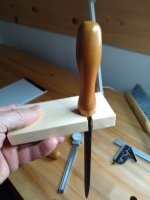
So I was noodling around today trying to come up with a holder that would allow side removal and still be secure. I tried just a slot but the small ones were very unstable and I didn't want these falling off the wall. The problem is with the handle. I then thought mortising a shallow square to allow the handle to set down would prevent them from falling forward and off the wall.

I first drill a hole about 6 cranks of my brace, then cut a slot with my carcass saw. I then squared out the drilled hole. All along I was thinking I could clean up the bottom with one of my small router planes. The 3/4" square hole was just too small for that. Now what am I going to do?

Honest, my first thought was 'I wonder if Lee Valley makes a miniature router plane?' So I started looking around at my tools trying to think of something to level the bottom easily. When I spotted my Tite Mark marking gauge I knew I had a just the thing to clean up the bottom.
IMG_20220223_141814653.jpg

I hate problems but I like problem solving. This worked perfectly and I am real happy to find a solution for cleaning up the bottom and a way forward to a better holder for my floats. I like the way the float sits down. It feels much more secure this way.

IMG_20220223_141840758.jpg
 
Now you're just showing off.
When I first started making these, I thought I would just bang them out. I mean they are just shop "furniture". But as I got going, I could not help and do the best job I could. And as I progressed it became really apparent that the skills I was honing would become valuable when I was making some REAL projects again. I have probably used my chisels more in the last month than I did in the previous 5 years. And I am using them constantly everyday. The same goes for my floats, rasps and brace. The hand plane and handsaw work was always something I did on a very regular basis when I had a shop, but I also continue to improve in these areas. I don't think you ever stop improving your techniques.

And what you don't see behind the photo's I show are the many scraps of wood where I practice and workout how I am going to make these holders. So the amount of work using these hand tools is much greater than appears here.

I am not real happy with the plane float holder as I know I can do better, but it will be fine for now. Maybe someday I will rebuild it, but for now I am moving on to my rasps. I finished up a practice piece and am happy how it turned out. I just need to sketch out on paper the layout and then prep stock. I am going to repurpose the pine I used for a temporary sticking board I built for planing the tongue and groove joints. It has better grain than any of the leftover pine stock I have. I will create a new sticking board out of some other pine.

IMG_20220228_135607798.jpg
IMG_20220228_135551184.jpg
IMG_20220228_140133060.jpg
 
And as I progressed it became really apparent that the skills I was honing would become valuable when I was making some REAL projects again.
So true. I am just starting to feel comfortable with the basics again after a break. The holders look great. If you're like me you will pause every now and again over time and think about how glad you are that you took the time to make custom holders. Such a simple thing. But when you reach for your tools often and find them easy to get your hands on . . . (y)
 
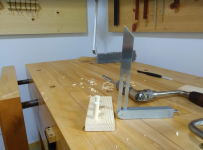
Spring is busy time around here but that does not include doing anything associated with woodworking. So things have slowed down on the tool wall. I have a bunch up, holding tools, but I will wait until finished to show everything. Just started working on some hammer holders after trying to figure out which way I wanted to go. I think I have settled on using dowel rod drilled into a backer board to hold them. Problem is I need to drill them at a slight angle (5 degrees off 90). Can I do that by eyeball using my brace with a sliding bevel gauge to one side to guide me? If one is slightly off the eye will pick it up.

Looks like I can. Used a practice piece to see if it was doable. Time will tell if I have 3 hammers or more in a row and all the dowels are in line. Sometimes it amazes me what you can accomplish using hand tools and a practiced eye.

1652568516339.png

1652568561958.png
 
Top