Scuttlebutt Coffee Company Build

Leo Voisine

Member
Messages
5,728
Location
East Freeetown, Massachusetts
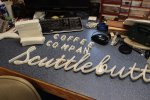
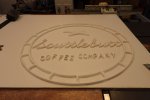
Well this was a bit hair raising but I got through the first part.
This is 1/2 PVC I did a bunch of stuff wrong, so I need to remake some of the letters.
I used a 1/8" 2 flute end mill.
At the end I was testing some speed and feed.
I ended up with: 18200 RPM, 150 IPM, results in .0041 Chipload.
Chipload is kinda light, but for a small end mill it's OK.

These pics are straight off the machine, not cleaned up yet.
I need to remake some letters and one more ring.
After that I need to make the base sign.

Something REALLY new for me will be making the welded frame interior for the base.
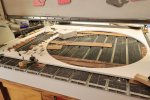
IMG_9578.JPG
IMG_9577.JPG
IMG_9579.JPG
IMG_9580.JPG
 
Wow, that looks great! I'm trying to take notes of product names you're using and their purpose. I see that I can get the PVC board from my local supplier. They carry a regular and a uv protected version. Will you be painting the ring and lettering or just leaving natural pvc?
 
So what's the downside to light chip load in this situation? I was under the (perhaps erroneous) assumption that it basically meant slower but cleaner.. but your note indicates there is more.

On the welding... Sounds fun :) I have a little mix (Hobart 140) and it's been a ton of fun. Using gas is DEFINITELY cleaner than flux core, I still use flux core some because it's less fussy outside in the wind and I kind of like welding outside because of the fume risk.
 
Ryan, chipload is important for a number of reasons. It is an indicator of proper cutting action. If the chipload is too low there is a good indication of too high an RPM or too low a feedrate. Either of these can lead to too much friction and too much heat on the cutter. Too high a chipload can cause clogging in the flutes of the cutter and can break the cutter. Where this is an extra long small diameter cutter I want a low sideways cutting force on the cutter, but still a high enough chipload to be able to evacuate the chip and keep the cutter somewhat cool.

I have just bought a Lincoln 140. Lots to learn. I will be using Flux Core wire. I will be welding outside. I do not have any gas yet, but one day I will try that also.

Darren, I will be painting the PVC. It just looks better as painted.
 
Thanks for the chipload discussion.

If you're using flux core, I might suggest getting a couple of welding blankets to cover up the areas adjacent to what your welding to reduce the amount of splatter you'll need to grind back in the surrounding area. Getting the power level right helps some as well (just high enough for full penetration but no more - run a test piece and cut the weld in half). But so far I haven't gotten flux core to be anywhere even slightly close to splatter free and am lead to understand that it's just sort of the nature of the game with it. I'm still pretty much at the "a grinder and paint makes a welder what he ain't" stage though.
 
I'm kinda where Ryan is. I hadn't used the flux core for the 15 years I've had my welder, and of course I ran out of gas and wire right when covid hit and was in the middle of the cnc build. It did the job and it certainly did make me hone my grinding/painting skills. :D Given the choice I'll stick with gas. I did just get both replaced, so hopefully I'm good for another 15 years. :)

If you don't have a welding table, I'd suggest picking up a piece of 24" x 24" x 1/4" mild steel plate to at least put on a higher surface to keep you closer visually to your work to watch what is happening. Mig welding is a bit like trying to write with a pencil. You can do it by holding the eraser side of the pencil, but the quality isn't that great if you don't have control and can't see the tip very well. ;)
 
Plus one on getting a piece of steel plate. I got one that fits on the top of my hydraulic lift table so I can raise it up to weld. It just lives there the rest of the time.
 
Thanks for the welding advice. I need all I can get.

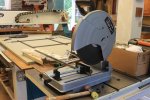
Right now money is flowing in the wrong direction. I just returned from Harbor freight with a sand blasting cabinet, 14" abrasive cut off saw, 14" cutoff wheels, and a variety of welding related stuff.

This will be an ongoing process to learn. At least I am NOT going to be trying to get into blacksmithing, as that is an interest of mine. I have enough to keep my mind busy.
 
Did you get the table top or free standing blast cabinet?

For the abrasive cut-off saw, if you happen to have a spare furnace filter around, prop it up behind the saw to catch the sparks and metal dust, it's surprising how much dust/mess those create. For sheet metal and small stock, I keep some of their thinner 4" cut-off blades in a HF 4" grinder. I usually store the 14" saw and only use it for larger projects. Lately I've been just having the metal shop cut most of my metal to length for me if I'm working off of plans, they don't charge anymore than for full length anyway.
 
I got the freestanding 40 pound blast cabinet. Not sure yet how or where I will set up the 14" abrasive saw yet. I have used these things for many years in manufacturing. It may be something I just pull out when I need it. I am not really trying to set up a metal working shop. Wish I had the room for a full metal shop with Bridgeport and Lathe and welding bench and all, but I just don't have room. I could use it and I like it, but I just can't. I like blacksmithing too, but I need to draw a line somewhere!

For now, I am thing about clearing some space in the upstairs of my shop. I have a 12' by 26' area upstairs that I use for junk storage. Who knows some of it may become a MINI metal area. Maybe I can set up a small space in my cellar. I just don't know yet.

I also need to set up a shipping and packaging area for when I start selling online. I did EBAY years ago and had an area for shipping and packaging in my shop before the shop grew.

BTW - at your advice I ordered a 24x24x1/4 steel plate. Now I need to build a weld cabinet. It's OK, I know I need it.

I need to do some welding for this Scuttlebutt sign and the time is REALLY close.
 
Prepare for a day of assembly on that blast cabinet. :D If you have them, for the front glass frame, install rivet nuts into the pre-drilled holes for the glass frame, if not, it's a two person job to get that frame on, or one with really long arms. Also, do the glass frame last as you'll need to reach through the opening to tighten up some nuts I picked up a rivet nut kit this past winter and went ahead and installed them for my frame, so much easier to change out the protective plastic. EDIT: If I recall, I think I was able to do the glass frame alone, using one of the "L" shaped 90* screwdrivers on the far screws, it was a chore though.

Depending on the media you're using, you may need to run a shop vac to clear the air in there. You could also use a small squirrel cage fan/hose if the dust isn't too bad and vent it outside. Since I mostly used mine for cleaning up firearms and tools, I'm running a #13 glass bead, which is almost like a flour, so it gets really dusty. There are a lot of diy upgrades to do on that cabinet, just google them. The one I need to do yet is adding caster/cart under it to make it move-able.

Anyway, there are a lot of exciting projects ahead for you. :lurk:
 
Last edited:
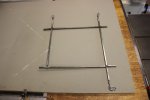
Well, I cut up the thick wall 1/2" square mild steel tubing.

I layed it out in aspire to get the dimensions.

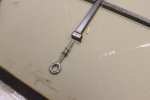
All the chain, eyes and shackles are 316 Stainless steel.

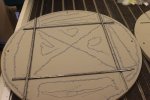
The frame is going to embedded into the signfoam.
Then sandwiched and epoxied in the middle of the two signfoam halves.

I think I am going to try some welding either today or early tomorrow. First I need to clean up the steel.


IMG_9590.JPGIMG_9588.JPGIMG_9587.JPG
 
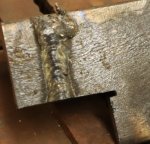
Well it's not pretty, it's not elegant, not certifiable but, it IS functional.

This is the internal frame for the sign.

I welded, and tapped some ends for shackles and screw eyes. The screw eyes and shackles as well as the chain is all 316 Stainless Steel. Should hold up the sign well enough.

IMG_8699.JPG

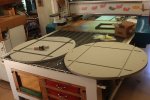
Tomorrow I will be cutting the 1" thick sign foam. 2 pieces. Just the frame pockets, alignment holes, and outside.
 
Top